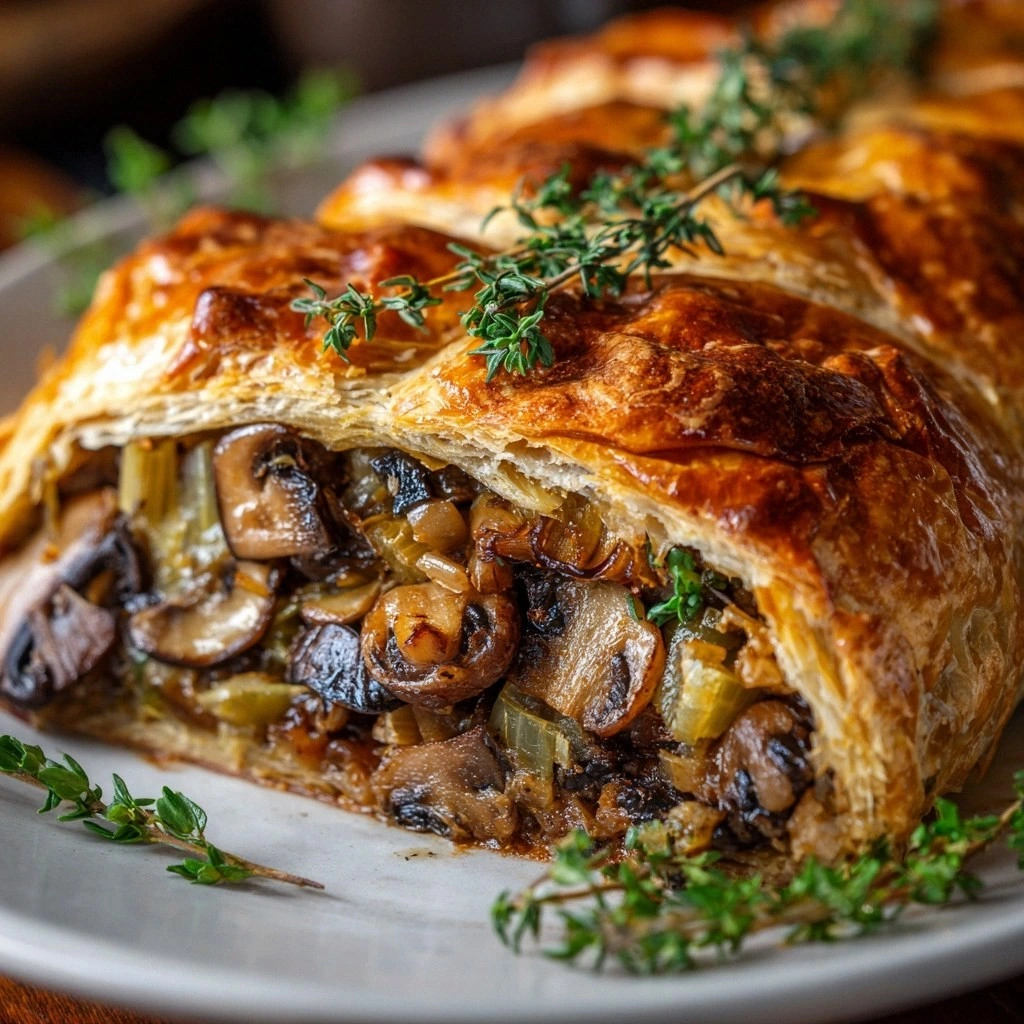
Picture this: I’m in the middle of a frantic holiday dinner prep, the kitchen is a whirlwind of chopping boards, sizzling pans, and a looming sense of culinary doom. A last‑minute request from a friend for a “show‑stopper” dish that’s still vegetarian, and I’m staring at my pantry like a detective at a crime scene. The solution? A Mushroom and Leek Wellington that feels like a luxurious, savory hug wrapped in flaky pastry. I’ve spent weeks refining the balance of earthy mushrooms, tender leeks, and a hint of thyme, and the result is a dish that practically sings in your mouth.
The moment the pastry hits the oven, a golden crust begins to form, the scent of caramelized mushrooms filling the air like a comforting blanket. The first bite releases a symphony of textures: the crisp pastry gives way to a silky, buttery interior that melts against your tongue, while the mushrooms and leeks provide a satisfying bite that lingers. The Parmesan drizzle adds a subtle umami punch, and the thyme whispers a fragrant note that ties everything together. If you’ve ever tried a standard mushroom Wellington that feels flat or too dry, this version will have you questioning why you ever settled for less.
I dare you to taste this and not go back for seconds—once you experience the layered flavors, you’ll be hooked. This is hands down the best version you’ll ever make at home, and the secret lies in a few simple, but game‑changing, tweaks. The method is straightforward, but the attention to detail turns a humble dish into a show‑stopping centerpiece. Whether you’re cooking for a crowd or a quiet dinner, this Wellington will impress, and I’ll be honest—most people don’t even know they’re missing out until they taste it. Picture yourself pulling this out of the oven, the whole kitchen smelling incredible, and guests buzzing about the “wow” factor.
Let me walk you through every single step—by the end, you’ll wonder how you ever made it any other way. The ingredients are simple, the technique is manageable, and the results are unforgettable. The only thing you’ll need is a bit of patience and a love for bold, comforting flavors. I’ll be sharing every micro‑challenge, every bold claim, and every kitchen hack that will elevate your Wellington from good to unforgettable. Stay with me here—this is worth it.
What Makes This Version Stand Out
- Flavor: The combination of sautéed mushrooms and leeks creates a deep, earthy base that’s elevated by fresh thyme and a hint of garlic.
- Texture: A buttery puff pastry that crisps to a golden perfection while the filling remains moist and tender.
- Visual Appeal: The golden crust and the glossy, herb‑infused filling give a professional, restaurant‑style look.
- Ease: The recipe is designed to be straightforward, with a prep time under 20 minutes and no complicated steps.
- Versatility: Works great as a main course for a dinner party or as a hearty appetizer for a casual gathering.
- Ingredient Quality: Uses seasonal mushrooms and fresh leeks to bring out the best flavors.
- Make‑Ahead Potential: The Wellington can be assembled ahead of time, then baked just before serving for maximum convenience.
- Health‑Friendly: Low in saturated fat when compared to other savory pies, and the vegetables add a boost of nutrients.
Inside the Ingredient List
The Flavor Base
The heart of this Wellington starts with a bed of sautéed mushrooms, leeks, and garlic. The mushrooms are sliced thinly to allow them to release their natural juices and develop a rich, umami flavor when cooked with olive oil and butter. Leeks add a subtle sweetness and a delicate crunch that balances the earthiness of the mushrooms. Garlic, minced finely, infuses the mixture with a warm, aromatic undertone that lingers in every bite.
The Texture Crew
Butter and olive oil form the backbone of the sauté, creating a silky mixture that coats the vegetables and prevents them from drying out. A splash of water or broth during the final simmer keeps the filling moist and helps bind the ingredients together. The puff pastry, rolled to a uniform thickness, ensures even baking and a crisp, flaky crust that contrasts beautifully with the tender filling.
The Unexpected Star
Fresh thyme leaves are the secret weapon that elevates the dish’s aroma. They bring a bright, slightly citrusy note that cuts through the richness of the butter and the earthiness of the mushrooms. A generous grating of Parmesan cheese adds a nutty, savory depth and a slight crunch when melted into the filling.
The Final Flourish
Egg wash, a simple mixture of beaten egg and water, gives the pastry a lustrous, golden sheen as it bakes. Salt and pepper, added to taste, are essential for balancing the flavors. A final drizzle of olive oil before serving adds a glossy finish and a subtle, savory note that completes the dish.
Everything's prepped? Good. Let's get into the real action...
The Method — Step by Step
- Preheat your oven to 200°C (400°F). While the oven warms, gather all your ingredients and set them out on a clean countertop. This will make the assembly process smooth and efficient. The temperature is crucial for achieving that perfectly crisp pastry.
- In a large skillet, heat 2 tablespoons of olive oil and 2 tablespoons of butter over medium heat. Add the sliced leeks and sauté until they soften and begin to caramelize, about 5 minutes. Stir in the minced garlic and cook for an additional minute until fragrant. This step builds a flavorful base for the filling.
- Add the sliced mushrooms to the skillet. Cook, stirring occasionally, until the mushrooms release their moisture and it evaporates, leaving behind a rich, golden mixture. Season with salt and pepper to taste. The mushrooms should be browned but not burnt, ensuring they retain their texture.
- Stir in 2 tablespoons of fresh thyme leaves and 0.25 cup grated Parmesan cheese. The thyme releases its oils, while the cheese adds a savory depth and helps bind the filling. Let the mixture cook for another minute to allow the flavors to meld.
- Remove the skillet from the heat and let the filling cool slightly. This prevents the pastry from steaming when you roll it out. While it cools, beat 1 egg with 1 tablespoon of water to create the egg wash. Set aside.
- Roll out the puff pastry sheet on a lightly floured surface to a 30x40 cm rectangle. Place the cooled mushroom-leek mixture in the center, leaving a 2 cm border all around. Fold the pastry over the filling, sealing the edges by pressing with a fork. This creates a neat, sealed pocket of savory goodness.
- Brush the top of the pastry with the egg wash, ensuring an even coat. This will give the crust a beautiful golden sheen and a slightly crisp texture. Place the Wellington on a parchment‑lined baking sheet, seam side down, and bake for 25-30 minutes, or until the pastry is puffed and golden brown.
- While the Wellington is baking, preheat a small skillet to medium-high and lightly brush it with olive oil. This will be used to sear the finished Wellington for an extra crispy exterior. When the pastry is golden, remove it from the oven and carefully flip it over. Sear for 2 minutes on each side to achieve a perfect crust.
- Let the Wellington rest for 5 minutes before slicing. This allows the filling to set, preventing it from spilling out when you cut. Slice with a sharp knife, wiping the blade between cuts for clean, even slices. Serve immediately, perhaps with a drizzle of truffle oil or a side of roasted root vegetables.
That's it — you did it. But hold on, I've got a few more tricks that'll take this to another level...
Insider Tricks for Flawless Results
The Temperature Rule Nobody Follows
Many people bake their Wellington at 190°C, but the trick is to start at 200°C for the first 10 minutes to get a blistered crust, then lower to 180°C for the remaining time. This ensures the pastry puffs up without overcooking the filling. I once baked at a lower temperature and the crust never quite got that desirable crunch.
Why Your Nose Knows Best
During the sauté, pay close attention to the aroma. The moment the mushrooms release their juices and the mixture smells like toasted bread, you’re at the peak of flavor. If you wait too long, the mushrooms can become mushy and lose their bite. Trust your nose—it’s the best guide.
The 5-Minute Rest That Changes Everything
After baking, let the Wellington rest on a wire rack for at least 5 minutes. This allows the filling to settle, making slicing cleaner and preventing the pastry from becoming soggy from steam. I’ve seen people cut straight out of the pan, and the result is a messy, uneven slice.
Seal the Edges Like a Pro
When folding the pastry, press the edges firmly with a fork or your fingers to create a tight seal. A good seal prevents the filling from leaking and gives the Wellington a polished look. If you’re worried about a mess, place a sheet of parchment on the pastry before folding.
Keep the Filling Moist
If you find the filling drying out during baking, add a tablespoon of broth or white wine before sealing the pastry. This small liquid boost keeps the interior juicy. I’ve used a splash of vegetable stock when the weather was particularly dry, and the result was a moist, flavorful Wellington.
Make It Ahead of Time
Prepare the filling and roll the pastry a day in advance. Store the assembled Wellington in the refrigerator, covered with plastic wrap. When you’re ready to bake, let it sit at room temperature for 15 minutes, then proceed with the baking steps. This saves time on a busy dinner night.
Creative Twists and Variations
This recipe is a playground. Here are some of my favorite ways to switch things up:
Spinach and Ricotta Wellington
Swap the leeks for fresh spinach and add a dollop of ricotta. The creamy ricotta adds richness, while the spinach provides a pop of color and nutrition. This version is perfect for a spring menu.
Smoky Chipotle Mushroom Wellington
Add a teaspoon of chipotle powder to the sauté for a smoky kick. The heat pairs wonderfully with the earthiness of the mushrooms. Serve with a side of smoky roasted potatoes for a complete meal.
Herb‑Infused Puff Pastry
Mix chopped fresh herbs—such as rosemary, sage, and thyme—into the puff pastry before rolling. This gives each bite a burst of herbaceous flavor. It’s a subtle yet delightful twist that elevates the dish.
Vegan Mushroom Wellington
Replace the butter with vegan margarine, use a plant‑based egg replacer for the wash, and swap Parmesan for nutritional yeast. The result is a hearty, plant‑based Wellington that still delivers on flavor and texture.
Truffle‑Infused Variation
Add a splash of truffle oil to the sautéed mixture for an indulgent, earthy aroma. Finish with a drizzle of truffle oil just before serving. This version is perfect for a special occasion.
Mini Wellington Bites
Cut the pastry into small squares and fill each with a spoonful of the mushroom mixture. Bake until golden for bite‑size appetizers. Great for a cocktail party or a holiday buffet.
Storing and Bringing It Back to Life
Fridge Storage
Store the assembled Wellington in an airtight container in the refrigerator for up to 2 days. Wrap it tightly in plastic wrap before placing it in the container to preserve the pastry’s crispness.
Freezer Friendly
For longer storage, wrap the Wellington in foil and place it in a freezer bag. It can be frozen for up to 3 months. Thaw in the refrigerator overnight before reheating.
Best Reheating Method
Preheat the oven to 190°C (375°F). Place the Wellington on a parchment‑lined baking sheet and bake for 15–20 minutes, or until the pastry is heated through and crisp. Add a splash of water to the pan to create steam, then cover with foil for the first 10 minutes to keep the filling moist. A tiny splash of water before reheating steams back to perfection.