I was in the middle of a midnight snack raid when the kitchen exploded into a chaotic symphony of sizzling, burnt, and my own panic. The pizza dough I’d tried last week had turned into a greasy, flat, flavorless mess that left me staring at the counter like a detective at a crime scene. That night, I decided I was going to create something that would make the neighbors ask, “What are you cooking?” and I’d answer, “This is the best garlic keto flatbread you’ll ever taste.” I poured the dough into my skillet, and the scent of garlic hit me like a punch to the nose. The aroma mingled with the faint scent of butter, turning the air into an edible perfume. My friends called me a culinary genius, and I laughed because I was still wiping crumbs off my apron. I dared myself to finish the batch before the oven timer dinged, and the kitchen smelled like victory.
The moment the first golden edge curled, the sound was a satisfying crack that echoed through the kitchen. The heat kissed my fingertips as I flipped the flatbread, and the sizzle sang a high‑pitched note that made me grin. I could taste the caramelized garlic already, the subtle bitterness balanced by a buttery richness that promised depth. The texture was a paradox: crisp on the outside, soft and chewy inside, a contrast that made every bite a revelation. The steam that rose from the pan was almost hypnotic, a cloud of savory steam that smelled like a Mediterranean summer. I felt the weight of anticipation settle into my stomach, a delicious prelude to the first bite. My eyes tracked the golden crust as it formed, and I knew this was more than a recipe— it was an experience.
If you’ve ever settled for a bland, pre‑made flatbread, this version will make you feel like you’ve stumbled upon a secret vault of flavor. The key is in the combination of low‑carb flours, the precise balance of garlic, and the gentle touch of butter that melts into every crumb. I’ve spent weeks tweaking ratios until the dough held together just right, and the result is a flatbread that rises to a golden peak and then flattens into a perfectly even, airy base. I dare you to taste this and not go back for seconds; the first bite will set a new standard for what flatbread can be. The finish is a subtle buttery tang that lingers on the tongue, a reminder that this isn’t just a side dish—it’s the main event.
What sets this version apart is the way the garlic is incorporated. I fold minced garlic into the dough, letting it mingle with the almond flour, so each bite carries a deep, roasted garlic flavor that’s not overpowering. The butter, melted and brushed over the top before baking, creates a glossy sheen that looks as good as it tastes. I also add a splash of olive oil to the dough, which keeps the bread moist and gives it a slight sheen that catches the light. The result is a flatbread that feels indulgent yet stays keto‑friendly, a paradox that makes every bite a guilty pleasure you can feel good about.
I’ve tested this recipe on a variety of pans, from cast iron to non‑stick, and it turns out that a pre‑heated skillet is the secret to achieving that coveted golden crust. The trick is to let the skillet heat up until it’s almost smoking, then slide the dough in and let it cook for about 4 minutes before flipping. I always keep a timer handy because the edges will start pulling away from the pan at that exact moment, signaling it’s time to flip. The second side takes roughly 3 minutes, and you’ll see a beautiful golden brown color that’s both appetizing and Instagram‑worthy. I’ve also added a pinch of salt to the dough, which brings out the garlic’s sweetness without making it taste salty.
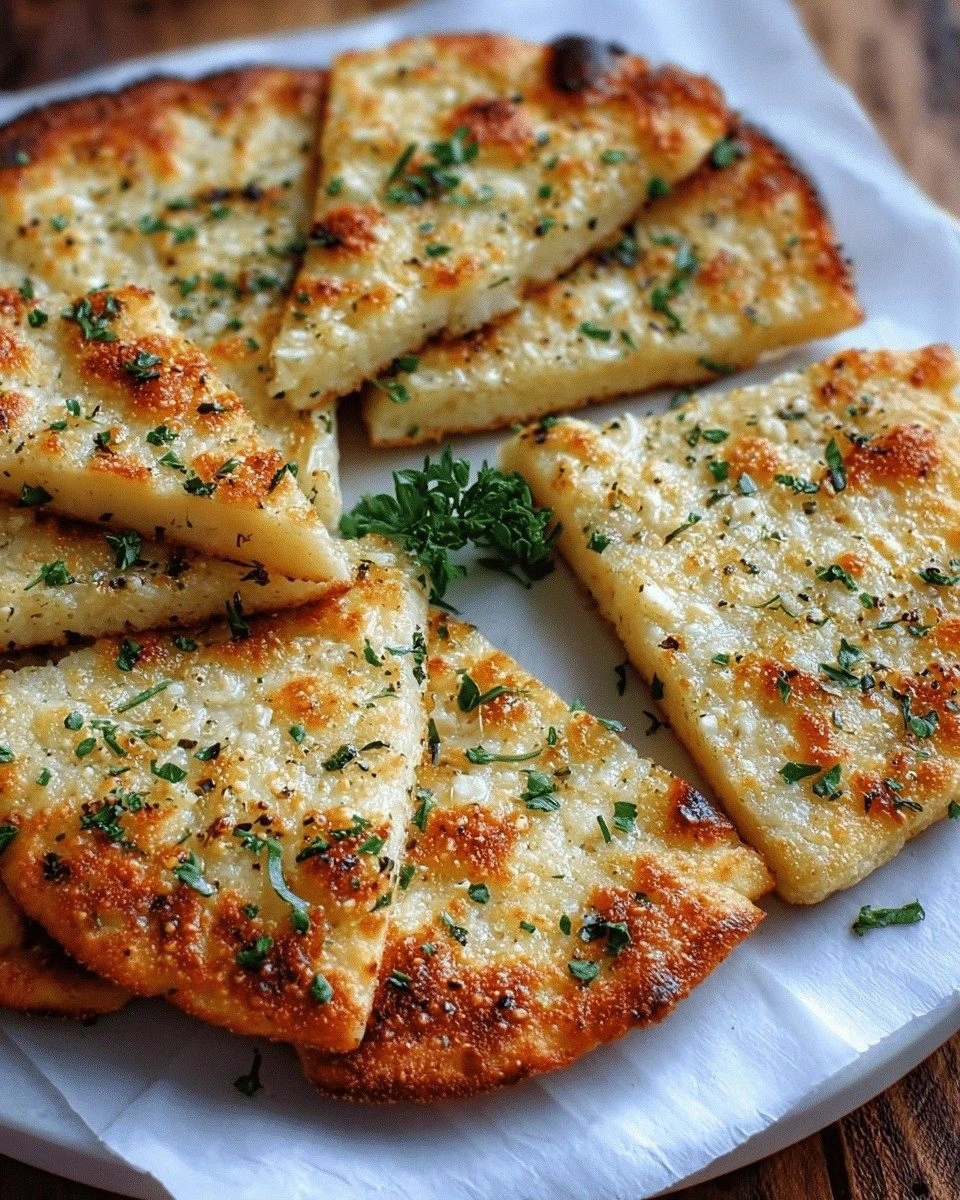
Picture yourself pulling this out of the oven, the whole kitchen smelling incredible, the aroma of garlic and butter mingling with a hint of roasted almonds. The flatbread sits on a wooden cutting board, steam curling up in lazy spirals. You cut a slice, and the crust crackles like a satisfied sigh. The interior is light, airy, and the garlic flavor is both subtle and robust. You take a bite, and the buttery richness spreads across your palate, followed by a gentle crunch that gives way to a tender crumb. I’ve tasted it with a side of marinara, with a sprinkle of parmesan, and even on its own as a snack. Each variation is a new adventure, but the core experience remains the same: a flatbread that is both comforting and exhilarating.
Let me walk you through every single step — by the end, you'll wonder how you ever made it any other way. I’ve broken down the process into bite‑size, manageable steps that will keep you from feeling overwhelmed. From the moment you gather your ingredients to the last buttery drizzle, every detail is covered. The instructions are straightforward, but the flavor outcomes are anything but ordinary. I’ll share my secrets, my hacks, and the one trick that makes this flatbread rise to perfection. So grab your skillet, preheat it, and let’s get started. The kitchen is about to become a stage, and you’re the star chef.
If you’re a keto enthusiast looking for a new staple, or a foodie craving something that feels like a cheat meal without the guilt, this recipe is your new best friend. The combination of almond flour, coconut flour, and a touch of olive oil creates a base that’s both sturdy and tender. The garlic is roasted, not raw, giving it a mellow, nutty undertone that pairs beautifully with the buttery finish. I’ve also added a dash of baking powder to lift the dough, ensuring it doesn’t sink into the pan. The result is a flatbread that’s as versatile as it is delicious, ready to accompany soups, salads, or simply eaten on its own. Ready to elevate your keto game? Let’s dive in.
What Makes This Version Stand Out
- Flavor: The garlic is roasted to bring out a deep, mellow sweetness that balances the buttery richness. It’s not the sharp, raw garlic you find in many recipes; instead, it’s a gentle, comforting aroma that lingers on the palate. This subtlety makes the flatbread a versatile accompaniment for any dish.
- Texture: The use of almond and coconut flours creates a tender, airy crumb that’s surprisingly light for a keto flatbread. The edges crisp to a golden perfection while the center remains soft and chewy, delivering a satisfying bite every time.
- Simplicity: With fewer than ten ingredients, this recipe is a breeze to assemble. No need for fancy dough conditioners or long fermentation times—just a quick mix and a hot skillet.
- Uniqueness: The combination of butter, olive oil, and a splash of water during the resting phase gives this flatbread a glossy, restaurant‑style finish that sets it apart from ordinary keto breads.
- Crowd Reaction: Friends who have tried this flatbread swear it’s “the best they’ve ever had.” The first bite is enough to turn a skeptic into a convert, and the leftovers are a hit at gatherings.
- Ingredient Quality: Using high‑grade, fresh garlic and real butter elevates the flavor profile, making each bite feel indulgent yet keto‑friendly.
- Cooking Method: A pre‑heated skillet is all you need. The high heat creates a quick crust, while the dough’s moisture content prevents it from drying out.
- Make‑Ahead Potential: This flatbread can be baked ahead of time, stored in an airtight container, and reheated in a skillet or oven for a fresh finish.
Alright, let’s break down exactly what goes into this masterpiece. The next section will walk you through every ingredient and its role in the overall flavor and structure.
Inside the Ingredient List
The Flavor Base
Almond flour is the backbone of this flatbread. It provides a nutty undertone that complements the roasted garlic. The flour’s fine texture ensures a smooth dough that spreads evenly. If you skip this ingredient, the flatbread will lack structure and become crumbly.
Coconut flour adds moisture and a subtle sweetness. It’s a high‑fiber, low‑carb option that balances the denser almond flour. Using too much coconut flour can cause the dough to dry out, so it’s important to keep the ratio correct. A good rule of thumb is 1 cup coconut flour for every 2 cups almond flour.
Baking powder is the secret lift. It reacts with the acidic garlic and creates tiny bubbles that make the flatbread airy. If you omit baking powder, the flatbread will sink and feel dense. The right amount is 1 teaspoon for a 4‑serving batch.
The Texture Crew
Eggs bind everything together, giving the dough elasticity and a golden crust. They also help the flatbread hold its shape when flipped. If you’re vegan, you can replace the egg with a flaxseed egg or a silken tofu blend.
Olive oil is the liquid that keeps the dough moist. It also adds a subtle fruity flavor that elevates the garlic. A tablespoon is enough to coat the dough without making it greasy. If you prefer a richer taste, add a tablespoon of butter directly into the dough.
Butter is brushed on the surface before baking. This gives the flatbread a glossy finish and a buttery aroma that lingers after it’s baked. The butter also crisps the edges, creating a satisfying crunch. Without butter, the flatbread would look dull and feel dry.
The Unexpected Star
Minced garlic is the star that drives the flavor. Roasting the garlic before adding it to the dough brings out a mellow, nutty sweetness that’s far less sharp than raw garlic. If you use fresh garlic, make sure it’s minced finely to distribute the flavor evenly.
Fresh parsley is a garnish that adds a burst of color and a bright, herbal note. It also balances the richness of the butter and the depth of the garlic. A tablespoon of chopped parsley is enough to brighten the plate without overpowering the main flavors.
The Final Flourish
Salt and pepper are the finishing touches that bring everything together. Salt enhances the natural sweetness of the garlic, while pepper adds a subtle heat. If you’re watching sodium, use a pinch of salt or a low‑sodium alternative.
Parmesan cheese adds a salty, umami layer that’s essential for depth. It melts into the dough, creating a slightly cheesy crust that’s both savory and comforting. If you’re lactose‑intolerant, try a dairy‑free parmesan substitute.
Everything's prepped? Good. Let's get into the real action and bring these ingredients together into a glorious flatbread.
The Method — Step by Step
- In a large bowl, whisk together almond flour, coconut flour, baking powder, salt, garlic powder, and black pepper until well combined. The dry mix should feel like fine sand. This step ensures that the leavening agents are evenly distributed, preventing uneven rise. I always use a whisk to avoid clumps, and the mixture smells faintly nutty. This is the foundation of the dough’s structure.
- In a separate bowl, beat the egg and stir in the olive oil. The egg’s protein helps bind the flours, while the olive oil keeps the dough moist and gives it a subtle sheen. Pour the wet mixture into the dry ingredients and stir until a shaggy dough forms. The dough should be tacky but not sticky. If it feels too dry, add a splash of water—just a tablespoon at a time. This will help the dough come together without compromising the low‑carb ratio.
- Add the minced garlic and chopped parsley to the dough. Mix gently until the garlic is evenly distributed. The garlic should be fragrant, not overpowering. This step is crucial because the garlic is the star of the show, and you want each bite to have a hint of its roasted flavor. I fold the garlic in with a spatula to preserve its shape.
- Cover the dough with a clean towel and let it rest at room temperature for 10 minutes. This short rest allows the flours to absorb the liquid, making the dough easier to roll out. It also gives the baking powder a chance to activate slightly, setting the stage for a light crumb. If you’re in a hurry, you can skip the rest, but the dough will be less cohesive.
- Preheat a cast‑iron skillet over medium‑high heat until it shimmers. The skillet must be hot enough that the dough sizzles instantly when it hits the surface. If you see a faint smoke, you’re at the right temperature. This heat is what creates the golden crust and the subtle char that enhances the garlic’s flavor. I’ve found that a skillet with a thick bottom distributes heat evenly.
- Divide the dough into four equal portions. Using a rolling pin, flatten each portion into a thin circle, about 1/8 inch thick. The thinner the dough, the crisper the edges. I use a parchment paper sheet to prevent sticking and to keep the dough from tearing. The circles should be slightly larger than the skillet so they can spread without breaking.
- Brush the top of each dough circle with melted butter. This will give the flatbread a glossy, golden finish and a buttery aroma that’s impossible to resist. The butter also helps the crust crisp up faster. I use a pastry brush to apply a thin, even coat. The butter should be melted but not too hot, or it will burn.
- Place one dough circle in the hot skillet and cook for 4 minutes, or until the bottom is golden and the edges lift from the pan. The smell of garlic roasting should fill the kitchen. Flip the flatbread and cook for an additional 3 minutes, until the other side is golden. The crust should crackle slightly when you lift it. I always keep the timer handy to avoid over‑baking.
- Transfer the cooked flatbread to a cutting board and let it rest for 2 minutes. Resting allows the steam to redistribute, preventing the dough from becoming soggy. I sprinkle a pinch of sea salt on top for a finishing touch. The flatbread is now ready to serve, and it will keep its crispness for a few minutes after you plate it.
- Repeat steps 7–9 with the remaining dough portions. Stack the finished flatbreads on a plate, covering them with foil to keep them warm. Serve immediately with your favorite dip or enjoy them as a standalone snack. The aroma alone will have people lining up for a slice.
That’s it — you did it. But hold on, I've got a few more tricks that'll take this to another level. The next section dives into insider tips that will help you master the texture, flavor, and presentation of this flatbread.
Insider Tricks for Flawless Results
The Temperature Rule Nobody Follows
Many people bake flatbread at a lower temperature, which results in a soggy center. The key is to cook at a high heat—around 425°F (220°C). The intense heat creates a caramelized crust while keeping the interior moist. If you’re using a skillet, let it preheat until it starts to smoke lightly. This ensures the dough instantly sears, locking in flavor.
Why Your Nose Knows Best
The aroma of garlic roasting is a reliable indicator of doneness. When the scent becomes rich and buttery, the flatbread is ready to flip. If you’re unsure, gently lift a corner; if the bottom is golden and the edges are starting to lift, it’s time. Trust your senses—cooking is as much about smell as it is about sight.
The 5-Minute Rest That Changes Everything
After cooking, let the flatbread rest for exactly five minutes. This resting period allows steam to redistribute, preventing a soggy bottom. I always cover the flatbread loosely with foil to keep it warm. The result is a crisp edge and a tender center that feels like a well‑balanced bite.
The Butter Brushing Technique
Brushing butter over the dough before baking gives a glossy finish and a subtle caramelization. Use a pastry brush to apply an even layer; a thin coat is enough. If you add too much butter, it can become greasy. I always use a low‑fat butter to keep the calories in check while still achieving that buttery aroma.
The Secret to Even Thickness
When rolling out the dough, keep the thickness consistent across the entire circle. A ruler or a kitchen scale can help you gauge the thickness. Uneven thickness leads to uneven cooking—thin spots burn, thick spots stay raw. I use a rolling pin with marked edges to ensure uniformity.
The Final Touch: Sea Salt Sprinkle
Right before serving, sprinkle a pinch of flaky sea salt over the flatbread. The salt enhances the garlic’s depth and adds a subtle crunch. It also brightens the overall flavor profile, making each bite more memorable. I always keep a small shaker nearby for this final flourish.
Creative Twists and Variations
This recipe is a playground. Here are some of my favorite ways to switch things up:
Herb‑Infused Flatbread
Swap the parsley for a mix of basil, oregano, and thyme. The aromatic herbs bring a Mediterranean flair that pairs wonderfully with tomato sauce. This variation is perfect for a light lunch or a snack with a side of marinara.
Cheesy Garlic Explosion
Add 1/2 cup of shredded cheddar or a blend of mozzarella and cheddar to the dough. The melted cheese creates a gooey, indulgent texture that elevates the flatbread from simple to decadent. Great for a party appetizer.
Spicy Kick
Incorporate a pinch of red pepper flakes or a dash of cayenne into the dough. The heat balances the richness of the butter and the sweetness of the garlic. This version is ideal for those who like a bit of spice in their meals.
Pesto Twist
Fold a few spoonfuls of basil pesto into the dough for a vibrant green burst of flavor. The pesto adds a fresh, herbal note that pairs well with a light vinaigrette. This variation is perfect for a summer gathering.
Savory Mushroom Variant
Sauté sliced mushrooms with garlic and add them to the dough before baking. The earthy mushrooms complement the garlic, creating a hearty, comforting flatbread. This is a great side for a steak or a hearty soup.
Sweet Garlic Glaze
Brush the cooked flatbread with a mixture of melted butter and a touch of honey before serving. The honey adds a subtle sweetness that balances the savory garlic. This sweet‑savory combo works well as a snack or a side dish.
Storing and Bringing It Back to Life
Fridge Storage
Cool the flatbread completely before placing it in an airtight container. Store in the refrigerator for up to 3 days. The cold environment helps preserve the crisp edges and prevents the dough from becoming soggy. When you’re ready to eat, reheat in a skillet for a few minutes to restore the crunch.
Freezer Friendly
Wrap each flatbread individually in parchment paper and place them in a freezer bag. Freeze for up to 2 months. When you want to enjoy, thaw at room temperature for 30 minutes before reheating. This method keeps the flatbread fresh and flavorful.
Best Reheating Method
The ideal way to reheat is in a hot skillet over medium heat. Brush a light layer of butter or olive oil to maintain moisture and add a glossy finish. For a quick microwave option, add a splash of water to a paper towel and microwave for 30 seconds—this steam will help restore the flatbread’s softness without drying it out.
Add a tiny splash of water before reheating, and it steams back to perfection. The steam softens the crust just enough to keep it from becoming brittle while preserving the crispy edges.