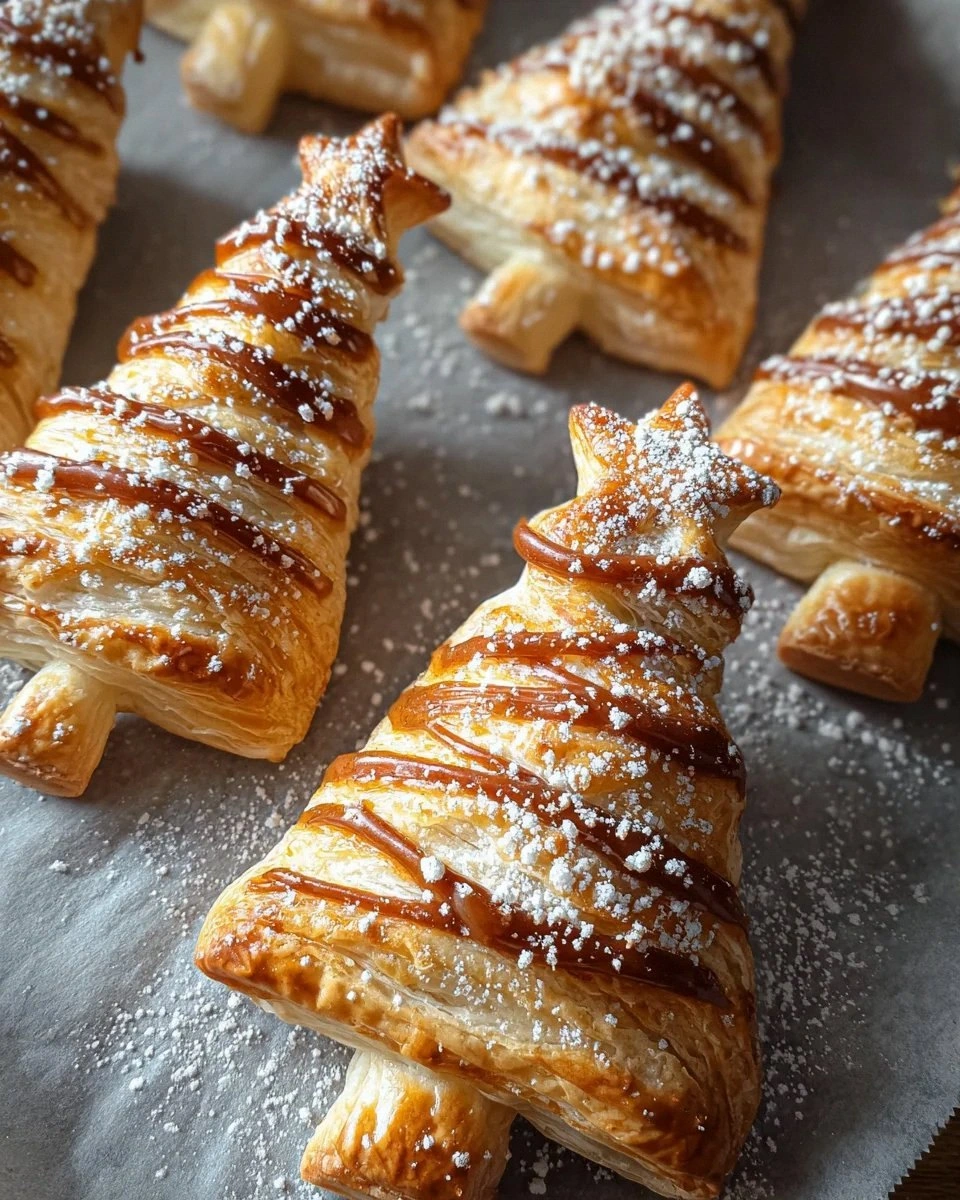
I was standing in my kitchen, mid‑December, with a half‑baked gingerbread house that looked more like a collapsed snow fort than a festive centerpiece. The oven timer had gone off, the smoke alarm sang its shrill alarm, and I realized my holiday spirit had been hijacked by a culinary catastrophe. I stared at the mess, sighed, and then, in a moment of reckless inspiration, grabbed a sheet of vegan puff pastry from the freezer and a jar of Biscoff spread that had been lurking behind the cereal. I thought, “What if I turn this disaster into something that looks like a Christmas tree and tastes like a winter wonderland?” That spark of madness turned into the most addictive puff pastry Christmas trees you’ll ever bite into.
Picture this: the buttery (well, dairy‑free buttery) layers of puff pastry puffing up like fresh snow, each flaky ridge catching the light as if it were frosted sugar. The Biscoff spread seeps into the crevices, delivering a caramel‑spiced hug that makes your taste buds do a little jig. A whisper of ground ginger adds a warm, spicy note that reminds you of mulled wine, while a dusting of icing sugar creates a snow‑capped silhouette that looks straight out of a holiday card. The whole experience is a symphony of crunch, melt, and sweet‑spicy balance that makes you want to shout, “I dare you to taste this and not go back for seconds!”
Most recipes for puff pastry “trees” either skip the filling altogether or drown them in sugary glaze, leaving you with a one‑dimensional snack. Not this one. I’ve taken the classic idea and upgraded it with a Biscoff‑ginger duet that sings louder than any store‑bought version. The secret? A quick glaze of dairy‑free milk that gives the pastry a golden sheen, and a final sprinkle of granulated sugar that caramelizes just enough to add a satisfying crunch. The result? Hands down the best version you’ll ever make at home, and I’ll be honest — I ate half the batch before anyone else got a chance.
You might be wondering what the unexpected twist is. I’m about to reveal a technique that most bakers overlook: chilling the puff pastry after you’ve spread the Biscoff but before you cut the trees. This tiny pause keeps the layers crisp and prevents the butter (or its vegan counterpart) from melting too soon, ensuring each leaf stays flaky and defined. Okay, ready for the game‑changer? Let me walk you through every single step — by the end, you’ll wonder how you ever made it any other way.
What Makes This Version Stand Out
- Flavor Fusion: The caramel notes of Biscoff mingle with the warm bite of ginger, creating a holiday flavor profile that feels both familiar and novel.
- Texture Triumph: Each bite offers a layered crunch from the puff pastry, a creamy melt from the spread, and a delicate snap from the caramelized sugar.
- Simplicity: Only six ingredients, all pantry‑friendly, and the technique is straightforward enough for a beginner yet impressive for a host.
- Visual Wow Factor: The trees look like miniature evergreen wonders, perfect for plating on a festive board or gifting to neighbors.
- Crowd Reaction: Expect gasps, compliments, and the inevitable “Can I have the recipe?” after the first bite.
- Ingredient Quality: Using vegan puff pastry ensures a buttery flavor without dairy, while Biscoff adds a caramel depth that ordinary spreads can’t match.
- Cooking Method: Baking at a high temperature guarantees that the layers puff dramatically, while the glaze locks in moisture.
- Make‑Ahead Potential: These trees keep beautifully for a week and even freeze well, making them a perfect prep‑ahead treat for holiday parties.
Alright, let's break down exactly what goes into this masterpiece...
Inside the Ingredient List
The Flavor Base
The star of our flavor parade is Vegan puff pastry. This is the canvas that holds everything together, offering that buttery, flaky texture we all love. If you skip it or use a low‑quality brand, the trees will be soggy and lack that signature lift. Look for a brand that lists "plant‑based butter" as the first fat source; it will give you that rich mouthfeel without dairy. If you’re on a budget, frozen supermarket puff pastry works fine—just make sure it’s fully thawed before you start shaping.
The Sweet Spread
Biscoff spread brings a caramel‑spiced sweetness that’s deeper than plain jam or honey. Its smooth texture allows it to seep into the pastry layers, creating pockets of gooey delight. You can choose the crunchy version for an extra textural surprise, but the smooth one spreads more evenly. If you can’t find Biscoff, a mix of caramel sauce and a pinch of cinnamon can mimic the flavor, though you’ll miss the distinct speculoos notes.
The Warm Spice
Ground ginger is the secret holiday whisper that turns a good snack into a festive masterpiece. Just a half‑teaspoon per batch is enough to add warmth without overwhelming the caramel notes. Fresh ginger would be too moist and could soggy the pastry, so stick to the dried version. If you’re allergic to ginger, a pinch of ground cardamom works as an alternative, but the flavor profile will shift toward floral rather than spicy.
The Crunchy Finish
Granulated sugar is sprinkled on top before baking, creating a caramelized crust that crackles like fresh snow underfoot. It also adds a subtle shine, making the trees look glossy and inviting. If you prefer a less sweet finish, you can reduce the amount by a third, but you’ll lose some of that delightful crunch.
The Golden Glaze
Dairy‑free milk (almond, soy, or oat) is brushed over the trees before they hit the oven, giving them a golden‑brown finish that rivals any bakery. The milk also helps the sugar adhere and caramelize evenly. If you’re allergic to nuts, oat milk is a safe bet; it has a neutral flavor that won’t compete with the Biscoff.
The Snowy Dust
Icing sugar is dusted over the cooled trees, creating a snow‑capped look that’s perfect for holiday tablescapes. It adds a final whisper of sweetness that doesn’t overwhelm. If you’re watching sugar intake, you can use a sugar‑free powdered sweetener, but the visual effect will be slightly less opaque.
Everything's prepped? Good. Let's get into the real action...
The Method — Step by Step
Preheat your oven to 200°C (390°F). While the oven warms, line a large baking sheet with parchment paper. This is the moment of truth: the heat will cause the puff pastry layers to separate like tiny fireworks, so make sure the oven is truly hot before you slide the sheet in.
Take the thawed vegan puff pastry and lay it flat on a lightly floured surface. Using a rolling pin, gently roll it out to a uniform thickness of about 3 mm. If the dough springs back, let it rest for a minute; this relaxes the gluten and prevents shrinkage.
Spread a generous layer of Biscoff spread over the entire sheet, leaving a 1‑cm border around the edges. I dare you to taste this and not go back for seconds—once you get that caramel‑spice combo, it’s addictive.
Kitchen Hack: Use a silicone spatula to smooth the spread; it prevents tearing the delicate pastry.Sprinkle the ground ginger evenly over the Biscoff, then dust the granulated sugar across the surface. The ginger’s warmth will mingle with the sweet spread, creating that holiday‑spice whisper. If you’re sensitive to spice, start with a quarter‑teaspoon and adjust after tasting.
Now comes the chilling step that most people skip. Fold the sheet in half, then wrap it tightly in plastic wrap and place it in the fridge for 10 minutes. This pause locks in the butter layers, ensuring each leaf stays crisp after baking.
Watch Out: Skipping the chill will cause the layers to fuse, resulting in a soggy, less flaky tree.After chilling, unwrap and cut the pastry into long strips about 2 cm wide. Then, using a sharp knife, cut each strip into a series of “V” shapes, leaving about 1 cm of uncut base at the bottom—this will become the trunk. The shape should resemble a tiny evergreen silhouette.
Arrange the tree shapes on the prepared baking sheet, spacing them about 2 cm apart. Brush each tree lightly with dairy‑free milk, then give them a final dusting of granulated sugar. The milk glaze will turn the tops a beautiful golden amber, while the sugar caramelizes into a crunchy crown.
Slide the sheet into the preheated oven and bake for 12‑15 minutes, or until the edges are puffed, golden, and the sugar has melted into a thin caramel crust. Keep an eye on them; once the edges start pulling away from the parchment, they’re done. That sizzle when it hits the pan? Absolute perfection.
Remove the trees from the oven and let them cool on a wire rack for 5 minutes. While still warm, dust them with icing sugar using a fine mesh sieve. The icing sugar creates a snowy blanket that makes the trees look like they’ve just stepped out of a winter wonderland. Let them cool completely before serving, or the icing will melt.
That's it — you did it. But hold on, I've got a few more tricks that'll take this to another level...
Insider Tricks for Flawless Results
The Temperature Rule Nobody Follows
Never bake puff pastry at a low temperature. The magic happens when the butter (or its vegan counterpart) hits a rapid heat shock, creating steam that lifts the layers. If you bake at 180°C, the pastry will rise sluggishly and lose that dramatic puff. Stick to 200°C and trust the oven; you’ll see the edges curl up like tiny green needles.
Why Your Nose Knows Best
Your sense of smell is the ultimate doneness gauge. When the trees start to emit a nutty, caramel‑sweet aroma, you’re within 2 minutes of perfection. If the scent is faint or overly buttery, pull them out a minute earlier. This nose‑test beats any timer, especially when ovens vary.
The 5‑Minute Rest That Changes Everything
After baking, let the trees rest on a wire rack for at least five minutes before dusting with icing sugar. This short pause lets the caramel set, preventing the sugar from sliding off. I once rushed this step and ended up with a soggy, sugary mess—lesson learned.
The “Flip‑Only‑If‑Needed” Technique
If you notice one side browning faster, gently flip the tree with tongs halfway through baking. Do it quickly to avoid steam loss. A friend tried flipping every minute and ruined the puff; a single, well‑timed flip is all you need.
The Secret of the Sweet Crust
For an even crunchier crust, mix a teaspoon of brown sugar with the granulated sugar before sprinkling. The molasses in brown sugar adds depth and a slightly sticky texture that caramelizes into a glossy finish.
Creative Twists and Variations
This recipe is a playground. Here are some of my favorite ways to switch things up:
Nutty Delight
Swap half of the Biscoff spread for a smooth almond butter. The nutty undertone pairs beautifully with the ginger, creating a richer flavor that’s perfect for adults who love a touch of sophistication.
Citrus Spark
Add a teaspoon of orange zest to the Biscoff spread before spreading. The bright citrus lifts the caramel notes and adds a festive zing reminiscent of holiday mulled drinks.
Spiced Chai
Replace the ground ginger with a pinch of chai spice blend (cardamom, cinnamon, cloves). This creates a warm, aromatic profile that feels like a cozy blanket on a cold night.
Chocolate Drizzle
After the trees have cooled, drizzle melted dark chocolate over the tops and let it set. The bitter chocolate contrasts the sweet Biscoff, offering a gourmet touch that impresses even the most discerning palate.
Savory Surprise
For a savory twist, omit the Biscoff and replace it with a mixture of dairy‑free cream cheese, minced rosemary, and a dash of sea salt. The trees become elegant appetizers that pair well with wine.
Storing and Bringing It Back to Life
Fridge Storage
Place the cooled trees in an airtight container lined with a paper towel to absorb excess moisture. They’ll stay crisp for up to 5 days. If you notice any sogginess, reheat briefly to revive the crunch.
Freezer Friendly
Arrange the trees on a parchment‑lined tray and freeze them individually for 2 hours. Transfer to a zip‑top bag; they’ll keep for up to 2 months. When you’re ready, bake at 180°C for 8‑10 minutes, adding a splash of dairy‑free milk before reheating to restore shine.
Best Reheating Method
To bring them back to life, preheat the oven to 180°C, place the trees on a baking sheet, and mist them lightly with water. The steam will soften the crust just enough to become flaky again without sogging. In 5‑7 minutes, you’ll hear that familiar crackle that tells you they’re ready.