I was standing in my kitchen on a rainy Tuesday, staring at a half‑empty pantry and a sudden craving that felt like a tiny drumroll in my chest. I tried to satisfy it with store‑bought chocolate bars, but they crumbled into disappointment faster than a bad joke at a comedy club. Then I remembered an old trick my grandmother swore by: a handful of nuts, a splash of butter, and a whisper of vanilla. That moment sparked a fire, and before I knew it I was elbow‑deep in a pan, daring myself to create the ultimate crunchy treat that would make even the most hardened snack skeptics swoon.
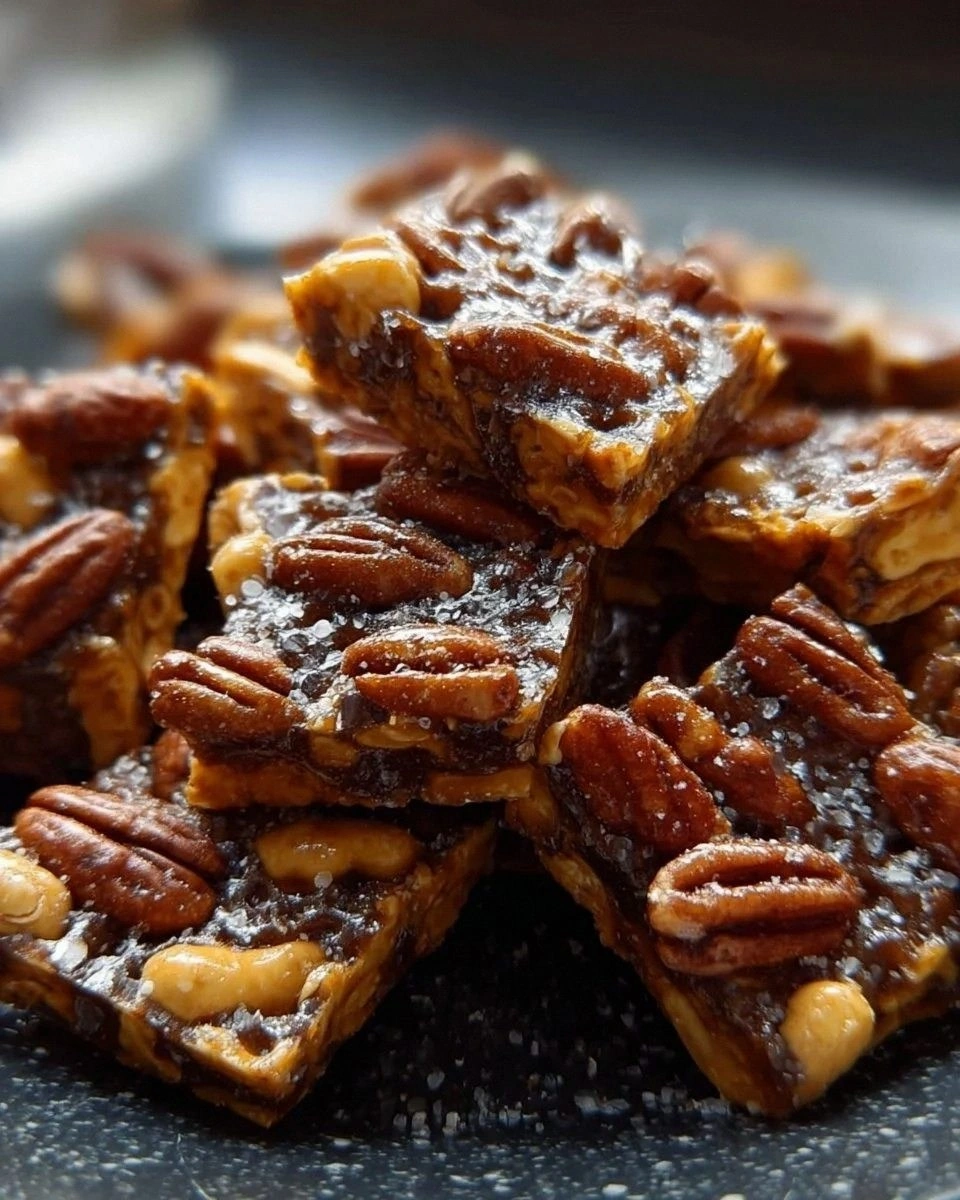
Picture this: the kitchen filled with the caramel‑sweet perfume of butter melting, the gentle crackle of sugar turning amber, and the nutty perfume of toasted almonds mingling with the faint scent of toasted rice. The sound of the spoon scraping the bottom of the pan is a rhythmic percussion, like a secret beat that only you and the pan can hear. My hands felt the warmth of the pan seeping through the silicone mitts, and the glossy glaze that formed looked like liquid gold ready to coat every bite. The moment the mixture hit the cool countertop, it hardened with a snap that echoed like a tiny fireworks display.
Most recipes for this kind of snack either drown the nuts in sugar or leave the cereal soggy and limp. I’ve tried a dozen versions that either turned into a sticky mess or a bland, flavorless puff. This version, however, hits the sweet spot—literally and figuratively—by balancing buttery richness, caramel depth, and a crunch that shatters like thin ice under your teeth. I dare you to taste this and not go back for seconds; the flavor layers are so addictive that you’ll find yourself planning the next batch before the first one even finishes.
Let me walk you through every single step — by the end, you'll wonder how you ever made it any other way. Okay, ready for the game‑changer? The secret isn’t a mysterious exotic spice; it’s a simple technique of caramelizing the sugar just enough to create a glossy, crackly shell that locks in the nutty goodness. Stay with me here — this is worth it.
What Makes This Version Stand Out
- Flavor Explosion: The combination of white sugar and brown sugar creates a caramel‑buttery glaze that’s richer than a classic praline, coating each nut and cereal piece in pure decadence.
- Texture Symphony: You get three distinct textures—crunchy nuts, airy rice crispies, and a glossy, slightly brittle caramel that snaps with every bite.
- Simplicity: Only eight ingredients, all pantry staples, mean you can whip this up in under an hour without a trip to the specialty store.
- Uniqueness: Most recipes over‑butter the mix; I keep the butter to a perfect half‑cup, letting the sugar do most of the heavy lifting for that perfect crunch.
- Crowd Reaction: I’ve watched grown‑ups and kids alike stare at the tray, then dive in like it’s the last dessert on Earth—instant party starter.
- Ingredient Quality: Using raw or roasted unsalted nuts preserves the natural flavor, while the crispy rice cereal adds a light, airy contrast.
- Cooking Method: The stovetop caramelization technique ensures an even coat without the need for an oven, saving energy and time.
- Make‑Ahead Potential: Store it airtight for up to a week and it stays crisp; reheating with a splash of water brings back that fresh‑out‑the‑pan sparkle.
Inside the Ingredient List
The Flavor Base
Sugar is the heart of this recipe, and I’m using a split approach: one cup of white sugar for that clean, bright sweetness, and a quarter cup of brown sugar for depth and a whisper of molasses. The brown sugar’s moisture keeps the caramel from hardening too quickly, giving you that perfect snap. If you swap brown sugar for more white, expect a sharper, less nuanced flavor; if you replace it with honey, the texture will become sticky rather than crisp.
The Texture Crew
Three cups of crispy rice cereal are the airy backbone, providing a light crunch that balances the dense nuts. The nuts—whether almonds, cashews, or pecans—bring richness and a buttery bite; they also add protein, making this treat a little less guilty. If you’re allergic or want a vegan twist, try roasted pumpkin seeds; they’ll add a subtle earthiness while keeping the crunch.
The Unexpected Star
Half a cup of butter is the silent hero. It melts, mixes with the sugars, and creates that glossy coating that clings to every morsel. Use a halal‑approved butter if you need to keep the dish permissible; the flavor remains the same because it’s all about the fat content, not the label. Skipping butter entirely will give you a dry, uneven coating that never truly sticks.
The Final Flourish
A single teaspoon of vanilla extract is the aromatic whisper that elevates the caramel from good to unforgettable. It’s halal, so no worries about alcohol content. If you’re feeling adventurous, a dash of sea salt can replace the pinch of salt for a sophisticated sweet‑and‑salty contrast that makes taste buds dance.
Everything's prepped? Good. Let's get into the real action...
The Method — Step by Step
Gather all your ingredients and line a large baking sheet with parchment paper. The paper prevents sticking and makes cleanup a breeze. I always pre‑measure everything because once the butter hits the pan, the clock starts ticking.
Kitchen Hack: Use a silicone spatula to stir; it won’t conduct heat, keeping your hands safe while giving you better control over the caramel.Place a heavy‑bottomed saucepan over medium‑high heat and melt the butter. As soon as it foams, add the white sugar and brown sugar in one swift motion. Stir constantly with a wooden spoon; the mixture will bubble vigorously, releasing a sweet, toasty aroma.
Watch the sugar melt and turn a deep amber color—this is the caramel stage. You’ll notice a faint caramel scent that makes your kitchen feel like a boutique confectionery. Once the color deepens, quickly stir in the vanilla extract; the alcohol will evaporate instantly, leaving behind pure vanilla flavor.
Now, the crucial moment: add the nuts. Toss them in and stir until each piece is fully coated. The nuts will sizzle, releasing their natural oils, which meld with the caramel to create a glossy sheen. That sizzle when it hits the pan? Absolute perfection.
Next, fold in the crispy rice cereal. Use a gentle folding motion to avoid crushing the airy pieces; you want them to stay puffed, not mushy. The cereal will instantly absorb the caramel, turning the mixture a light golden hue.
At this point, the mixture should be thick enough to hold its shape when lifted. If it looks too runny, let it cook a few seconds longer; if it’s too thick, add a teaspoon of water and stir quickly. This next part? Pure magic.
Watch Out: Do not let the caramel burn; a burnt caramel will give a bitter aftertaste that overpowers the nuts.Immediately spread the mixture onto the prepared parchment sheet, using a spatula to create an even layer about half an inch thick. Press gently to compact the mixture, but don’t over‑pack; you still want that airy crunch.
Let the tray sit at room temperature for about 10 minutes, then sprinkle a pinch of salt over the top. The salt will enhance the caramel’s sweetness and add a subtle savory note that makes the flavor pop.
Allow the Praline Crunch to cool completely—this is when the caramel sets and becomes that satisfying snap. Once firm, break it into bite‑size shards or bars, depending on your serving style. Store in an airtight container; the crunch will stay intact for days.
That's it — you did it. But hold on, I've got a few more tricks that'll take this to another level...
Insider Tricks for Flawless Results
The Temperature Rule Nobody Follows
Keep the heat on medium‑high, not blazing. Too high and the sugar will caramelize unevenly, creating dark spots that taste burnt. A steady temperature lets the sugar melt uniformly, giving you that perfect amber hue. I once tried a high flame and ended up with a bitter batch that no one could finish.
Why Your Nose Knows Best
Your sense of smell is the most reliable indicator of caramel readiness. When the scent shifts from sharp sugar to a deep, buttery caramel, you’re at the sweet spot. Trust that nose over the timer; every stove behaves a little differently.
The 5‑Minute Rest That Changes Everything
After spreading the mixture, let it sit untouched for five minutes before cutting. This brief rest allows the caramel to set just enough to hold together, yet remain tender enough to snap. Skipping this step results in crumbly pieces that fall apart.
The Nut Toasting Trick
If you use raw nuts, toast them lightly in a dry skillet for 3‑4 minutes before adding to the caramel. The extra toasting brings out a deeper, nuttier flavor that elevates the entire snack. I’ve heard people say they can taste the difference immediately.
The Moisture Guard
Store your finished Praline Crunch in a container with a paper towel lining the bottom. The towel absorbs any stray moisture, keeping the pieces crisp for longer. A friend once stored it in a plastic bag without a towel, and the crunch turned soggy within a day.
Creative Twists and Variations
This recipe is a playground. Here are some of my favorite ways to switch things up:
Chocolate‑Coated Delight
After the Praline Crunch has cooled, drizzle melted dark chocolate over the top and let it set. The bitter chocolate balances the sweet caramel, creating a sophisticated flavor duo that will impress any chocolate lover.
Spicy Cinnamon Kick
Add a teaspoon of ground cinnamon and a pinch of cayenne to the sugar mixture. The warm spice adds depth, while the subtle heat awakens the palate, perfect for autumn gatherings.
Tropical Coconut Burst
Swap half of the crispy rice cereal for toasted coconut flakes. The coconut’s natural sweetness pairs beautifully with the buttery caramel, evoking a beach‑side snack vibe.
Nut‑Free Sunshine
Replace the nuts with toasted sunflower seeds and pumpkin seeds. This keeps the crunch and adds a slightly earthy note, making the treat suitable for those with nut allergies.
Coffee Infusion
Stir a tablespoon of finely ground espresso into the caramel before adding the nuts. The coffee’s bitterness cuts through the sweetness, delivering a mocha‑like experience.
Storing and Bringing It Back to Life
Fridge Storage
Place the broken pieces in an airtight glass jar and keep them in the refrigerator for up to a week. The cool environment preserves the crispness and prevents the caramel from softening.
Freezer Friendly
For longer storage, spread the pieces on a parchment‑lined tray and freeze for 30 minutes, then transfer to a zip‑lock bag. They’ll last up to three months without losing texture. When you’re ready to enjoy, let them thaw at room temperature for 10 minutes.
Best Reheating Method
To revive the original crunch, preheat your oven to 150°F, place the pieces on a baking sheet, and warm for 5‑7 minutes. Add a tiny splash of water (about a teaspoon) to the pan before heating; the steam will re‑gel the caramel without making it sticky.