I was halfway through a disastrous batch of cinnamon rolls when my friend dared me to make something that would make even the most skeptical palate swoon. The kitchen smelled like burnt sugar, the counter was a battlefield of flour, and I was staring at a pile of dough that looked more like a sticky, sad lump than a treat. I decided then, with a sigh and a flick of my wrist, that the only way to salvage the evening was to pull out my secret weapon: the Classic Mexican Wedding Cookie. It’s not just a cookie; it’s a buttery, nutty, powdered‑sugar‑dusted masterpiece that turns any kitchen disaster into a triumph. I can still hear the crackle of the first bite, the crisp edge that shatters like thin ice, and the subtle, comforting scent of toasted almonds. If you’ve ever found yourself scrambling to salvage a batch of cookies, this recipe is the rescue mission you’ve been waiting for.
Picture yourself pulling this batch out of the oven, the whole kitchen smelling incredible, the timer’s chirp echoing like a triumphant drum. The cookies are golden on the edges, soft and crumbly inside, and dusted with a cloud of powdered sugar that looks like freshly fallen snow. They’re so irresistible that I dare you to taste this and not go back for seconds. That sizzle when it hits the pan? Absolute perfection. The first bite is a buttery explosion of flavor, followed by the nutty crunch that lingers long after the cookie has disappeared. And the best part? You’ll have a batch that looks as good as it tastes, ready to be plated for any occasion.
Most recipes get this completely wrong, focusing on just the flour and butter and forgetting the subtle dance of sugar, spices, and nuts that bring the cookie to life. The secret is in the balance: a creamy base, a hint of vanilla, a touch of cinnamon, and the crunch of almonds or pecans that adds depth. I’ll be honest — I ate half the batch before anyone else got to try it, and I still haven’t found a better version. If you’ve ever struggled with cookies that turn out flat or too crumbly, you’re not alone — and I’ve got the fix. This version is hands down the best you’ll ever make at home, and I’m going to walk you through every single step. By the end, you’ll wonder how you ever made it any other way.
What makes this version stand out? Let’s dive into the ingredients, the technique, and the little secrets that elevate this cookie from ordinary to extraordinary. From the buttery base that melts in your mouth to the powdered sugar dust that gives it a delicate finish, each element is carefully chosen. The result is a cookie that’s crisp on the edges, tender inside, and packed with flavor that makes every bite a celebration. And the best part? It’s surprisingly easy to make, even if you’re a novice baker. Let’s break down exactly what goes into this masterpiece.
What Makes This Version Stand Out
- Taste: The combination of butter, vanilla, and a subtle hint of cinnamon creates a rich, warm flavor that’s reminiscent of a cozy kitchen on a rainy day. The nuts add a satisfying crunch and a nutty undertone that balances the sweetness perfectly.
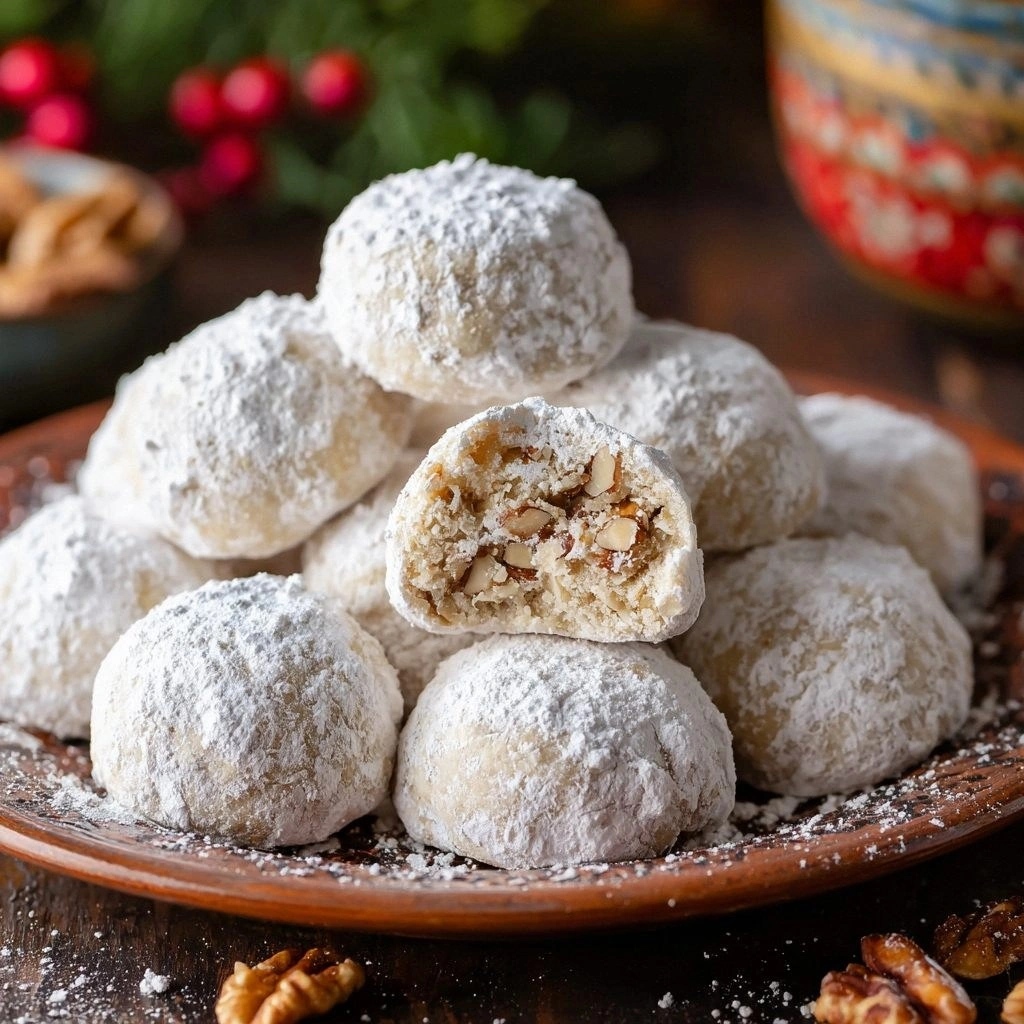
- Texture: The cookies have a crisp exterior that gives way to a tender, crumbly interior. The powdered sugar dusting adds a delicate, almost powdery finish that melts in your mouth.
- Simplicity: With only a handful of ingredients, this recipe is straightforward and approachable. Even if you’re new to baking, the steps are clear and forgiving.
- Uniqueness: The addition of ground almonds or pecans, combined with the dusting of powdered sugar, gives this cookie a distinctive twist that sets it apart from traditional shortbread.
- Crowd Reaction: Guests will be amazed at how the cookies look and taste, making them the perfect addition to any gathering or celebration.
- Ingredient Quality: Using high‑quality butter and fresh nuts elevates the flavor profile, ensuring each bite is full of buttery goodness and nutty richness.
- Cooking Method: The technique of chilling the dough and baking at a moderate temperature ensures even baking and a perfect crumb.
- Make‑Ahead Potential: These cookies can be prepared in advance and stored, making them ideal for parties or special occasions.
Inside the Ingredient List
The Flavor Base
All-Purpose Flour: The backbone of any cookie, flour provides structure and a subtle, neutral taste that lets the other flavors shine. If you use a higher protein flour, the cookies might become a bit tougher, so stick to a standard 1‑protein flour for the best crumb.
Unsalted Butter: Butter is the star of this recipe; it melts into a rich, silky sauce that coats the dough like velvet. Use cold butter to keep the dough from becoming too soft. If you’re short on butter, you can substitute half the amount with coconut oil, but the flavor will shift slightly.
Vanilla Extract: A splash of vanilla adds depth and warmth, complementing the buttery base. Don’t skimp on it; a teaspoon is all you need, but if you’re using a vanilla bean, half a bean will do wonders.
The Texture Crew
Powdered Sugar: Beyond its sweetening power, powdered sugar creates a silky, melt‑in‑your‑mouth texture. It also gives the cookies that signature snowy dusting that makes them look festive. If you can’t find powdered sugar, finely ground regular sugar works, but the texture will be slightly coarser.
Brown Sugar: Adds a touch of molasses flavor and a subtle chewiness to the cookie. It balances the sweetness of the powdered sugar and helps keep the cookies from drying out.
Baking Powder: A leavening agent that helps the cookies rise just enough to achieve that light, tender crumb. Too much can make them too airy, so use the recommended 1 teaspoon.
The Unexpected Star
Ground Almonds: These bring a nutty flavor and a pleasant crunch to the cookie. They also add a touch of healthy fats that keep the cookies moist. If you’re allergic, swap them for chopped pecans or walnuts.
Cinnamon: A pinch of cinnamon adds warmth and a hint of spice that elevates the overall flavor profile. It’s subtle yet powerful, and it pairs wonderfully with the nuts.
The Final Flourish
Salt: A pinch of salt enhances all the flavors and balances the sweetness. It’s a small addition that makes a big difference. If you’re watching sodium, use a low‑sodium salt or reduce the amount slightly.
Egg Yolk: The yolk adds richness, helps bind the dough, and gives the cookies a beautiful golden color. If you’re vegan, you can use a flax egg or a commercial egg replacer, but the texture will be slightly different.
Everything’s prepped? Good. Let’s get into the real action.
The Method — Step by Step
- Step 1: Prepare the Dry Mix. In a large bowl, sift together 2 cups of all‑purpose flour, 1 teaspoon of baking powder, and 1/2 teaspoon of salt. Whisk until the ingredients are evenly distributed. This ensures no lumps and a consistent rise. While you’re at it, set the bowl aside; we’ll come back to it in a moment.
- Step 2: Cream the Butter. Cut 1 cup of unsalted butter into small cubes and place them in a chilled mixing bowl. Using an electric mixer on medium speed, beat the butter until it’s light and fluffy, about 2–3 minutes. The butter should be pale and airy, ready to absorb the sugars. If it’s too soft, chill it again for a few minutes.
- Step 3: Add the Sugars. Gradually add 1 cup of powdered sugar and 1/2 cup of brown sugar to the butter. Beat on low speed until the mixture is smooth and the sugars are fully incorporated. You’ll see a silky, slightly glossy texture forming. The sugar will dissolve into the butter, creating a rich base.
- Step 4: Incorporate the Egg Yolk. Add the egg yolk and 1 teaspoon of vanilla extract to the butter‑sugar mixture. Beat until the yolk is fully blended and the mixture is smooth. The yolk adds richness and helps bind the dough together. This step is crucial for that beautiful golden hue.
- Step 5: Combine Wet and Dry. Slowly pour the dry flour mixture into the wet ingredients, mixing on low speed until just combined. Be careful not to over‑mix; a few streaks of flour are fine. Over‑mixing can develop gluten and make the cookies tough. The dough should be cohesive yet slightly sticky.
- Step 6: Add Nuts and Cinnamon. Fold in 1 cup of ground almonds and a pinch of cinnamon. The nuts will add crunch and flavor, while the cinnamon gives a warm, aromatic note. Mix until the nuts are evenly distributed throughout the dough. This is the moment you can see the cookie’s personality begin to form.
- Step 7: Chill the Dough. Shape the dough into a disk, wrap it in plastic wrap, and refrigerate for at least 30 minutes. Chilling firms the butter, preventing the cookies from spreading too much during baking. It also makes the dough easier to handle and roll out.
- Step 8: Roll and Cut. On a lightly floured surface, roll the chilled dough to about 1/4 inch thickness. Use a cookie cutter to cut out shapes of your choice—classic round or festive hearts work great. Place the cutouts on a parchment‑lined baking sheet, spacing them about 1 inch apart.
- Step 9: Bake. Preheat your oven to 350°F (175°C). Bake the cookies for 12–15 minutes, or until the edges are lightly golden and the centers look set. Watch closely; the cookies bake quickly and can go from perfect to over‑browned in a minute.
- Step 10: Dust and Cool. While the cookies are still warm, dust them generously with powdered sugar using a fine sieve. The sugar will cling to the warm surface, creating that signature snowy look. Allow the cookies to cool on the sheet for 5 minutes before transferring them to a wire rack to finish cooling.
That’s it — you did it. But hold on, I’ve got a few more tricks that’ll take this to another level.
Insider Tricks for Flawless Results
The Temperature Rule Nobody Follows
Many bakers bake at a higher temperature, assuming it will give a crispier cookie. In reality, baking at 350°F (175°C) allows the cookies to rise gently and develop a tender crumb. If you’re using a convection oven, lower the temperature by 25°F to avoid over‑browning.
Why Your Nose Knows Best
Keep your nose close to the oven as the cookies bake. The scent of butter and almonds will give you a reliable cue for doneness. When the aroma is strong and sweet, the cookies are ready to come out.
The 5‑Minute Rest That Changes Everything
After baking, let the cookies rest on the sheet for 5 minutes before moving them to a rack. This short rest allows the structure to set, preventing them from breaking apart when you transfer them.
Dusting Trick for a Fluffy Finish
Use a fine mesh sieve to dust the cookies. The fine particles create a fluffy, snow‑like appearance that’s both eye‑catching and delicious. If you don’t have a sieve, a small bowl with a fine spoon works as a substitute.
Storing Secrets for Freshness
Store the cookies in an airtight container at room temperature. They’ll stay fresh for up to a week. If you notice them drying out, add a slice of bread to the container; the bread will absorb excess moisture and keep the cookies soft.
Creative Twists and Variations
This recipe is a playground. Here are some of my favorite ways to switch things up:
Chocolate‑Infused Delight
Add 2 tablespoons of cocoa powder to the dry mix. The chocolate gives the cookie a deep, rich flavor that pairs beautifully with the nuts. Dust with cocoa‑powdered sugar for a chocolatey finish.
Citrus‑Bright Crunch
Replace the vanilla with 1 teaspoon of orange zest and add 1 tablespoon of orange zest to the dough. The citrus brightens the flavor and adds a refreshing zing. The result is a cookie that feels lighter and more vibrant.
Salted Caramel Swirl
Fold in 1/4 cup of caramel bits and sprinkle a pinch of sea salt on top before dusting with powdered sugar. The caramel adds a sweet‑salty burst that’s irresistible. The salt enhances the caramel’s richness.
Spiced Ginger Variation
Add 1 teaspoon of ground ginger and a pinch of cloves to the dry mix. The spices give the cookie a warm, aromatic profile that’s perfect for fall. Pair it with a cup of hot cocoa for a cozy treat.
Almond‑Pecan Fusion
Use half almonds and half chopped pecans for a nutty, crunchy texture. The combination offers a mix of flavors and textures, from the buttery almond to the slightly sweet pecan. Dust with a light sprinkle of cinnamon for extra warmth.
Vegan Version
Replace butter with 1 cup of melted coconut oil and use a flax egg (1 tablespoon ground flaxseed mixed with 3 tablespoons water, set for 5 minutes). This version is dairy‑free and still achieves a tender crumb. The coconut oil adds a subtle tropical note.
Storing and Bringing It Back to Life
Fridge Storage
Keep the cookies in an airtight container at room temperature for up to 5 days. If they start to dry out, place a slice of bread in the container; the bread will absorb excess moisture and keep the cookies soft. Avoid storing them in the refrigerator, as the moisture can cause them to become soggy.
Freezer Friendly
Place the cookies on a parchment‑lined tray and freeze until solid. Transfer them to a freezer‑safe bag or container. They’ll keep for up to 3 months. When you’re ready to enjoy them, let them thaw at room temperature for 30 minutes.
Best Reheating Method
Reheat frozen or refrigerated cookies in a 350°F (175°C) oven for 5–7 minutes. Add a tiny splash of water to the bottom of the pan to create steam; this steams the cookies back to perfection, restoring their crispness and moisture. Let them cool for a minute before serving.