I’ll be honest — the first time I tried to make a traditional Huevos Rancheros, I ended up with a soggy mess that looked more like a breakfast swamp than a culinary triumph. I was standing over a pan, the salsa splattering like fireworks, and my kitchen was suddenly a crime scene of broken tortillas and over‑cooked eggs. That disaster sparked a dare from my roommate: “Make something that actually looks as good as it tastes, and don’t let me have to rescue you this time.” I took that challenge, rolled up my sleeves, and after a few frantic experiments (and a half‑eaten batch that vanished before anyone else could try it), I discovered the ultimate hack: turn everything into a casserole. The result? A dish that pulls together the bold, smoky flavors of classic Huevos Rancheros while delivering the comforting, pull‑apart texture of a baked breakfast casserole.
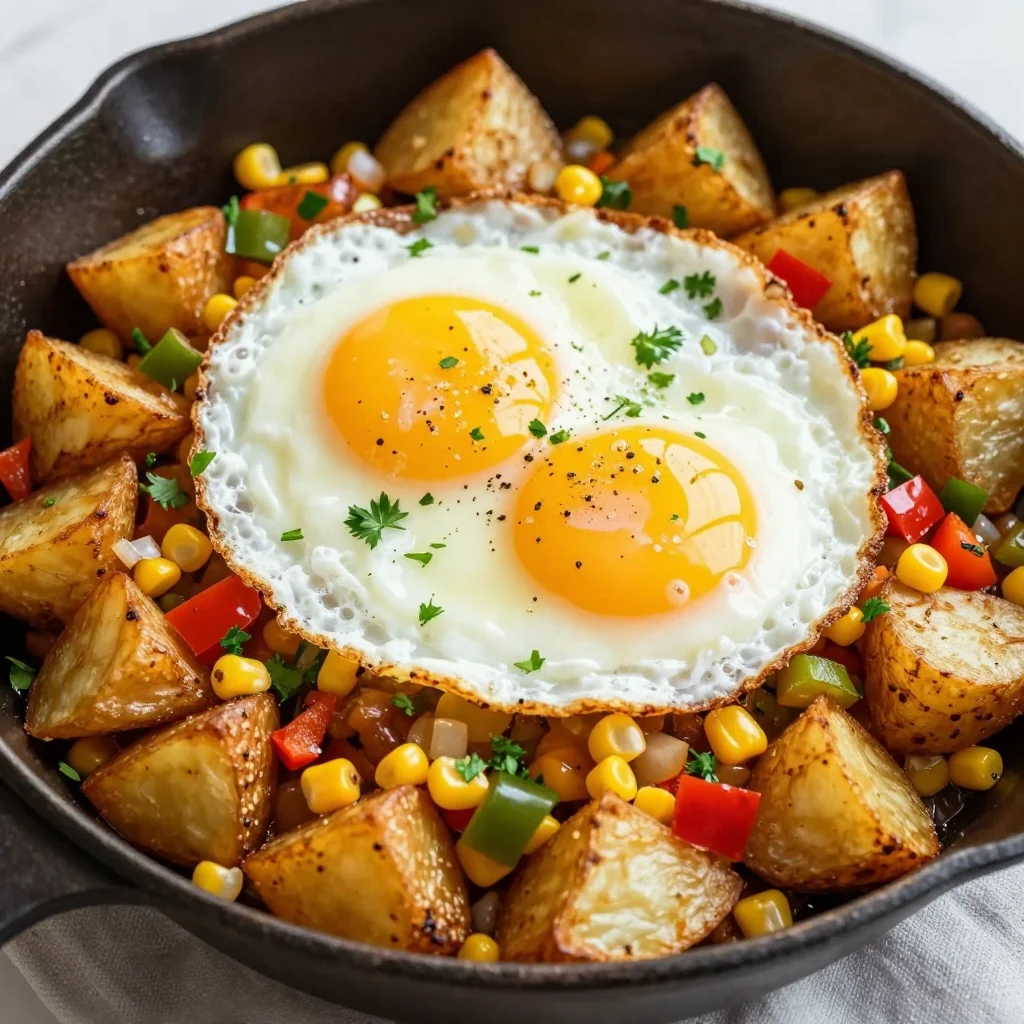
Picture this: the oven door swings open, and a cloud of fragrant steam escapes, carrying notes of cumin, paprika, and a whisper of jalapeño heat. The golden‑brown tortilla edges crackle like thin ice under your fork, while the cheese bubbles and stretches like a warm sunrise. The eggs, baked to a fluffy perfection, sit nestled between layers of black beans and bell peppers, each bite delivering a symphony of textures—crunch, cream, and a subtle bite of spice. The salsa, simmered just enough to thicken, coats everything like velvet, soaking the tortillas without making them soggy. Your nose picks up the faint aroma of toasted corn, and you can already taste the tangy zing that will make your taste buds do a happy dance.
What makes this version truly stand out is the simplicity of the method paired with a few unexpected twists that elevate the dish from “just another breakfast” to “the breakfast you’ll brag about for weeks.” Most recipes get the tortilla‑to‑egg ratio wrong, leading to a soggy bottom or a dry top. Here, I’m using a double‑layer technique that guarantees crispness on the bottom while keeping the middle luxuriously moist. And the secret weapon? A dash of cumin and paprika that creates a flavor depth you’d normally only get from a slow‑cooked Mexican stew. I dare you to taste this and not go back for seconds—trust me, you’ll be counting the minutes until the next morning.
Okay, ready for the game‑changer? I’m about to walk you through every single step—by the end, you’ll wonder how you ever made Huevos Rancheros any other way. Stay with me here — this is worth it. Let’s dive in and turn your ordinary mornings into effortless, flavor‑packed celebrations.
⚡ What Makes This Version Stand Out
- Flavor Explosion: The combination of cumin, paprika, and jalapeños creates a smoky heat that dances on the palate, while the salsa adds a bright, tangy contrast that keeps every bite exciting.
- Texture Harmony: Crispy tortilla edges meet creamy baked eggs, and the melted cheese adds a gooey pull‑apart finish—think of it as a breakfast symphony where each instrument knows its place.
- Simplicity Meets Elegance: With just ten ingredients and a single‑sheet pan, you get a restaurant‑quality dish without the hassle of juggling multiple pans and stovetop timing.
- Make‑Ahead Magic: Assemble the night before, pop it in the oven in the morning, and you’ll have a hot, ready‑to‑serve casserole that feels like a fresh‑made brunch.
- Crowd‑Pleaser: Whether you’re feeding a family, a brunch crew, or a picky teenager, the balanced spice level and comforting textures win over even the most skeptical eaters.
- Ingredient Quality: Using fresh bell peppers and high‑quality cheese adds a depth that canned substitutes can’t match—trust me, the difference is night and day.
- Versatile Base: The casserole can be dressed up with avocado, cilantro, or a drizzle of crema, giving you endless opportunities to personalize each serving.
- Storage Friendly: It reheats beautifully, keeping the tortillas from turning rubbery and the eggs from becoming dry—perfect for leftovers or meal‑prep warriors.
🍋 Inside the Ingredient List
The Flavor Base
Salsa (2 cups): This is the soul of the dish, providing acidity, sweetness, and a touch of heat that balances the richness of the cheese and eggs. If you skip it, the casserole will feel flat and overly dense. For a fresher twist, blend roasted tomatoes, onions, and a splash of lime for a smoky salsa that sings.
Cumin (1 teaspoon) & Paprika (1 teaspoon): These spices are the unsung heroes that turn a simple egg bake into a Mexican masterpiece. Cumin adds an earthy warmth, while paprika delivers a subtle smoky note. If you run out, a pinch of chili powder can stand in, but you’ll lose that nuanced depth.
The Texture Crew
Tortillas (10): Corn tortillas are the traditional choice, offering a slightly gritty bite that complements the soft eggs. Flour tortillas work too, but they’ll give a softer, more cake‑like texture. When selecting, look for tortillas that are pliable yet sturdy—those that don’t crack when you fold them.
Eggs (12 large): The eggs provide protein and a fluffy custard‑like interior once baked. Using large eggs ensures the right ratio of liquid to solids; smaller eggs could leave the casserole dry. If you’re vegan, try a tofu scramble seasoned with turmeric for a similar texture.
Cheese (2 cups): A blend of cheddar and Monterey Jack melts beautifully, creating that golden, bubbly crust we all crave. Skipping cheese means losing the gooey pull‑apart factor, turning the dish into a plain egg bake. For a sharper bite, add a handful of cotija or feta at the end.
The Unexpected Star
Black Beans (1 cup): These little legumes add a buttery bite and a protein boost, making the casserole more filling. If omitted, the dish can feel too egg‑heavy. Rinse canned beans thoroughly to avoid excess salt and a mushy texture.
Bell Peppers (1 cup): Sweet, crunchy, and colorful, they bring a fresh contrast to the smoky salsa. Dicing them small ensures they cook evenly and integrate into the layers. If you love heat, swap half the bell peppers for roasted poblano.
Jalapeños (2 tablespoons): Finely chopped, they give a gentle kick that awakens the palate without overwhelming. Adjust the amount based on your tolerance—more for thrill‑seekers, less for the kids.
Everything's prepped? Good. Let's get into the real action…

🔥 The Method — Step by Step
Preheat your oven to 375°F (190°C). While the oven warms up, line a 9x13 inch baking dish with parchment paper—this makes cleanup a breeze and prevents the casserole from sticking. The heat will be steady, ensuring the tortillas crisp up without burning. Pro tip: If you love a extra‑crunchy bottom, place the dish on the middle rack and let the heat circulate evenly.
Take each tortilla and lightly brush both sides with a drizzle of olive oil, then toast them on a hot skillet for about 30 seconds per side. You’ll hear a satisfying sizzle that tells you they’re just about to reach that perfect golden‑brown hue. This step is pure magic because it creates a barrier that stops the salsa from soaking in too much later.
🪄 Kitchen Hack: Use a pastry brush to coat the tortillas evenly; uneven oil leads to patchy crispness.Arrange a single layer of toasted tortillas at the bottom of the dish, overlapping them just enough to cover the surface. Sprinkle half of the black beans and bell peppers over the tortillas, then drizzle 1 cup of salsa evenly. The salsa should pool slightly but not drown the tortillas—think of it as a flavorful glaze.
Crack the 12 large eggs into a large bowl, add a pinch of salt, a dash of pepper, and the cumin and paprika. Whisk vigorously until the mixture is uniform and slightly frothy; this incorporates air, giving you a lighter texture once baked. Pour the seasoned egg mixture over the layered tortillas, ensuring it seeps into every nook and cranny.
Scatter the remaining black beans, bell peppers, and jalapeños across the top. Then, pour the remaining cup of salsa in a slow, decorative swirl—this not only adds flavor but also creates a beautiful marbled effect when baked. Finally, sprinkle the 2 cups of shredded cheese evenly; the cheese will melt, turn golden, and create that irresistible crust.
Place the casserole in the preheated oven and bake for 25‑30 minutes. Around the 20‑minute mark, check the edges—they should start pulling away from the sides of the dish, and the cheese should be bubbling with a deep amber hue. Watch Out: If the top is browning too fast, loosely cover with foil to prevent a burnt top while the interior finishes cooking.
👀 Watch Out: Over‑baking can turn the eggs rubbery. Pull the casserole out when the center is just set— it will continue to firm up as it rests.Once baked, remove the casserole from the oven and let it rest for 5‑7 minutes. This resting period allows the juices to redistribute, making each slice moist and preventing the edges from crumbling apart. The aroma at this stage is so intoxicating that you’ll feel compelled to take a bite right then and there—resist, and you’ll be rewarded later.
Slice the casserole into generous squares, garnish with fresh cilantro, avocado slices, or a dollop of sour cream if you like. Serve hot, and watch as your guests scramble for seconds. That sizzle when you cut through the cheese? Chef's kiss.
That's it — you did it. But hold on, I've got a few more tricks that'll take this to another level…
🏆 Insider Tricks for Flawless Results
The Temperature Rule Nobody Follows
Never rush the oven preheat. A fully heated oven guarantees that the bottom tortillas crisp up instantly, preventing sogginess. If you slide the dish in too early, the heat will rise gradually, and the tortillas will steam instead of crisp. Trust me, the difference between a soggy base and a crunchy one is night and day.
Why Your Nose Knows Best
When the cheese starts to brown and you catch that buttery, nutty aroma, you’re at the perfect doneness point. Relying solely on timers can be misleading because ovens vary. Use your nose as a trusty kitchen gauge—if you smell a toasty, caramelized scent, pull the casserole out.
The 5‑Minute Rest That Changes Everything
Allowing the casserole to rest after baking isn’t just about temperature; it lets the proteins in the eggs settle, giving you clean slices instead of a mushy mess. During this short pause, the cheese continues to set, and the salsa thickens slightly, creating a cohesive bite.
Layering Like a Pro
Instead of dumping all the beans and peppers at once, distribute them in two layers—once before the eggs, once on top. This technique ensures every forkful gets a balanced bite of veggies and beans, rather than a clump at the bottom.
The Secret of Fresh Cilantro
Add cilantro at the very end, right before serving. The bright, citrusy notes wilt quickly, and adding it early will mute its flavor. A sprinkle of fresh cilantro right before the first bite adds a pop of green that lifts the entire dish.
🎨 Creative Twists & Variations
This recipe is a playground. Here are some of my favorite ways to switch things up:
Southwest BBQ Fusion
Swap the salsa for a smoky chipotle BBQ sauce and add shredded chicken. The sweet‑smoky flavor pairs beautifully with the cumin, and the chicken makes it a heartier dinner option.
Green Goddess
Replace the bell peppers with spinach and zucchini, and use a pesto drizzle instead of salsa. The herbaceous pesto adds a fresh, bright contrast that’s perfect for spring mornings.
Cheesy Fiesta
Mix in a blend of pepper jack and queso fresco for an extra‑spicy, melty cheese layer. Top with pickled red onions for a tangy crunch that cuts through the richness.
Veggie‑Only Power Bowl
Leave out the eggs and double the beans and veggies. Add a splash of plant‑based milk to the salsa to keep it saucy. This version is perfect for vegans who still crave that comforting casserole feel.
Breakfast Burrito Casserole
Roll each tortilla around a spoonful of the egg‑bean mixture before layering, creating a “rolled” effect that mimics a burrito. When sliced, each piece looks like a mini burrito—fun for kids and Instagram‑ready.
❄️ Storing & Bringing It Back to Life
Fridge Storage
Allow the casserole to cool completely, then cover tightly with foil or a reusable lid. It will keep fresh for up to 4 days. When reheating, slice a piece, sprinkle a tiny splash of water on top, and microwave for 1‑2 minutes, or bake at 350°F for 10 minutes for a crispier edge.
Freezer Friendly
Portion the casserole into individual servings, wrap each piece in plastic wrap, then place in a freezer‑safe bag. It freezes well for up to 2 months. To reheat, thaw overnight in the fridge, then bake at 375°F for 15‑20 minutes until hot throughout.
Best Reheating Method
For the crispiest revival, preheat a skillet over medium‑high heat, add a drizzle of oil, and place a slice face‑down for 2‑3 minutes. The bottom will regain its crunch, while the top stays melty. Add a splash of water before covering the pan for a few seconds to steam the cheese back to gooey perfection.