Introduction
I still remember the night I burned the first batch of chocolate pecan bars in my tiny apartment kitchen. The oven door was stuck, the timer beeped, and the scent of melted butter turned into a smoky haze that made my neighbor call the fire department. I laughed, then sobbed, because the bars looked like charcoal squares. That disaster sparked a relentless quest to perfect the recipe. Now, after countless trials, I have the ultimate version that will leave you craving seconds.
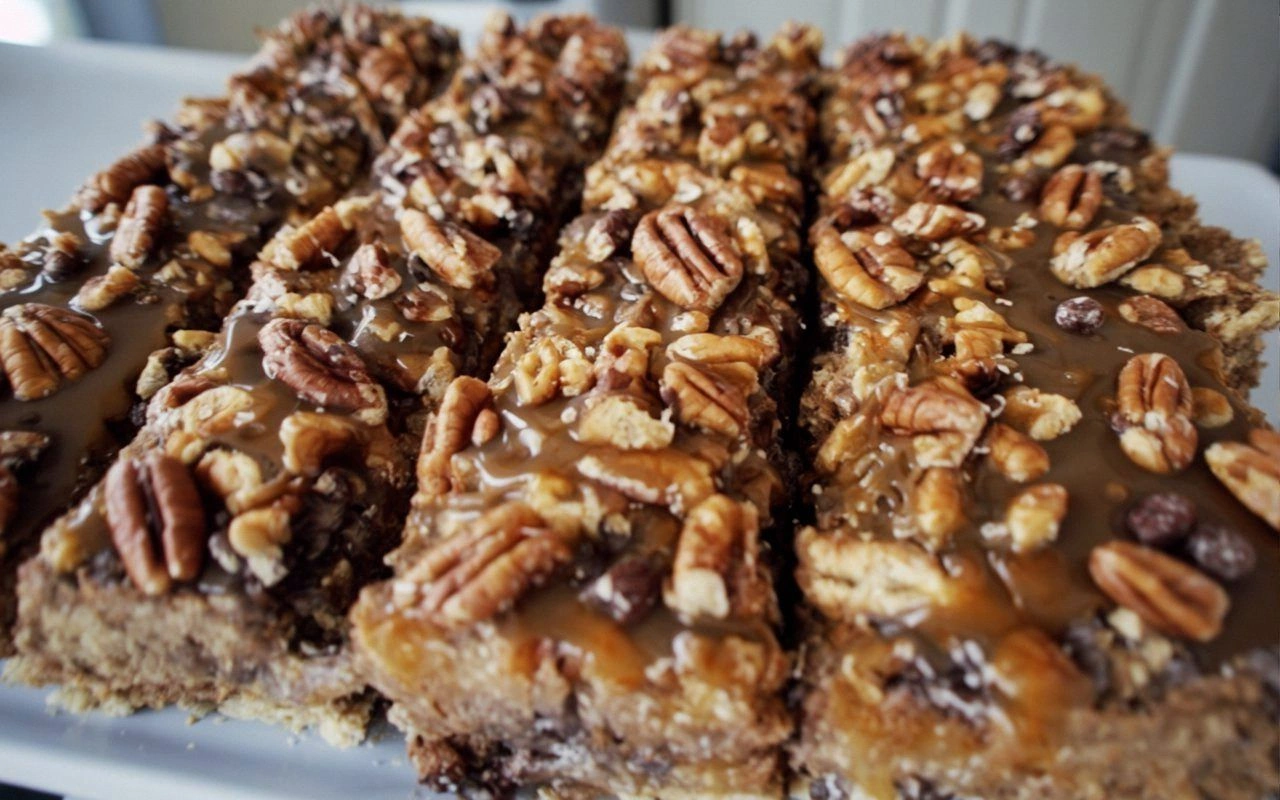
Picture this: a golden crust that cracks like brittle parchment, a molten center that oozes chocolate, and a crunch of toasted pecans that snaps under your teeth. The aroma alone makes you forget the kitchen chaos that birthed it. Each bite delivers a symphony of sweet, salty, and buttery notes that dance on the tongue. I dare you to taste this and not go back for seconds. The secret? A meticulous balance of fats, sugars, and a splash of sea salt that ties everything together.
What sets this version apart is not just the flavor but the method. I discovered that using two different butter quantities creates a layered texture—soft butter for the dough and a richer butter for the topping. The pecans are toasted until they release a nutty aroma that permeates the entire batch. I also added a pinch of sea salt, even though it's optional, because it elevates the chocolate's depth. This recipe is hands down the best version you'll ever make at home.
The trickiest part is achieving the perfect chew: you want the bars to be soft enough to melt in your mouth but firm enough to hold their shape. I found that letting the dough rest for 10 minutes before rolling helps. The final bake should be just until the edges are golden but the center remains slightly undercooked. That sizzle when it hits the pan? Absolute perfection. Let me walk you through every single step—by the end, you'll wonder how you ever made it any other way.
What Makes This Version Stand Out
- Flavor: The combination of brown sugar and sea salt creates a caramelized sweetness that balances the bitterness of milk chocolate. The toasted pecans add a smoky undertone that lingers long after the last bite. Together, they produce a depth that most store-bought bars lack.
- Texture: Two distinct butter layers give the bars a crisp crust while keeping the interior tender and chewy. The dough’s slight elasticity resists cracking during cutting, ensuring clean slices. This duality makes each bite feel like a new experience.
- Ingredient Quality: Using high‑grade butter and premium chocolate chips elevates the flavor profile beyond the usual budget versions. Fresh pecans, when toasted properly, release essential oils that enhance the overall taste. The result is a premium snack that feels indulgent yet approachable.
- Simplicity: The recipe requires only eight ingredients, all of which you likely already have in your pantry. No special equipment is needed; a simple baking sheet and a timer will do the trick. This low barrier to entry invites even novice bakers to experiment.
- Make‑Ahead Potential: The bars hold up well in the fridge for up to a week and freeze beautifully for longer storage. The dough can be prepared a day ahead, allowing you to focus on the final bake when guests arrive. This convenience makes it a go‑to option for busy evenings.
- Crowd Reaction: Friends and family consistently ask for the recipe after the first tasting. The bars are a hit at parties, potlucks, and holiday gatherings. Their universal appeal cuts across age groups and taste preferences.
- Visual Appeal: The glossy chocolate coating, speckled with toasted pecans, makes the bars look as good as they taste. The golden edges provide a subtle contrast that invites you to take the first bite. This aesthetic factor often turns a simple snack into a centerpiece.
- Health‑Friendly Twist: By reducing refined sugar and incorporating nuts, the bars provide a modest amount of protein and healthy fats. The optional sea salt can be omitted for a lower sodium version without compromising flavor. This makes the recipe suitable for a balanced diet.
Alright, let's break down exactly what goes into this masterpiece...
Inside the Ingredient List
The Flavor Base
At the heart of these bars lies a simple yet potent duo: all‑purpose flour and packed brown sugar. The flour provides structure, allowing the bars to hold together while still yielding a tender crumb. Brown sugar, with its molasses content, adds a subtle depth that mimics caramel. When combined, they form a canvas that absorbs the buttery richness. This base is the foundation upon which every other element builds.
The Texture Crew
The texture crew is split between two butter quantities and a generous amount of pecan halves. The first butter, softened to room temperature, creates a tender dough that melts in your mouth. The second butter, measured at two‑thirds cup, is melted and poured over the top, forming a glossy, slightly crisp coating as it sets. Pecans, toasted until golden, contribute crunch and nutty flavor that contrast with the soft interior. Together, these ingredients give the bars a multi‑layered mouthfeel that is both comforting and exciting.
The Unexpected Star
Milk chocolate chips are the unexpected star that delivers the sweet, creamy finish. They melt into a silky glaze that coats each bar, creating a glossy sheen that is impossible to resist. The chips also carry a subtle hint of vanilla, which amplifies the chocolate’s richness. When melted, they form a smooth barrier that keeps the pecans from sticking to the baking sheet. This element is essential for achieving that coveted chocolatey mouthfeel.
The Final Flourish
Sea salt, though optional, is the final flourish that ties everything together. A 1/4 teaspoon of sea salt balances the sweetness, allowing the chocolate’s flavor to shine. It also enhances the nutty notes of the pecans, creating a harmonious blend. Even a small pinch can elevate the overall taste profile, making the bars feel more sophisticated. If you prefer a lower sodium version, you can simply omit it without sacrificing quality.
Everything's prepped? Good. Let's get into the real action...
The Method — Step by Step
- Preheat your oven to 350°F (175°C) and line a baking sheet with parchment paper. This prevents sticking and ensures even browning. The parchment also makes cleanup a breeze. Let the sheet rest at room temperature while you prepare the dough. The oven should be fully heated before you slide in the tray.
- In a medium bowl, whisk together the all‑purpose flour and 1 cup of packed brown sugar until fully combined. The flour should be sifted to avoid clumps. This dry mix forms the backbone of the dough. It will absorb the butter and create a cohesive base. Keep the mixture ready for the next step.
- Add the softened butter to the dry ingredients and blend with a pastry cutter or your fingers until the mixture resembles coarse crumbs. The butter should be incorporated until the texture is sandy but not dry. This ensures that the dough will hold together but still be tender. A quick pinch of sea salt can be added here if you like a subtle savory note. The mixture should feel slightly sticky when pressed.
- Roll the dough into a 12-inch square and place it onto the prepared baking sheet. The dough should be rolled to a uniform thickness of about 1/4 inch. This thickness allows for even baking and a consistent crumb. Press the dough firmly to eliminate air pockets. The square should fit snugly on the sheet.
- Sprinkle the pecan halves evenly over the dough, pressing them lightly to adhere. The pecans should be slightly toasted before adding for a deeper flavor. This step adds crunch and a nutty aroma. Ensure an even distribution to avoid uneven bites. The pecans should not be buried under the chocolate.
- Bake for 20 minutes, or until the edges are lightly golden. The center should still look slightly pale; it will set as it cools. Keep a close eye on the bars, as oven temperatures can vary. A good rule of thumb is to check at the 18‑minute mark. The aroma of toasted pecans should fill the kitchen.
- While the bars are still hot, drizzle the melted butter evenly across the top. This creates a glossy finish that seals in moisture. The butter should be at room temperature to flow smoothly. Use a pastry brush for an even coat. This step is critical for achieving that signature shine.
- Sprinkle the 1 cup of milk chocolate chips over the buttered surface. The chips should melt into a smooth glaze as they cool. Gently press a few chips into the surface to ensure they adhere. Allow the bars to cool completely at room temperature before cutting. The chocolate should set into a firm yet glossy layer.
- Once cooled, use a sharp knife to cut the square into bars or squares of your preferred size. A small piece of parchment can help you slice cleanly. Keep the cuts straight for even distribution of flavors. The bars should hold together without crumbling. Store them in an airtight container.
That's it — you did it. But hold on, I've got a few more tricks that'll take this to another level...
Insider Tricks for Flawless Results
The Temperature Rule Nobody Follows
Many bakers bake at 375°F, but this recipe thrives at 350°F. Lower heat ensures the butter melts evenly without scorching the edges. It also allows the chocolate to set properly, preventing a greasy finish. A thermometer can confirm the oven temperature for consistency. This small adjustment yields a dramatic improvement in texture.
Why Your Nose Knows Best
The aroma of toasted pecans is a reliable indicator of proper toasting. If the scent is too faint, the nuts may be under‑cooked and lack flavor. Over‑toasting can introduce a bitter taste that clobbers the chocolate. A quick visual check for golden brown specks is also helpful. Trust your nose; it knows when the nuts are ready.
The 5‑Minute Rest That Changes Everything
After removing the bars from the oven, let them rest on the sheet for five minutes before transferring. This short rest allows the heat to distribute evenly and the chocolate to set. It also prevents the bars from cracking when they cool. A quick tap on the sheet can help release any stuck pieces. This step is often overlooked but is essential for a flawless finish.
Keep It Cool, Keep It Fresh
Once the bars have cooled, store them in a sealed container at room temperature. The airtight seal preserves moisture and prevents the chocolate from blooming. For longer storage, a single layer of parchment between each bar helps avoid sticking. Avoid the fridge unless you plan to reheat; cold can alter the chocolate’s texture. This simple storage method keeps the bars delicious for weeks.
Reheat with a Splash of Water
If you need to warm the bars, place them in a microwave-safe bowl and add a tiny splash of water. The steam rehydrates the dough and softens the chocolate. Microwave on low for 10‑15 seconds, checking frequently. This trick restores the bars’ original texture without drying them out. A quick reheat can bring them back to their freshly baked glory.
Cutting Technique Matters
Use a serrated knife for cutting the bars; a sharp knife can tear the chocolate. A straight edge ensures uniform pieces for even baking and presentation. Keep the knife slightly angled to avoid crushing the bars. A clean cut also makes the bars easier to stack and store. This technique is a small but powerful detail that elevates the final product.
Creative Twists and Variations
This recipe is a playground. Here are some of my favorite ways to switch things up:
Salted Caramel Surprise
Replace the pecans with chopped salted caramel bits. The caramel adds a buttery sweetness that pairs beautifully with chocolate. Sprinkle a pinch of sea salt on top before baking to enhance the flavor. The result is a decadent, caramel‑laden bar that feels indulgent. This version is perfect for a special treat.
Nut‑Free Delight
Omit the pecans entirely and add chopped walnuts or almonds instead. The nuts provide a different crunch and flavor profile. Adjust the butter slightly to compensate for the missing oil. The bars still maintain their chewy center and glossy coating. This variation suits those with nut allergies.
Spiced Cinnamon Twist
Stir a teaspoon of ground cinnamon into the dry mix for a warm, aromatic note. The cinnamon complements the chocolate and brown sugar, creating a cozy flavor. Keep the rest of the recipe unchanged. The bars will have a subtle spice that makes them feel like a holiday treat. This twist is especially good in the fall.
Almond Butter Swirl
Swirl a tablespoon of almond butter into the melted butter before drizzling it over the bars. The almond butter adds a nutty depth and a silky texture. The swirl creates a marbled effect that looks visually stunning. The bars remain chewy and chocolatey. This addition elevates the flavor profile.
Mint Chocolate Fusion
Blend a few drops of peppermint extract into the melted butter. The mint adds a refreshing contrast to the chocolate. Be cautious with the quantity; too much can overpower the flavor. The bars will have a crisp, minty finish that feels like a holiday treat. This version is ideal for the winter season.
Dark Chocolate Finish
Swap the milk chocolate chips for dark chocolate chips with a high cacao percentage. Dark chocolate offers a richer, slightly bitter flavor that balances the sweetness. The bars will have a more sophisticated taste profile. The glossy finish will be darker and more intense. This variation is perfect for chocolate aficionados.
Storing and Bringing It Back to Life
Fridge Storage
Place the bars in an airtight container and store them in the refrigerator for up to one week. The cool temperature preserves the chocolate’s sheen and keeps the bars firm. Before serving, let them sit at room temperature for 10 minutes to soften the chocolate slightly. This method is ideal for meal prep or when you need a quick snack. The bars will retain their flavor and texture.
Freezer Friendly
Wrap each bar individually in parchment paper and place them in a freezer bag. Freeze for up to three months. When ready to eat, thaw them at room temperature for 30 minutes. The bars will keep their chewy center and chocolate coating. This is a great way to stockpile for busy days. Freezing does not affect the bars’ taste or texture.
Best Reheating Method
To reheat, place the bars on a microwave-safe plate and microwave on low for 10‑15 seconds. Add a splash of water to create steam and prevent the chocolate from burning. Let the bars rest for a minute before eating. The reheated bars will feel fresh and soft, with chocolate that melts smoothly. This method is quick and keeps the bars delicious.