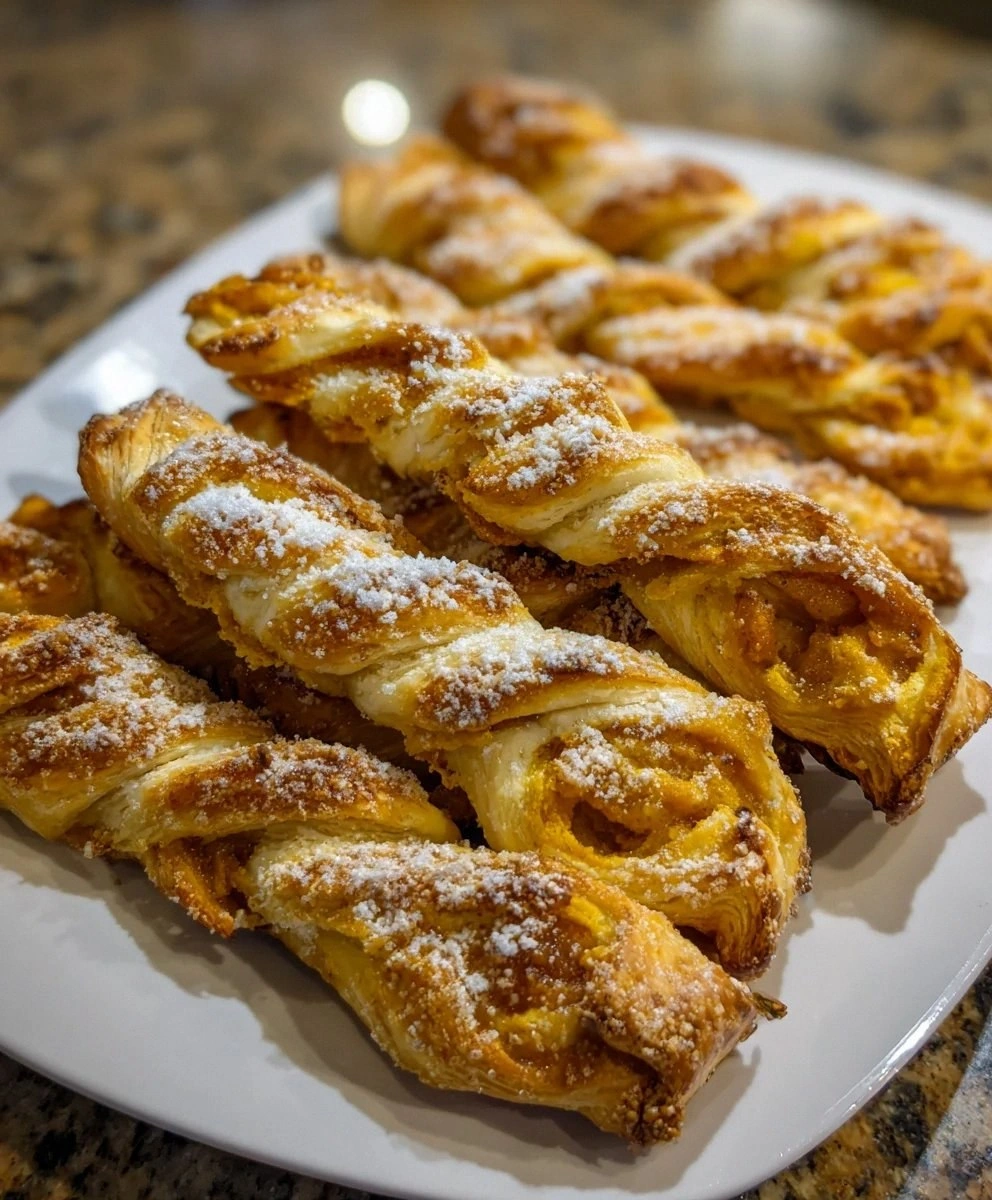
I still remember the day I tried to impress my mother-in-law with homemade croissants and ended up with something that looked like a failed science experiment. The kitchen looked like a flour bomb had exploded, the croissants were dense enough to use as paperweights, and the smoke alarm was serenading us with its finest rendition of "Someone Left Something in the Oven." Fast forward three years, and here I am, turning out pumpkin puff pastry twists so stunning they could make a French patisserie chef weep with joy. The irony? These twists take about one-tenth the effort of those disastrous croissants, and they taste like autumn decided to throw a party in your mouth.
Picture this: It's a crisp October morning, you're still in your pajamas, and the smell of warm spices is drifting through your kitchen like a cozy blanket. You're pulling a tray of these golden spirals from the oven, and the puff pastry has puffed so dramatically it looks like it's trying to escape the pan. The edges are shattering into a thousand buttery flakes, while the pumpkin filling stays lusciously smooth and aromatic. Your neighbor knocks on the door because the smell has wafted all the way to their house. True story — this has happened to me twice now, and I've learned to make a double batch just for neighborhood diplomacy.
Here's what I love most about this recipe: it's basically foolproof. We're talking frozen puff pastry levels of easy, but with a homemade taste that makes people think you've been secretly training with a pastry chef. The pumpkin filling isn't your average pie filling — I've added a secret ingredient that makes it taste like someone distilled the essence of fall and folded it into the most luxurious custard you've ever encountered. And the twists? They're not just pretty; they create these incredible texture contrasts that'll have you closing your eyes and sighing with every bite.
But before we dive in, let me warn you about something. I made a batch last week thinking I'd have enough for a dinner party. Cut to me, standing in my kitchen at 2 AM, eating the last twist over the sink like some kind of pastry-addicted raccoon. These things disappear faster than free samples at Costco. So if you're planning to share, maybe make a double batch. Or triple. Trust me on this one.
What Makes This Version Stand Out
Flavor Bomb: Most pumpkin pastries taste like someone waved a cinnamon stick over them and called it a day. Not these twists. We've got a complex spice blend that includes cardamom and a whisper of black pepper that makes the pumpkin taste more pumpkin-y. It's like turning the volume up on all the autumn flavors you love.
Texture Paradise: The magic happens when the puff pastry separates into those shatteringly crisp layers while the filling stays creamy and smooth. You get that satisfying crunch followed by the silky pumpkin filling, creating a contrast that textural dreams are made of. It's like eating a cloud wrapped in a crispy blanket.
Zero Stress Factor: No yeast, no waiting for dough to rise, no rolling out pastry from scratch. We're using store-bought puff pastry, but I'm sharing my doctor-up secrets that make it taste like it came from a boutique bakery. Even if you've never baked anything more complicated than slice-and-bake cookies, you can nail this recipe.
Instagram-Worthy Results: These twists look like they should be in the display case of a Parisian café. The spiral pattern creates these gorgeous golden ridges that photograph beautifully. I've had friends refuse to eat them at first because they looked too pretty — but that never lasts long.
Make-Ahead Champion: You can prep these completely, freeze them, and bake them straight from frozen. This makes them perfect for holiday mornings when you want something spectacular but don't want to wake up at dawn to make it happen. I've got three trays in my freezer right now for emergency brunches.
Universal Crowd-Pleaser: Kids love them because they look like fun spirals. Adults love them because they taste sophisticated. Pumpkin spice enthusiasts love them for obvious reasons, but even people who claim to hate pumpkin desserts devour these. I brought them to an office party and witnessed a usually reserved accountant licking pumpkin filling off his fingers without shame.
Inside the Ingredient List
The Flavor Foundation
Pumpkin puree forms the soul of this recipe, but not all canned pumpkin is created equal. I've tested every brand on the market, and the organic varieties consistently deliver deeper, more intense pumpkin flavor that makes these twists taste like they came from a farm stand instead of a can. The texture matters too — you want puree that's thick and velvety, not watery or grainy. If you can only find the regular grocery store stuff, line a fine-mesh strainer with cheesecloth and let it drain for about 30 minutes. This concentrates the flavor and prevents your filling from becoming too loose.
Brown sugar does heavy lifting here, bringing those caramel notes that make everything taste more complex. I use dark brown sugar because it has more molasses, which creates this incredible depth that plays beautifully with the warm spices. Don't even think about substituting white sugar — you'll lose that rich, almost butterscotch quality that makes people ask "what's your secret ingredient?" Plus, the moisture in brown sugar helps keep your filling perfectly smooth instead of grainy.
The Texture Crew
Heavy cream transforms what could be a simple pumpkin spread into something luxurious and spoonable. The fat content is crucial here — anything less than 36% won't create that silky texture that makes the filling stay put instead of oozing out during baking. I've tried with half-and-half and the results were sad and watery. If you're dairy-free, full-fat coconut milk works surprisingly well, adding a subtle tropical note that plays nicely with the spices.
Egg yolk acts as both a thickener and a flavor enhancer, creating a custard-like consistency that sets beautifully when baked. Skip it and your filling will be loose and sad, running out of the twists and burning on the pan. The yolk also adds richness that makes these feel indulgent rather than like health food disguised as dessert. Save the white for an omelet tomorrow — you'll need the strength after eating half the batch tonight.
The Unexpected Star
Here's where things get interesting: a teaspoon of espresso powder. This isn't about making these taste like coffee — it's about amplifying the pumpkin flavor in a way that makes people go "wow, these taste so... pumpkin-y!" The bitterness balances the sweetness and creates this incredible complexity that separates these twists from every other pumpkin pastry out there. It's my secret weapon, and now it's yours. Use it wisely.
A whisper of maple extract takes these from great to legendary. Just a quarter teaspoon adds this haunting background note that makes people close their eyes and think of autumn leaves and cozy sweaters. You could use real maple syrup, but the extract is more concentrated and won't throw off the liquid ratios. Plus, it means you can save the good maple syrup for Saturday morning pancakes.
The Final Flourish
Puff pastry quality matters more than you think. The all-butter varieties (look for Dufour or Trader Joe's) create layers so flaky they practically levitate off the baking sheet. The cheaper vegetable oil versions work in a pinch, but they won't have that rich, buttery flavor that makes these taste bakery-fresh. Keep your pastry cold — I mean COLD — until the moment you're ready to use it. Warm pastry is sad pastry that won't puff properly, and nobody wants sad twists.
Egg wash is your ticket to golden-brown perfection. Just one beaten egg with a splash of water creates the most gorgeous shiny crust that photographs beautifully. Brush it on gently with a soft pastry brush, being careful not to press too hard and deflate those precious layers. Sometimes I add a tiny pinch of salt to the egg wash — it helps break down the proteins and creates an even more glossy finish.
The Method — Step by Step
- Start by making the pumpkin filling because it needs time to cool and thicken. In a medium saucepan, whisk together the pumpkin puree, brown sugar, heavy cream, egg yolk, and all your spices until smooth. This is where the magic begins — the mixture should be the color of autumn leaves and smell like everything good about fall. Cook over medium heat, stirring constantly with a rubber spatula, until it thickens enough to coat the back of a spoon. You'll know it's ready when you can draw a line through it with your finger and the line holds its shape. Remove from heat and stir in the espresso powder and maple extract. Let this cool completely — warm filling will melt your pastry faster than you can say "kitchen disaster."
- While your filling cools, it's time to prep your pastry. Unfold one sheet of puff pastry on a lightly floured surface and roll it gently just to smooth out the creases. Don't go crazy with the rolling pin — you're not trying to make it thinner, just more pliable. Keep the other sheet in the fridge until you're ready for it. Brush off any excess flour with a pastry brush, then spread a thin, even layer of the cooled pumpkin filling over the entire surface, leaving a half-inch border at the top edge. The layer should be thin enough that you can still see the pastry through it — think of it as pumpkin wallpaper, not pumpkin carpet.
- Now comes the fun part: creating the twist magic. Starting from the long edge closest to you, roll the pastry up tightly but gently, like you're rolling a jelly roll or a yoga mat. Don't press too hard — you want to keep all those precious layers intact. When you reach the end, brush the bare edge with a little water and press gently to seal. Wrap this log in plastic wrap and refrigerate for at least 30 minutes. This chilling step is crucial — it firms up the butter and makes cutting clean spirals possible instead of creating pumpkin-filled chaos.
- While your first roll chills, repeat the process with the second sheet of pastry and remaining filling. I like to make one batch with the classic filling and experiment with the second — maybe add some chopped crystallized ginger or a sprinkle of orange zest for a bright twist. Once both logs are chilled and firm, preheat your oven to 400°F. Line two baking sheets with parchment paper — trust me, you'll thank yourself later when you're not scrubbing burnt pumpkin off your pans. Position your racks in the upper and lower thirds of the oven for even baking.
- Using a sharp knife (I use a serrated bread knife for clean cuts), slice each log into 12 equal pieces. Work quickly so the pastry stays cold — if it starts getting soft and squishy, pop it back in the fridge for 10 minutes. Place the slices cut-side down on your prepared baking sheets, spacing them about 2 inches apart because they spread more than you'd expect. Press down gently on each twist to flatten it slightly — this creates more surface area for caramelization and prevents them from unrolling in the oven.
- Beat your egg with a tablespoon of water until it's completely smooth and frothy. Brush this over each twist, being careful to cover all the exposed pastry but not letting it pool in the centers. The egg wash is what creates that gorgeous golden-brown color and shiny finish that makes these look professional. Sometimes I sprinkle a little coarse sugar on top for extra crunch and sparkle — it creates these little caramelized spots that are absolutely irresistible.
- Bake for 20-25 minutes, rotating the pans halfway through, until the twists are puffed and deeply golden brown. The smell that fills your kitchen during this time should be bottled and sold as "Essence of Autumn." Keep an eye on them during the last few minutes — they go from perfectly golden to tragically burnt faster than you can say "pumpkin spice." When done, they should be crisp on the bottom and edges, with filling that's bubbling slightly and pastry that's dramatically puffed.
- Let them cool on the baking sheets for 5 minutes — this is the hardest part because they smell incredible and you're going to want to shove one directly into your mouth. Resist! The filling is basically molten lava at this point. After 5 minutes, transfer to a wire rack to cool completely, or serve them slightly warm with a dusting of powdered sugar. They'll keep for 2-3 days in an airtight container, but let's be honest — they've never lasted more than a few hours in my house.
Insider Tricks for Flawless Results
The Temperature Rule Nobody Follows
Here's the thing about puff pastry: it's basically layers of butter and dough, and butter has a very specific melting point. Too cold and it won't puff properly, too warm and it becomes a greasy mess. The sweet spot is keeping your kitchen around 68-70°F. I know, I know — you can't control the weather, but you can control your pastry. If your kitchen is warm, work in smaller batches and keep everything in the fridge between steps. I even chill my cutting board sometimes when it's particularly hot. The difference between pastry that's been handled at the right temperature versus warm pastry is the difference between Instagram-worthy spirals and sad, flat discs that look like they gave up on life.
Your refrigerator temperature matters too — it should be set to 37-38°F. Any warmer and your pastry won't firm up properly between steps. I learned this the hard way when my fridge was running warm and my twists looked like they'd been through a windstorm. A simple fridge thermometer costs about five bucks and will save you from pastry heartbreak. Plus, once you get the temperature right, you'll be amazed at how much easier everything becomes.
Why Your Nose Knows Best
Forget timers — your nose is the best kitchen tool you have. When these twists are perfectly done, your kitchen will smell like a autumnal paradise: buttery, spicy, slightly caramelized. If you smell burning, you've gone too far. If you don't smell anything yet, they're not ready. This might sound like kitchen voodoo, but professional bakers use their noses all the time because smell is directly connected to memory and emotion. When the scent hits that perfect note of "I need to eat these immediately," that's when you check for doneness.
I've also noticed that the smell changes about 2 minutes before they're actually done. It becomes more intense and complex, like the flavors are concentrating and caramelizing. That's your cue to start checking every 30 seconds. This is especially important if you're baking multiple trays — the top one might be done before the bottom one, even if you rotate them. Trust your nose, but verify with your eyes and a gentle press on the center of a twist — it should feel set and slightly springy.
The 5-Minute Rest That Changes Everything
After baking, resist every impulse to immediately transfer these twists to a serving plate. They need those 5 minutes on the baking sheet to set up properly. The filling is still bubbling and the pastry is finishing its final puff. Moving them too early results in broken, sad twists that leak their precious filling all over your counter. I know it's hard — they smell incredible and you're probably drooling — but good things come to those who wait. Use this time to make coffee or set the table, and when you come back, they'll be perfect and ready to handle.
This resting period also allows the steam trapped inside to redistribute, which keeps the pastry crisp rather than letting it get soggy. It's like a little spa moment for your twists. Sometimes I use this time to clean up the kitchen, which makes me feel like I've got my life together even when I'm standing there in pajamas eating pastry for breakfast. Plus, cleanup is way easier when the filling hasn't had time to cement itself to your pans.
Creative Twists and Variations
This recipe is a playground. Here are some of my favorite ways to switch things up:
The Sweet Potato Plot Twist
Swap out the pumpkin for roasted and mashed sweet potatoes for a deeper, more complex flavor. Sweet potatoes have this incredible natural sweetness that intensifies when roasted, creating a filling that's almost caramel-like. Add some toasted pecans to the filling for crunch, and you've got something that tastes like Thanksgiving decided to dress up for a party. The color is even more vibrant than pumpkin — we're talking jewel-toned orange that practically glows on the plate.
The Chocolate Orange Affair
Add two tablespoons of cocoa powder to the filling and replace the maple extract with orange zest for a sophisticated flavor profile that tastes like a Terry's Chocolate Orange got a gourmet makeover. The bitterness of the cocoa balances the sweetness perfectly, while the orange adds brightness that keeps things interesting. This version is especially good for dinner parties where you want to impress people who claim they don't like pumpkin desserts.
The Savory Rebel
Replace the sweet filling with goat cheese, caramelized onions, and fresh thyme for a sophisticated appetizer that'll make you rethink everything you know about puff pastry. The tangy goat cheese plays beautifully against the sweet onions, and the thyme adds an herby note that makes these taste like they came from a fancy wine bar. Serve these warm with a crisp white wine and watch them disappear faster than you can explain what makes them so addictive.
The Nutella Swirl
Keep the pumpkin filling but add dollops of Nutella before rolling up the pastry. As it bakes, the chocolate hazelnut spread creates these incredible pockets of molten chocolate that make people make involuntary happy noises. The combination of pumpkin spice and chocolate is criminally underrated — it's like someone took your favorite fall flavors and your favorite comfort food and made them have a beautiful baby.
The Breakfast Champion
Add crumbled bacon and a drizzle of maple syrup to the filling for a sweet-savory breakfast twist that makes ordinary bacon seem lazy. The salty bacon intensifies the sweetness of the pumpkin, while the maple ties everything together in a way that makes perfect sense at 8 AM. These are especially dangerous because they feel breakfast-appropriate, which means you can justify eating three of them before noon.
The International Incident
Replace the standard spices with ras el hanout (a Moroccan spice blend) and add some chopped dried apricots to the filling. The warm spices and sweet fruit create this incredible North African-inspired pastry that tastes like someone transported a Moroccan souk into your kitchen. It's unexpected, sophisticated, and will make you look like a culinary genius even though it's literally the same technique with different seasonings.
Storing and Bringing It Back to Life
Fridge Storage
These twists will keep in an airtight container at room temperature for up to 3 days, but honestly, they've never lasted that long in my house. If you must store them, layer them between sheets of parchment paper to prevent them from getting soggy. The refrigerator is actually your enemy here — it makes the pastry tough and sad. Room temperature is your friend, but keep them away from direct sunlight or heat sources. I've found that a cake dome works perfectly for maintaining the right environment while keeping them visible enough to tempt everyone who walks by.
Freezer Friendly
Here's where things get exciting: these freeze beautifully both before and after baking. For unbaked twists, freeze them on a baking sheet until solid, then transfer to a freezer bag. You can bake them straight from frozen — just add 3-5 minutes to the baking time. For already-baked twists, let them cool completely, then freeze in a single layer before transferring to containers. When you're ready to eat them, reheat in a 350°F oven for 8-10 minutes until warmed through and crisp. They'll taste almost as good as fresh, which is dangerous knowledge to have when it's 2 AM and you're craving something sweet.
Best Reheating Method
Avoid the microwave at all costs — it turns puff pastry into a rubbery tragedy. Instead, use a toaster oven or regular oven at 350°F for 5-8 minutes. If you're in a hurry, you can use an air fryer at 325°F for 3-4 minutes, which creates incredibly crisp results. For the ultimate revival, place them on a wire rack set over a baking sheet — this allows hot air to circulate underneath, ensuring every surface gets crispy. Sometimes I add a tiny splash of water to the baking sheet before reheating; the steam helps refresh the pastry without making it soggy.