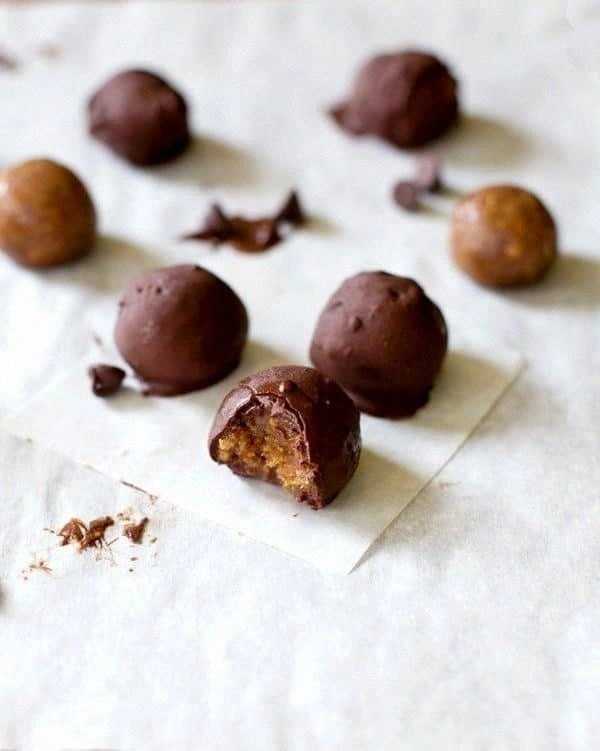
I was in the middle of a frantic weekday dinner when my roommate dared me to create something that could satisfy a sudden, insatiable craving for both cookie dough and peanut butter. I stared at the empty pantry, the clock ticking, and imagined the perfect bite: a soft, chewy center that melts like butter, speckled with chocolate chips, and a crust that cracks just enough to give that satisfying snap. The kitchen filled with the smell of melted butter and roasted peanuts, and I could almost hear the faint crackle of caramelizing sugar before the batter even hit the pan. That moment was pure culinary chaos, but it sparked the birth of what I now call the ultimate Peanut Butter Cookie Dough Bal.
Picture this: the oven door swings open, a wave of warm, nutty aroma floods the room, and a tray of golden‑brown orbs sits waiting, each one promising a bite that’s both crunchy and melt‑in‑your‑mouth soft. The scent is a blend of toasted peanuts, sweet caramel, and a whisper of vanilla that makes your stomach do a little happy dance. When you bite in, the outer crust gives way to a doughy interior that feels like a hug from an old friend—comforting, familiar, yet somehow elevated. The chocolate chips melt just enough to create glossy pockets of decadence, while a sprinkle of sea salt on top adds a bright pop that makes the flavors sing.
Most cookie dough recipes out there either skip the peanut butter altogether or drown the dough in a sea of sugar, resulting in a one‑note sweet that quickly becomes boring. This version, however, balances the rich, earthy depth of natural peanut butter with just enough sugar to let the flavors shine without overpowering. I’m talking about a dough that’s buttery, nutty, and just the right amount of sweet—no more, no less. The secret? A tiny dash of baking soda that creates that perfect airy crumb, and a quick chill that locks in the buttery texture while keeping the dough from spreading too thin.
And now for the kicker: I’m going to reveal a technique that most home bakers overlook—folding the butter and peanut butter together over low heat before cooling. This step creates a silky emulsion that makes every bite feel like it’s been wrapped in a buttery blanket. I dare you to taste this and not go back for seconds. Let me walk you through every single step — by the end, you’ll wonder how you ever made it any other way.
What Makes This Version Stand Out
- Flavor Fusion: The marriage of creamy peanut butter and caramelized butter creates a depth that ordinary cookie dough can’t match, delivering a nutty richness that lingers on the palate.
- Texture Harmony: A crisp outer edge gives way to a soft, doughy center, offering the satisfying contrast that makes every bite feel like a mini adventure.
- Simplicity: Only ten pantry staples are required, and the method uses everyday kitchen tools—no fancy mixers or obscure gadgets needed.
- Unique Technique: The low‑heat butter‑peanut butter emulsion locks in moisture, ensuring the balls stay tender even after cooling.
- Crowd‑Pleaser: Whether you’re serving kids, picky eaters, or the most discerning dessert snob, this recipe consistently earns rave reviews and empty plates.
- Ingredient Quality: Using natural, unsalted peanut butter and real butter elevates the flavor profile far beyond processed shortcuts.
- Cooking Method: Baking on a parchment‑lined sheet at a precise temperature yields uniform browning without the need for a conveyor belt.
- Make‑Ahead Potential: These balls freeze beautifully, making them an ideal make‑ahead treat for busy weeks or impromptu gatherings.
Inside the Ingredient List
The Flavor Base
The star of this dish is creamy peanut butter. Choose a natural, unsweetened variety; the oil separation you see on the jar is a sign of purity, and it gives the dough a buttery mouthfeel without artificial aftertastes. If you substitute with a sweetened version, the cookies become overly sugary and lose that nuanced nutty edge. A good tip: stir the peanut butter thoroughly before measuring to ensure an even consistency.
Next up is unsalted butter. This is the secret behind the silky interior. By melting it gently with the peanut butter, you create an emulsion that distributes fat evenly throughout the dough, preventing those dreaded dry spots. If you’re out of butter, a blend of coconut oil and a splash of milk can mimic the richness, though the flavor will shift toward tropical notes.
The Texture Crew
All‑purpose flour provides the structural backbone. Using a cup of flour that’s been sifted ensures a light, airy crumb. If you replace it with whole‑wheat flour, expect a denser bite and a nuttier flavor—great for a health‑focused twist, but not for the classic version.
Baking soda is the unsung hero that creates that subtle lift. A pinch too much and the cookies will puff up like muffins; a pinch too little and they’ll be flat and dense. Remember, the soda reacts with the brown sugar’s acidity, giving the dough its gentle rise.
Brown sugar adds moisture and a hint of molasses, which deepens the flavor and contributes to the chewy texture. If you prefer a crisper edge, swap half of it for granulated sugar, but you’ll lose some of that caramel undertone.
The Unexpected Star
Chocolate chips are the surprise guest that turns a simple cookie dough ball into a decadent treat. Use high‑quality semi‑sweet chips for a balanced bitterness; dark chocolate will add complexity, while white chocolate can make the flavor too sweet.
Sea salt flakes sprinkled just before baking provide a bright contrast that lifts the sweet and nutty notes. If you skip this step, the cookies may taste flat, lacking that final pop that makes you say “wow”.
The Final Flourish
Vanilla extract adds a fragrant backdrop that ties all the flavors together. A single teaspoon of pure vanilla does more than flavor; it rounds the edges of the peanut butter’s earthiness, making the overall profile feel cohesive.
Egg acts as a binder, ensuring the dough holds together during baking. If you’re avoiding eggs, a tablespoon of flaxseed meal mixed with three tablespoons of water can substitute, but the texture will be slightly less tender.
Lastly, a pinch of salt amplifies every other ingredient. Even a small amount of kosher or sea salt can transform the flavor from bland to brilliant.
Everything's prepped? Good. Let's get into the real action...
The Method — Step by Step
Preheat your oven to 350°F (175°C). While the oven warms, line two baking sheets with parchment paper; this prevents sticking and gives the balls a uniform golden crust. I like to set a timer for the preheat because the kitchen can get noisy, and you don’t want to forget the oven’s ready.
A quick visual cue: the oven window should be fully lit and the heating element should glow a steady orange. If you’re using a convection oven, reduce the temperature by 25°F to avoid over‑browning.
In a medium saucepan, combine 1 cup of creamy peanut butter and 1/2 cup of unsalted butter. Melt over low heat, stirring constantly until the mixture is glossy and fully combined. This low‑heat emulsion is the game‑changer that locks in moisture.
Kitchen Hack: Use a silicone spatula to scrape every last bit of the mixture from the pan; those caramelized bits add extra flavor.Transfer the warm butter‑peanut butter blend to a large mixing bowl. Add 1 cup granulated sugar and ½ cup packed brown sugar. Beat with a hand mixer on medium speed until the mixture lightens in color and becomes fluffy—about 2 minutes. This step aerates the dough, giving it that tender crumb.
Crack 1 large egg into the bowl, then stir in 1 tsp vanilla extract. Mix until just combined; over‑mixing can develop gluten, leading to a tougher texture.
Watch Out: Adding the egg when the mixture is too hot can scramble it—let the butter‑peanut mixture cool to warm before adding the egg.Sift together 2 cups all‑purpose flour, 1 tsp baking soda, and ½ tsp salt. Gradually fold the dry ingredients into the wet mixture using a spatula, being careful not to over‑mix. The dough should come together in a slightly sticky, cohesive mass.
Stir in 1 cup chocolate chips and, if you like a crunch, ½ cup chopped peanuts. The chips should be evenly dispersed, creating little pockets of molten chocolate that will burst during baking.
Cover the bowl with plastic wrap and refrigerate for exactly 20 minutes. This short chill firms the butter, making the dough easier to shape and preventing excessive spreading.
Using a tablespoon or a small ice‑cream scoop, portion out the dough into uniform balls—about 1.5 inches in diameter. Place each ball onto the prepared parchment, leaving about 2 inches of space between them.
Kitchen Hack: Lightly dust your hands with flour before shaping to prevent sticking and keep the balls perfectly round.Sprinkle a pinch of flaky sea salt on each ball—just enough to catch the eye and add that bright pop. Slide the sheet into the oven and bake for 12‑14 minutes, or until the edges turn a light golden brown and the tops look set.
The aroma at this point is intoxicating; you’ll hear a faint crackle as the sugar caramelizes. Remember, the centers will still look a little soft—that’s the sign of a perfectly chewy interior.
Remove the cookies from the oven and let them cool on the sheet for 5 minutes before transferring to a wire rack. This brief rest lets the cookies set without becoming too hard.
That’s it — you did it. But hold on, I’ve got a few more tricks that’ll take this to another level...
Insider Tricks for Flawless Results
The Temperature Rule Nobody Follows
Always start with a fully preheated oven. If the oven is still climbing, the cookies will spread unevenly, leading to a flat bottom and uneven browning. I keep a small oven thermometer on the counter; it’s a cheap insurance policy that pays off every time.
Why Your Nose Knows Best
When the cookies are about 10 minutes in, trust your sense of smell more than the timer. You’ll notice a sweet, nutty perfume that signals the edges are just beginning to caramelize. If you wait too long, the sugars will burn, turning that lovely scent into a bitter smoke.
The 5‑Minute Rest That Changes Everything
After baking, let the cookies rest on the sheet for exactly five minutes before moving them. This short pause lets the interior finish cooking via residual heat, ensuring the centers stay soft while the crust firms up. Skipping this step often results in a crumbly texture that falls apart.
Chill the Dough, Not the Oven
If you’re planning to bake multiple batches, keep the dough chilled between rounds. A cold dough ball hits the hot oven faster, giving a better rise and a crispier edge. It also prevents the butter from melting too quickly, which can cause spreading.
The Secret of Sea Salt Flakes
Don’t just sprinkle regular table salt; use flaky sea salt for texture and a burst of flavor. The flakes melt slowly, creating tiny pockets of salty crunch that contrast beautifully with the sweet dough.
Creative Twists and Variations
This recipe is a playground. Here are some of my favorite ways to switch things up:
Double‑Chocolate Delight
Swap half of the all‑purpose flour for cocoa powder and increase the chocolate chips to 1½ cups. The result is a deep, fudgy bite that satisfies even the most serious chocolate addicts.
Spicy Peanut Surprise
Add a pinch of cayenne pepper and a drizzle of honey to the dough before baking. The heat pairs unexpectedly well with the sweet peanut butter, creating a flavor that’s both bold and comforting.
Nut‑Free Version
Replace the peanut butter with sunflower seed butter and swap chopped peanuts for toasted pumpkin seeds. The texture stays crunchy, and the flavor shifts to a lighter, earthier profile—great for those with nut allergies.
Breakfast Boost
Fold in rolled oats and a handful of dried cranberries, then serve warm with a splash of milk. The oats add chewiness, while the cranberries give a tart contrast that makes these perfect for a weekend brunch.
Holiday Spice Mix
Incorporate a teaspoon of pumpkin pie spice and a dash of maple syrup into the wet ingredients. The warm spices and maple’s caramel notes turn these balls into a seasonal treat that feels like a hug on a cold night.
Storing and Bringing It Back to Life
Fridge Storage
Place the cooled cookies in an airtight container with a paper towel at the bottom to absorb excess moisture. They’ll stay fresh for up to five days, and the texture remains pleasantly chewy.
Freezer Friendly
Layer the cookies between parchment sheets inside a zip‑top freezer bag. Freeze for up to three months. When you’re ready to eat, let them thaw at room temperature for 10 minutes, then pop them in a 300°F oven for 5 minutes to revive that fresh‑out‑of‑the‑oven crisp.
Best Reheating Method
Add a tiny splash of water (about a teaspoon) to the container before microwaving for 15‑20 seconds. The steam revives the interior, making it as soft as the first bite without turning the edges rubbery.