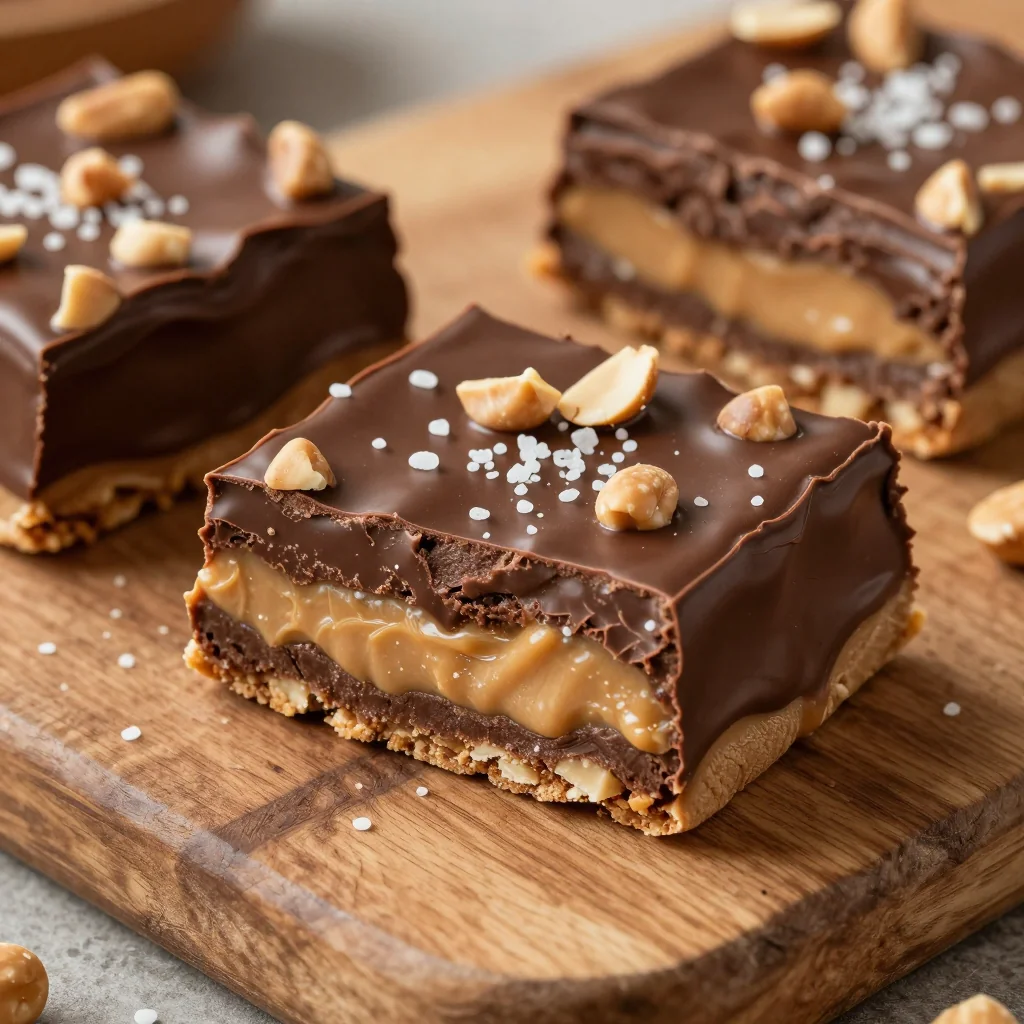
I still remember the night my kitchen turned into a chocolate catastrophe. A stubborn pan, a rogue Oreo, and a stubborn oven that refused to cooperate. I was staring at a half‑cooked mess that smelled like burnt sugar and a faint hint of vanilla, and I swore to myself that I would never again settle for anything less than buttery, fudgy, and utterly irresistible. That night, I decided to rewrite the rules of brownie making and turned a simple batter into a decadent, gooey masterpiece that even my skeptical friends begged for a second bite.
Picture this: you open the oven door and the room is filled with a deep, chocolatey aroma that clings to your hair and your kitchen walls. The batter is glossy, the edges are slightly crisp while the center remains luxuriously molten. Each bite melts on the tongue like a velvety chocolate waterfall, leaving a faint crunch from the Oreo shards that explode with a satisfying crunch. The texture is a symphony of soft, chewy, and slightly crisp, all in one bite. This isn’t just a dessert; it’s a sensory experience that will have you saying, “I dare you to taste this and not go back for seconds.”
What sets this version apart is the intentional layering of flavors and textures. The semi‑sweet chocolate chips provide a smooth, rich chocolate base, while the white and brown sugars balance sweetness with a subtle caramel undertone. The Oreos are not just an additive—they’re the star of the show, adding a crunchy, salty contrast that cuts through the richness. The recipe keeps the batter thin enough for quick baking, yet thick enough to hold its shape, making it perfect for both casual snacking and special occasions. I’ll be honest—half the batch vanished before anyone else could touch a piece.
And there’s a secret ingredient that will make your brownies stand out: a splash of espresso powder. It intensifies the chocolate flavor without adding any coffee taste. I’ll walk you through every single step—by the end, you’ll wonder how you ever made brownies any other way. Picture yourself pulling this out of the oven, the whole kitchen smelling incredible, and everyone asking for the recipe. Let’s dive in.
What Makes This Version Stand Out
- Flavor Depth: The combination of semi‑sweet chocolate chips, white sugar, and brown sugar creates a layered sweetness that’s more complex than your average brownie. The espresso powder unlocks a deeper chocolate bite that lingers on the palate.
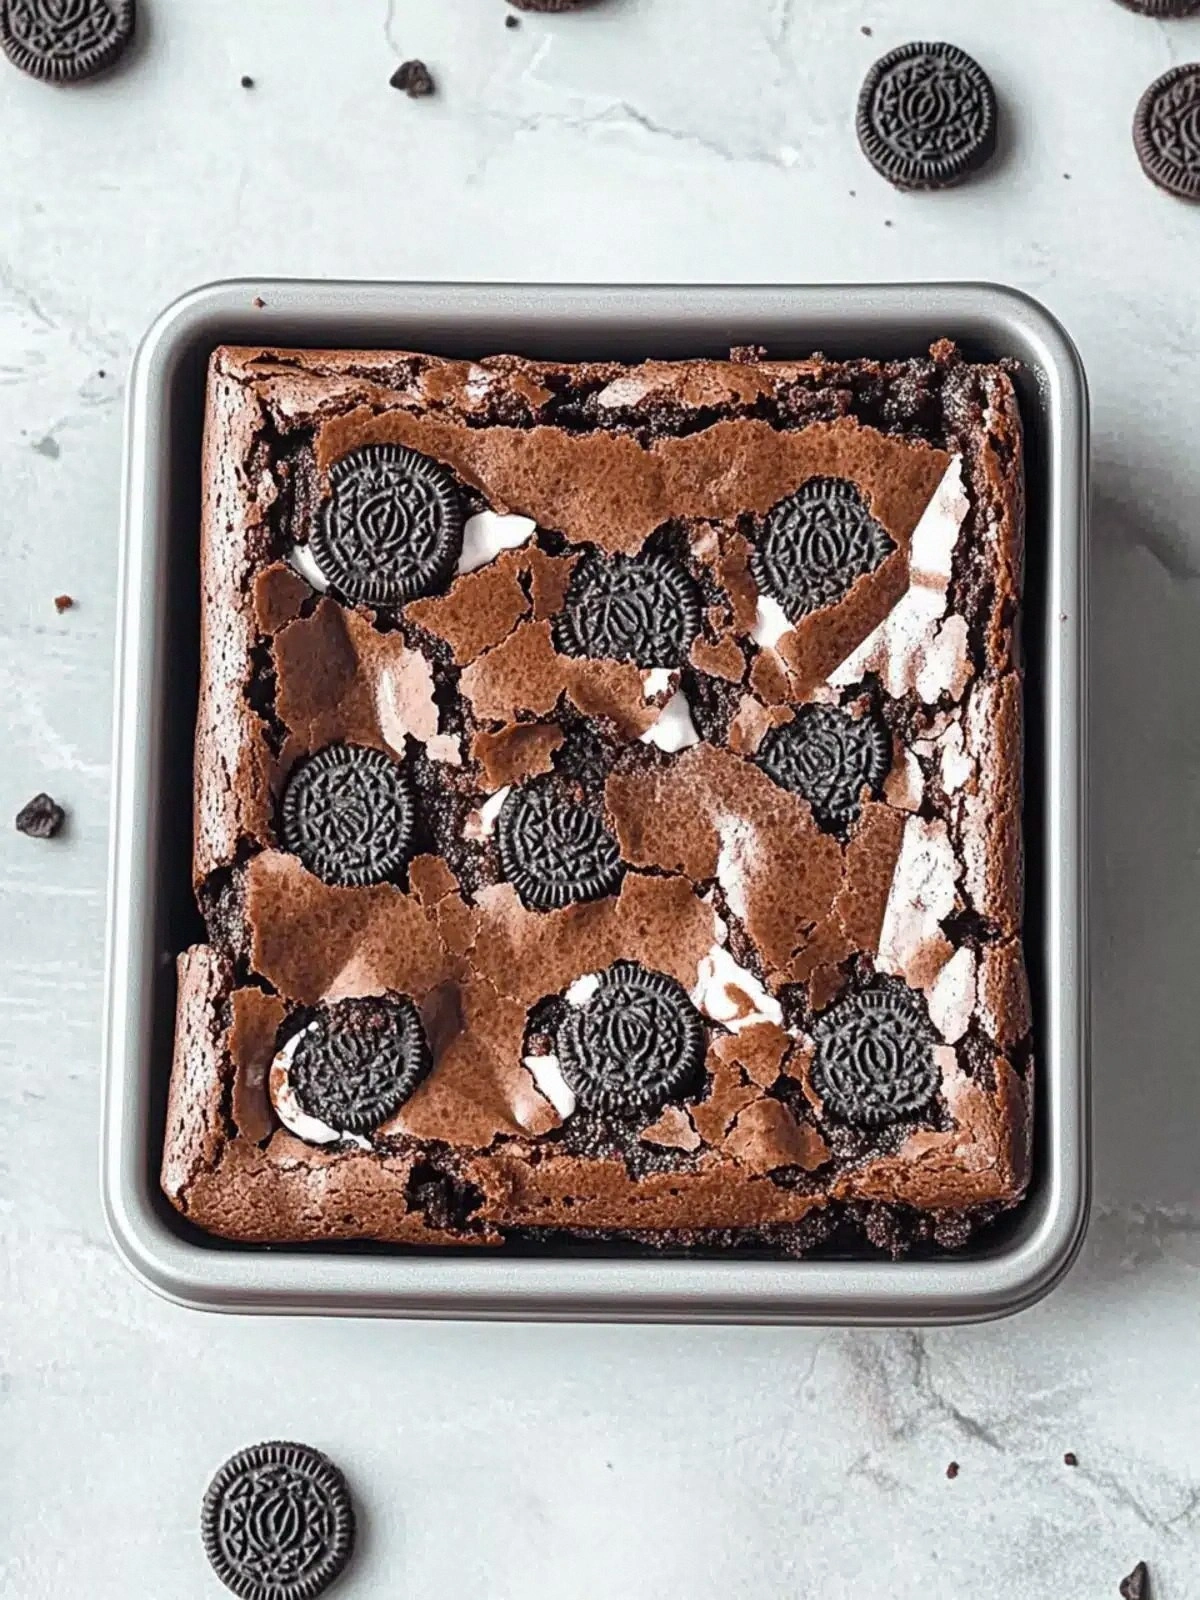
- Texture Contrast: The Oreos break up into crunchy shards that contrast perfectly with the fudgy interior, giving each bite a satisfying snap before the melt.
- Simplicity: Only 11 ingredients, no fancy equipment, and a single pan. I dare you to taste this and not go back for seconds.
- Time Efficiency: Prep takes 15 minutes, baking 30, so you’re ready to serve in just 45 minutes—perfect for a last‑minute dessert.
- Make‑Ahead Friendly: These brownies freeze well; just wrap them tightly and they’ll stay fresh for weeks.
- Crowd‑Pleaser: Whether you’re at a party or a quiet night in, guests will rave about the gooey center and the surprise Oreo crunch.
- Ingredient Quality: Using unsalted butter and high‑quality chocolate chips ensures a richer flavor that can’t be matched by store‑bought mixes.
- Visual Appeal: The glossy top and the visible Oreo fragments make for Instagram‑worthy photos that will have your followers begging for the recipe.
Alright, let’s break down exactly what goes into this masterpiece…
Inside the Ingredient List
The Flavor Base
Unsalted butter is the backbone of any brownie, providing richness and a silky mouthfeel. A cup of butter melts into a glossy batter that keeps the brownies moist. If you skip it, you’ll end up with a dry, crumbly texture that’s nothing short of disappointing. For a slightly lighter version, you can substitute half the butter with applesauce, but the flavor depth will be noticeably reduced.
The Texture Crew
Semi‑sweet chocolate chips give the batter a smooth chocolate core, while the white sugar creates a crisp exterior once baked. Brown sugar adds a caramel undertone and a hint of molasses, which balances the sweetness. The 1/2 cup of cocoa powder thickens the batter and intensifies the chocolate flavor. If you prefer a sweeter brownie, replace the brown sugar with an equal amount of honey, but be prepared for a slight change in moisture.
The Unexpected Star
Oreos aren’t just a garnish—they’re a structural element. They break into crunchy, salty shards that contrast with the fudgy center. The 15 cookies should be crushed into small pieces so they distribute evenly. If you’re allergic to dairy or prefer a vegan option, use a dairy‑free chocolate chip mix and a plant‑based butter substitute.
The Final Flourish
All‑purpose flour provides the structure, while the 1/2 teaspoon of salt sharpens the sweetness and brings out the chocolate notes. Eggs bind everything together and add a tender crumb. Vanilla extract gives a subtle warmth that complements the chocolate. A dash of espresso powder, though optional, deepens the chocolate flavor without adding a coffee taste. If you’re short on time, you can omit the espresso and still get a delicious result, but the depth will be slightly less.
Everything’s prepped? Good. Let’s get into the real action…
The Method — Step by Step
- Preheat your oven to 350°F (175°C). Line an 8‑inch square baking pan with parchment paper, leaving an overhang on two sides for easy lifting. This step ensures a perfectly even bake and makes cleanup a breeze. If you skip the parchment, you’ll end up with a sticky mess that’s hard to remove.
- In a medium saucepan, melt the butter over low heat until it’s liquid but not browned. Add the chocolate chips, stirring constantly until smooth. The key here is patience—rushing this step can cause the chocolate to seize. This creates the silky base that gives the brownies their fudgy texture.
- Remove the pan from heat and whisk in the white sugar, brown sugar, and cocoa powder until the mixture is glossy and the sugars are fully incorporated. The batter should look like a thick, chocolatey custard. A good trick is to let the mixture cool slightly before adding eggs; this prevents the eggs from scrambling.
- Beat in the eggs one at a time, ensuring each is fully blended before adding the next. The batter will thicken slightly after each addition. This step is crucial for a tender crumb and a cohesive structure.
- Stir in the vanilla extract and the optional espresso powder until evenly distributed. The espresso powder will deepen the chocolate flavor without adding a coffee taste. If you’re not a fan, simply omit it and proceed.
- Fold in the crushed Oreos gently, making sure they’re evenly dispersed. The shards should be visible throughout the batter, creating a delightful crunch in each bite. This is the moment of truth—watch how the batter’s color changes as the Oreos mix in.
- Pour the batter into the prepared pan, spreading it evenly with a spatula. Tap the pan gently on the counter to release any air bubbles and to level the surface. A flat top ensures a uniform bake.
- Bake for 30 minutes, or until the edges have pulled away slightly and a toothpick inserted in the center comes out with a few moist crumbs. The center should still be slightly gooey—overbaking will turn them into a cakey texture. Keep a close eye on the baking time; ovens vary.
- Remove from oven and let the brownies cool in the pan for 10 minutes before lifting them onto a wire rack. This allows the structure to set, preventing cracks. The aroma at this point is irresistible, and you’ll want to take a photo before you cut.
- Once cooled, use the parchment overhang to lift the entire slab out of the pan. Slice into squares using a sharp knife, wiping the blade between cuts for clean edges. Serve immediately or store in an airtight container for later enjoyment.
That's it—you did it. But hold on, I've got a few more tricks that'll take this to another level…
Insider Tricks for Flawless Results
The Temperature Rule Nobody Follows
Many people bake brownies at 375°F, but that can dry out the center. Lowering the temperature to 350°F and extending the bake time ensures a moist, fudgy interior. I’ve baked at 350°F for 30 minutes, and the result is a perfect balance of crisp edges and gooey core. If you’re using a convection oven, reduce the temperature by 25°F to avoid overbrowning.
Why Your Nose Knows Best
The first scent of chocolatey batter is the most telling indicator of success. When the butter and chocolate melt together, a rich, buttery aroma should fill the kitchen. If the smell is flat or overly sweet, you’re missing the depth that comes from using high‑quality chocolate chips and a splash of espresso. Trust your nose—if it’s singing, you’re on the right track.
The 5-Minute Rest That Changes Everything
After baking, let the brownies rest in the pan for exactly five minutes before lifting them out. This short rest allows the structure to set, reducing cracks and making slicing easier. Skipping this step often results in brownies that crumble when you try to cut them. I’ve found that a 5‑minute rest gives a cleaner slice every time.
The Crunchy Surprise
If you want an extra crunch, sprinkle a few crushed Oreo crumbs on top before baking. They’ll toast slightly, creating a caramelized crunch that contrasts beautifully with the fudgy center. This is a great way to add a finishing touch without changing the core recipe.
The Perfect Frosting (Optional)
A quick chocolate ganache can elevate these brownies to dessert‑level sophistication. Melt equal parts chocolate and heavy cream, stir until glossy, and pour over the cooled brownies. The ganache adds a silky finish and a glossy sheen that’s perfect for special occasions.
Creative Twists and Variations
This recipe is a playground. Here are some of my favorite ways to switch things up:
Coconut Crunch Edition
Swap the Oreo shards for toasted coconut flakes. The coconut adds a tropical flavor and a pleasant chew. Pair it with a drizzle of toasted coconut milk for an extra burst of flavor that will delight coconut lovers.
Nutty Delight
Add 1/2 cup of chopped walnuts or pecans to the batter. The nuts add a crunchy texture and a nutty aroma that complements the chocolate. Sprinkle a pinch of sea salt on top before baking for a sweet‑savory balance.
Minty Fresh Variation
Stir in a tablespoon of peppermint extract instead of vanilla. The mint gives a refreshing contrast to the chocolate, creating a mint‑chocolate brownie that’s perfect for summer parties.
Spicy Kick
Add 1/4 teaspoon of cayenne pepper to the batter. The heat pairs wonderfully with chocolate, offering a surprising twist that will keep guests intrigued. Serve with a scoop of vanilla ice cream to balance the spice.
Vegan Version
Replace butter with melted coconut oil, use plant‑based chocolate chips, and substitute the eggs with 1 mashed ripe banana or flaxseed eggs. The result is a moist, chocolatey brownie that’s completely dairy‑free.
Coffee‑Infused Twist
Add 2 tablespoons of instant espresso powder to the batter. The coffee enhances the chocolate flavor without giving a distinct coffee taste, creating a rich, complex dessert that coffee lovers will adore.
Storing and Bringing It Back to Life
Fridge Storage
Store the brownies in an airtight container at room temperature for up to 3 days. If you need them to stay fresher longer, keep them in the refrigerator; they’ll last up to a week. Just make sure to let them come to room temperature before serving to maintain the fudgy texture.
Freezer Friendly
Wrap each brownie individually in plastic wrap and place them in a freezer bag. They’ll stay fresh for up to 3 months. When you’re ready to enjoy, thaw them at room temperature for 30 minutes or microwave on low power for 10–15 seconds.
Best Reheating Method
To revive frozen or refrigerated brownies, preheat your oven to 300°F (150°C). Place the brownies on a baking sheet and heat for 8–10 minutes. Add a tiny splash of water before reheating; it steams the brownies back to perfection, keeping them moist and delicious.