Love this? Pin it for later! 📌
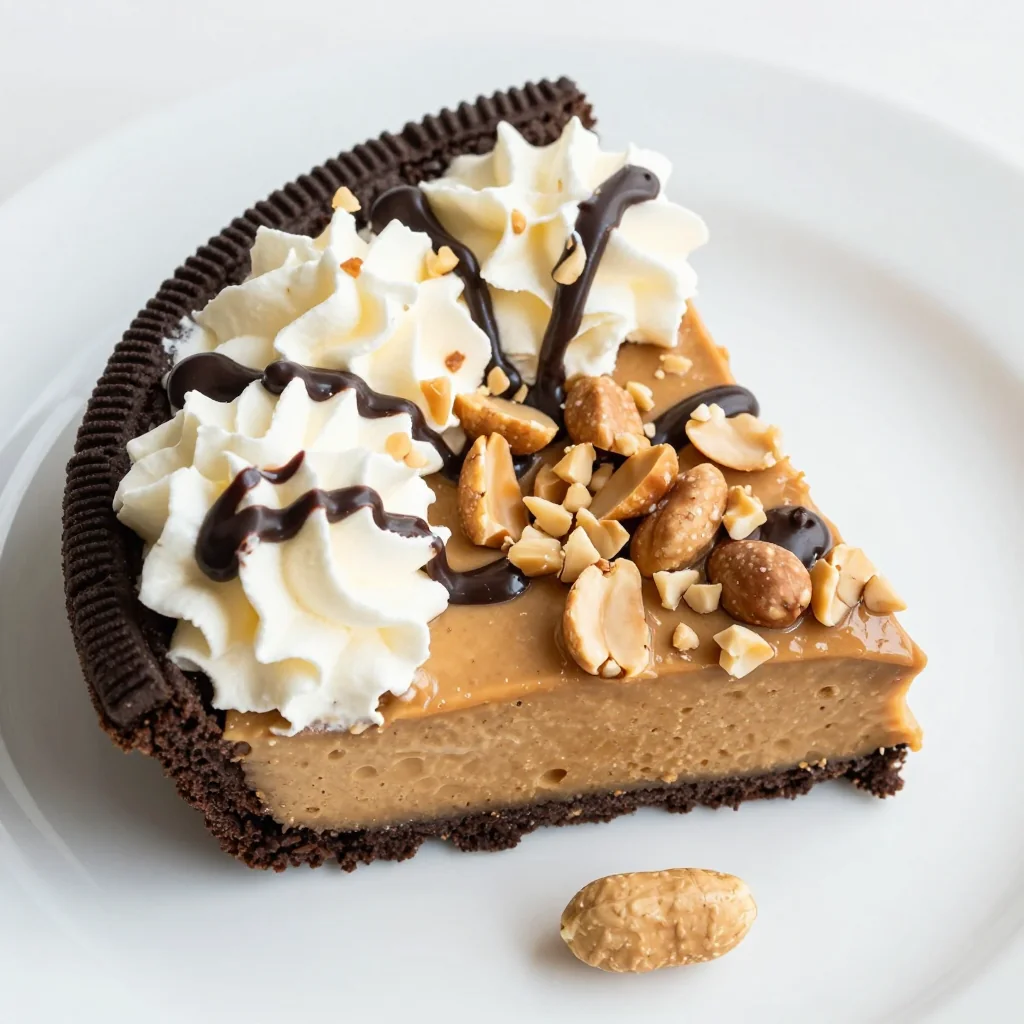
The ultimate crowd-pleasing dessert that disappears in minutes
Why This Recipe Works
- No-Bake Convenience: Perfect for summer parties when you don't want to turn on the oven
- Make-Ahead Friendly: Actually tastes better after chilling overnight, making party prep stress-free
- Feed a Crowd: One 9x13 pan yields 24 generous bars, perfect for potlucks and gatherings
- Irresistible Flavor Combo: The salty-sweet marriage of chocolate and peanut butter is universally loved
- Beginner-Friendly: No complicated techniques - if you can stir, you can make these bars
- Customizable Base: Easy to adapt with different mix-ins and toppings for variety
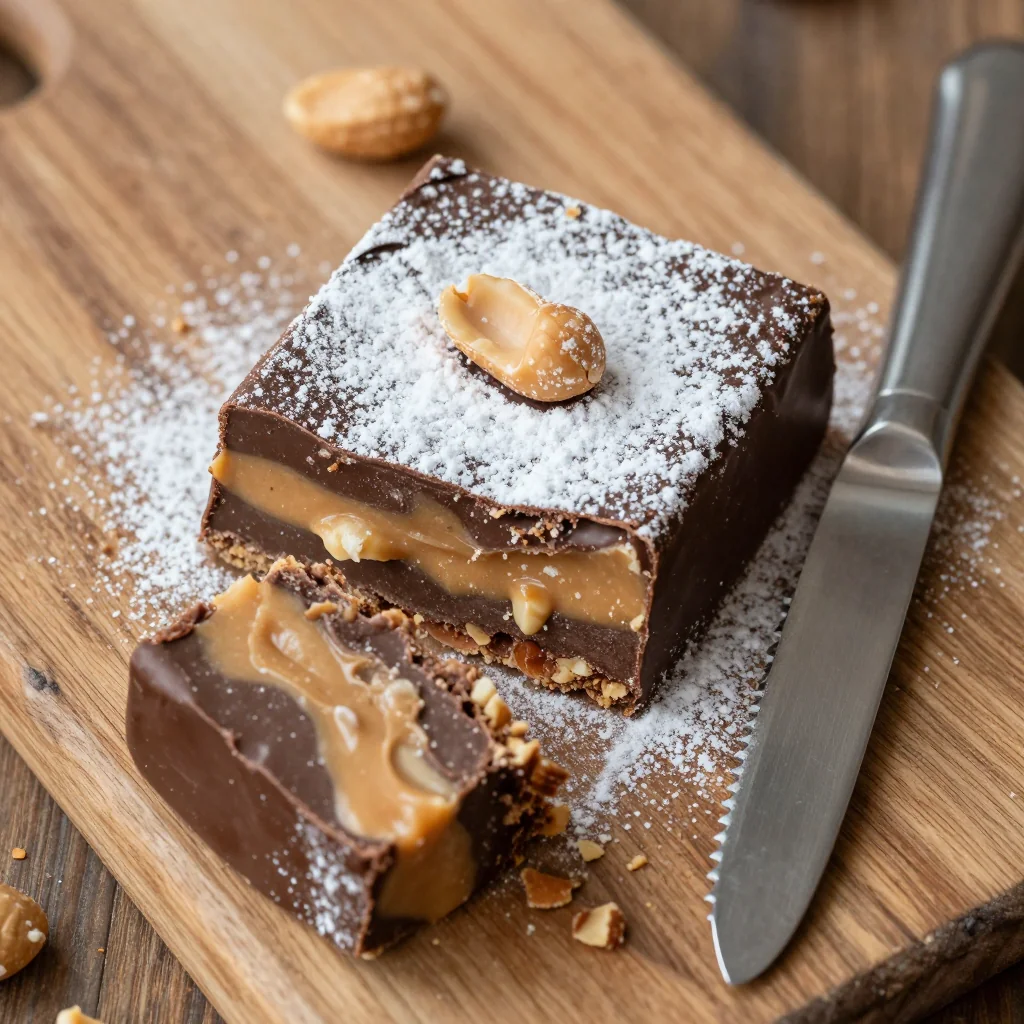
Let me tell you about the dessert that single-handedly made me the most popular guest at every potluck for the past five years. These chocolate peanut butter bars started as a desperate attempt to bring something – anything – to my neighbor's barbecue when I was fresh out of college and living on a tight budget. I had graham crackers, butter, peanut butter, and chocolate chips. That's it. What emerged from my refrigerator that humid July afternoon was nothing short of magic.
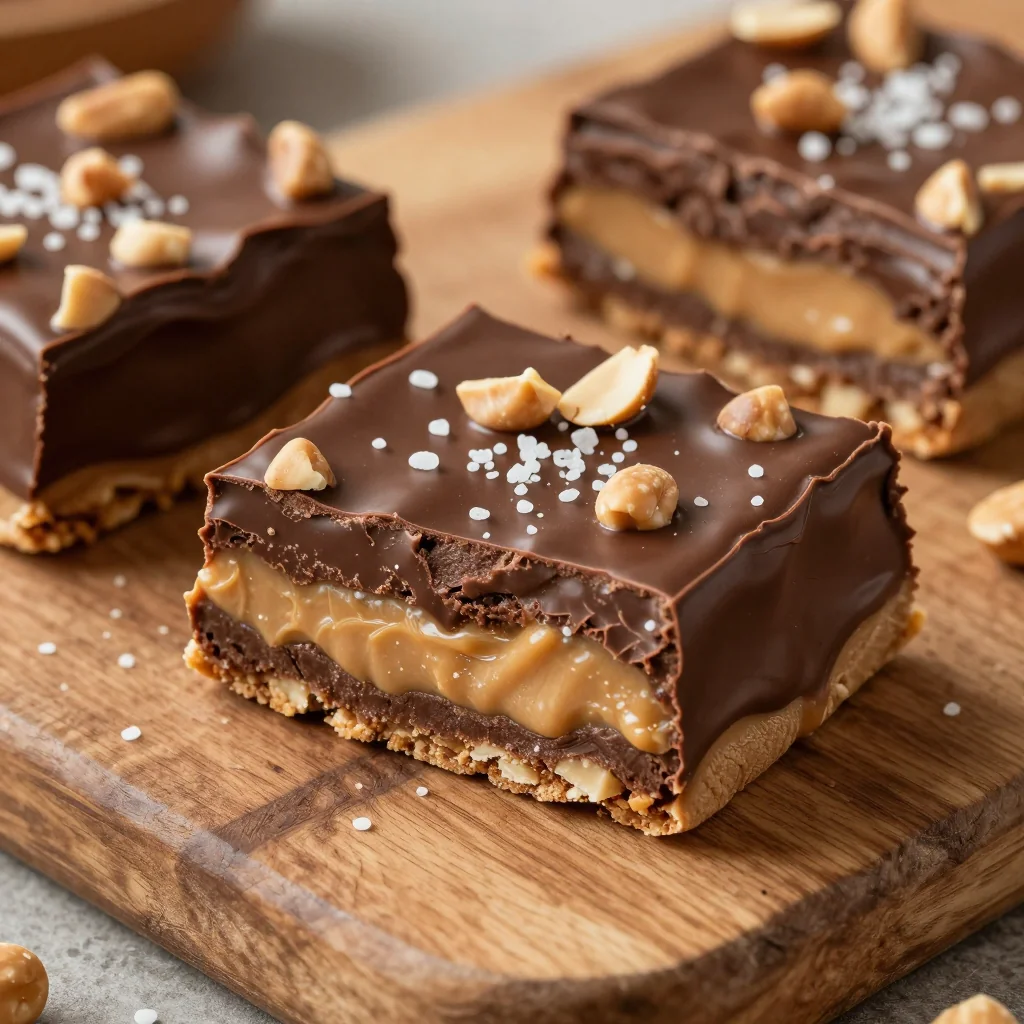
Since then, I've refined the recipe, tested countless variations, and watched these bars disappear from dessert tables faster than anything else. They're the dessert people sneak back for "just one more sliver" until the whole pan is mysteriously gone. The secret? It's all about the layers – a buttery, crunchy base that holds everything together, a peanut butter filling that's somehow both rich and airy, and a glossy chocolate topping that cracks satisfyingly under your fork.
What I love most about these bars is their universal appeal. Kids go crazy for them, adults reminisce about similar treats from childhood, and even the most dessert-averse person will usually accept a small piece "just to be polite" (spoiler: they'll be back for more). They're my go-to for everything from birthday parties to office celebrations, and I've probably made them over 100 times at this point.
Ingredients You'll Need
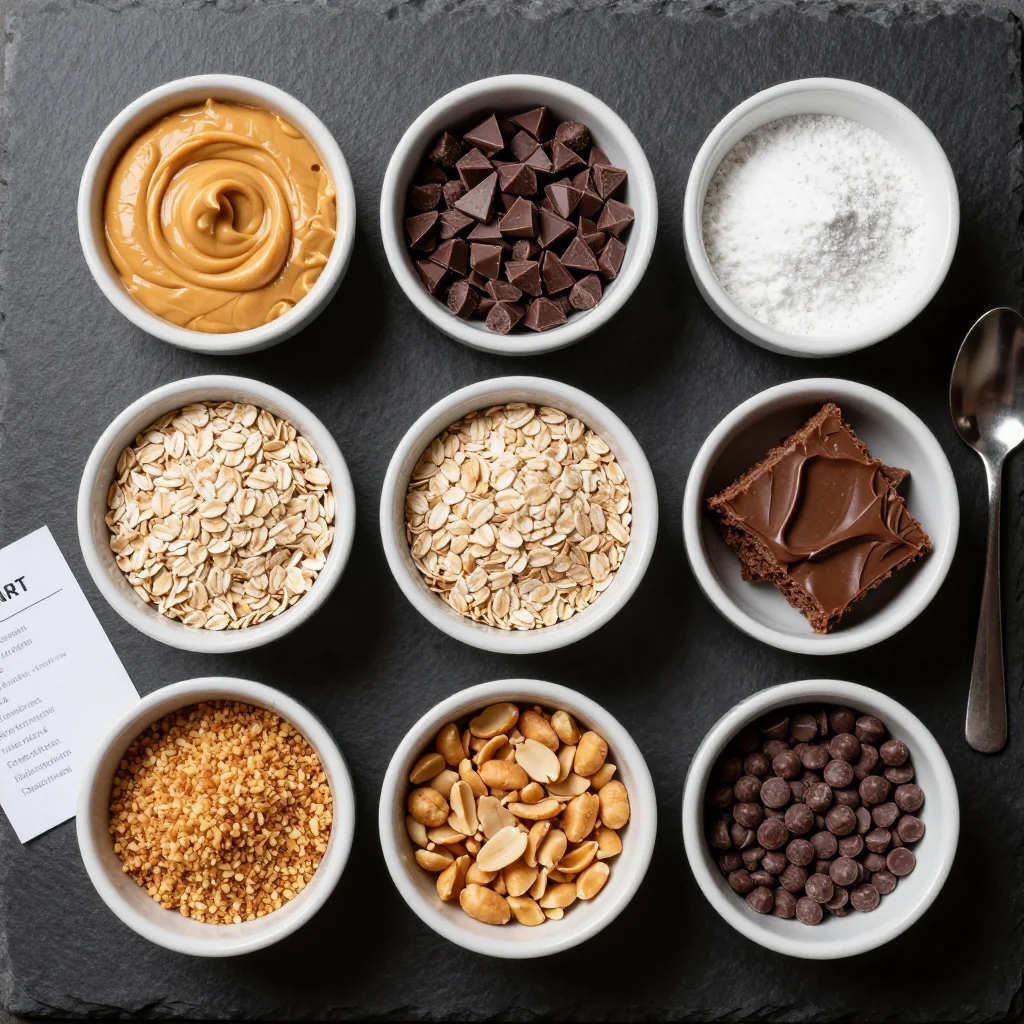
Before we dive into the magic, let's talk about what makes each ingredient special and how to choose the best quality components for maximum flavor impact.
Graham Cracker Crumbs: The foundation of our crust needs to be sturdy yet tender. I prefer using whole graham crackers and pulsing them myself – the texture is far superior to pre-made crumbs. Look for honey graham crackers for subtle sweetness, but the regular variety works beautifully too. You'll need about 12 full crackers to make 1½ cups of crumbs.
Unsalted Butter: Always use unsalted butter in baking so you can control the salt level. European-style butters with higher fat content (like Kerrygold or Plugra) create an exceptionally rich, tender crust. Make sure it's properly softened – room temperature butter should yield slightly to pressure but not be greasy or melted.
Creamy Peanut Butter: Here's where personal preference really matters. I use classic Jif or Skippy for that nostalgic flavor profile that takes people back to childhood. Natural peanut butters work, but they need to be stirred very well and the bars will be slightly less sweet. Avoid chunky varieties for this recipe – we want that silky smooth texture.
Powdered Sugar: Also known as confectioners' sugar, this dissolves instantly into our peanut butter layer, creating that melt-in-your-mouth texture. Sift it if it's lumpy, and store any leftover in an airtight container with a slice of bread to prevent clumping.
Semi-Sweet Chocolate Chips: Ghirardelli or Guittard are my go-to brands for consistent melting and rich flavor. The 60% cacao semi-sweet chips strike the perfect balance – dark enough to complement the sweet peanut butter but not so bitter that kids won't enjoy them.
Heavy Cream: The secret to our glossy chocolate topping. Look for cream with at least 36% milk fat content for the silkiest texture. Ultra-pasteurized works fine, but if you can find regular pasteurized cream, the flavor is more pure.
Vanilla Extract: Pure vanilla extract makes a noticeable difference here. I use Madagascar bourbon vanilla for its complex, creamy flavor that enhances both the chocolate and peanut butter notes.
Salt: Don't skip this! A pinch of salt in each layer balances the sweetness and makes the chocolate taste more chocolatey and the peanut butter more peanut-buttery. I use fine sea salt for its clean flavor.
How to Make Indulgent Chocolate Peanut Butter Bars for Party Desserts
Prepare Your Pan and Make the Crust
Line a 9x13-inch baking pan with parchment paper, leaving an overhang on the sides to act as handles for easy removal later. In a medium bowl, combine 1½ cups graham cracker crumbs, ⅓ cup granulated sugar, and 6 tablespoons melted butter. The mixture should resemble wet sand and hold together when squeezed. Press firmly and evenly into the bottom of your prepared pan – I use the bottom of a measuring cup to really pack it down. Place in the freezer while you make the filling.
Whip Up the Peanut Butter Filling
In a large bowl, beat 1 cup creamy peanut butter, ½ cup softened butter, and 1 teaspoon vanilla extract until light and fluffy – about 2 minutes with an electric mixer on medium speed. Gradually add 2 cups powdered sugar, beating until smooth and creamy. The mixture will be thick but spreadable. If it seems too stiff, add 1-2 tablespoons of milk or cream. Spread this luscious filling evenly over your chilled crust, getting right into the corners. Refrigerate while you prepare the chocolate topping.
Create the Silky Chocolate Ganache
Place 1½ cups semi-sweet chocolate chips in a heatproof bowl. In a small saucepan, heat ¾ cup heavy cream until it just begins to simmer – you'll see tiny bubbles forming around the edges. Pour the hot cream over the chocolate chips and let stand for 2 minutes without stirring. This allows the chocolate to melt evenly. Now, whisk gently from the center outward, creating smooth, glossy ganache. Add 1 tablespoon butter and a pinch of salt, whisking until incorporated.
Assemble and Chill
Pour the warm ganache over the peanut butter layer, tilting the pan to ensure even coverage. Use an offset spatula or the back of a spoon to spread it into the corners and create a smooth surface. For an extra professional finish, hold the pan 6 inches above your counter and drop it straight down a few times – this releases any air bubbles and creates a perfectly level surface. Refrigerate for at least 2 hours, or until completely set.
Slice and Serve Like a Pro
Remove from the refrigerator and lift the bars out using the parchment paper handles. Place on a cutting board. For clean cuts, heat a large sharp knife under hot water, wipe dry, and cut in one smooth motion. Wipe the knife clean between cuts. I like to cut into 24 squares for parties, but you can make them smaller for a larger crowd. Let sit at room temperature for 10-15 minutes before serving – this allows the chocolate to soften slightly and the peanut butter layer to achieve that perfect creamy texture.
Expert Tips
Temperature Matters
Always start with room temperature ingredients for the smoothest texture. Cold peanut butter won't blend properly, and cold butter won't whip up fluffy. Set everything out 30 minutes before you begin.
Don't Overmix
When making the peanut butter filling, beat just until combined and creamy. Overmixing can incorporate too much air, causing the filling to become porous and separate from the chocolate layer.
Parchment is Non-Negotiable
Those parchment paper handles are your best friend. Without them, you'll be chiseling bars out of the pan. Leave at least 2 inches overhanging on each side for easy lifting.
Quality Chocolate Makes a Difference
This is not the place for bargain chocolate chips. A good quality chocolate will melt smoothly, set with a beautiful snap, and taste complex rather than just sweet.
Patience with Chilling
Don't rush the chilling process. If the ganache isn't completely set, it will smear when you cut the bars. For the cleanest cuts, chill overnight if possible.
Warm Knife Technique
For picture-perfect slices, dip your knife in hot water and wipe dry between each cut. The warm blade melts through the chocolate cleanly without cracking.
Variations to Try
Crunchy Peanut Butter Version
Substitute half the creamy peanut butter with crunchy for added texture. You can also fold in ½ cup chopped roasted peanuts into the filling for extra crunch.
Dark Chocolate Indulgence
Replace semi-sweet chips with 70% dark chocolate and reduce the powdered sugar in the filling by ¼ cup for a more sophisticated, less sweet version.
Salted Caramel Twist
Drizzle ¼ cup store-bought or homemade caramel over the peanut butter layer before adding chocolate. Sprinkle with flaky sea salt for a sweet-salty masterpiece.
Gluten-Free Adaptation
Simply substitute gluten-free graham crackers or crushed gluten-free Oreos for the crust. Everything else is naturally gluten-free!
Storage Tips
These bars are incredibly storage-friendly, making them perfect for advance party prep. In the refrigerator, they'll keep beautifully for up to 1 week when stored in an airtight container. Layer them between sheets of parchment paper if you need to stack them, though they taste best when stored in a single layer.
For longer storage, freeze individual bars by placing them on a parchment-lined baking sheet until solid, then transfer to a freezer-safe container with parchment between layers. They'll keep for up to 3 months frozen. Thaw overnight in the refrigerator or at room temperature for 30-45 minutes.
Pro tip: If you're making these for a party, slice them while cold but let them sit at room temperature for 15-20 minutes before serving. This allows the peanut butter layer to soften to that perfect creamy consistency that made these bars famous in the first place.
Never store these at room temperature for more than 2 hours, especially in warm weather, as the chocolate will begin to soften and the bars will lose their clean, layered appearance.
Frequently Asked Questions
You can, but with caveats. Natural peanut butter needs to be extremely well-stirred and at room temperature. The oil separation can cause the filling to be less stable. If using natural, choose a "no-stir" variety or stir very thoroughly. The bars will be slightly less sweet and have a more pronounced peanut flavor, which many adults prefer.
The chocolate was too cold when you cut it. Always let the bars sit at room temperature for 15-20 minutes before slicing, and use a warm knife technique. Dip your knife in hot water, wipe dry, and cut in one smooth motion. The warmth slightly melts the chocolate, preventing cracks.
Absolutely! For an 8x8 pan, keep all ingredients the same but expect thicker bars that need an extra 30 minutes chilling time. For a 10x15 jelly roll pan, increase all ingredients by 50% for thinner bars perfect for larger crowds. The 9x13 size gives the ideal ratio of layers.
Transport them whole and cut at the destination if possible. If you must pre-cut, layer them in a container with parchment paper between layers and keep chilled with ice packs. A cooler bag works perfectly. Bring a serving spatula and extra parchment for easy serving.
Yes! A thin layer of raspberry or strawberry jam between the peanut butter and chocolate creates a PB&J vibe that's incredibly popular. Use about ⅓ cup jam, warmed slightly to make it spreadable, and spread it thinly over the peanut butter layer before adding chocolate. Just be sure it's not too thick or the layers won't adhere properly.
Cut into squares and place in a decorative tin or box with parchment paper between layers. Include a small card with storage instructions. They're beautiful tied with ribbon in a clear cellophane bag. For holiday gifts, add festive sprinkles to the chocolate layer before it sets.
Indulgent Chocolate Peanut Butter Bars for Party Desserts
Ingredients
Instructions
- Prepare the pan: Line a 9x13-inch baking pan with parchment paper, leaving overhang on the sides.
- Make the crust: Mix graham cracker crumbs, sugar, and melted butter. Press firmly into the bottom of the prepared pan. Freeze while making filling.
- Create the filling: Beat peanut butter, butter, and vanilla until fluffy. Gradually add powdered sugar until smooth and creamy. Spread over crust.
- Make the ganache: Place chocolate chips in a bowl. Heat cream until simmering, pour over chocolate, let stand 2 minutes, then whisk until smooth.
- Assemble: Pour ganache over peanut butter layer, spread evenly. Refrigerate at least 2 hours until set.
- Slice and serve: Lift out using parchment, cut into 24 squares with a warm knife. Let stand 15 minutes before serving.
Recipe Notes
For cleanest cuts, use a knife dipped in hot water and wiped dry between cuts. Bars can be made 3 days ahead and stored refrigerated. Let stand at room temperature 15 minutes before serving for best texture.