I was standing in my kitchen, mid‑midnight, with a half‑finished batch of store‑bought mochi that tasted like cardboard and regret. The timer buzzed, the oven door slammed shut, and I thought, “If I’m going to suffer through this, I might as well turn it into something unforgettable.” That moment of culinary desperation birthed the most decadent, buttery, coconut‑infused mochi you’ll ever lay eyes on. I dared myself to create a version that would make even the most skeptical dessert snob say, “Okay, this is the best thing I’ve ever eaten on a Tuesday.” The result? A chewy, buttery marvel that sings with tropical vibes and a hint of island magic.
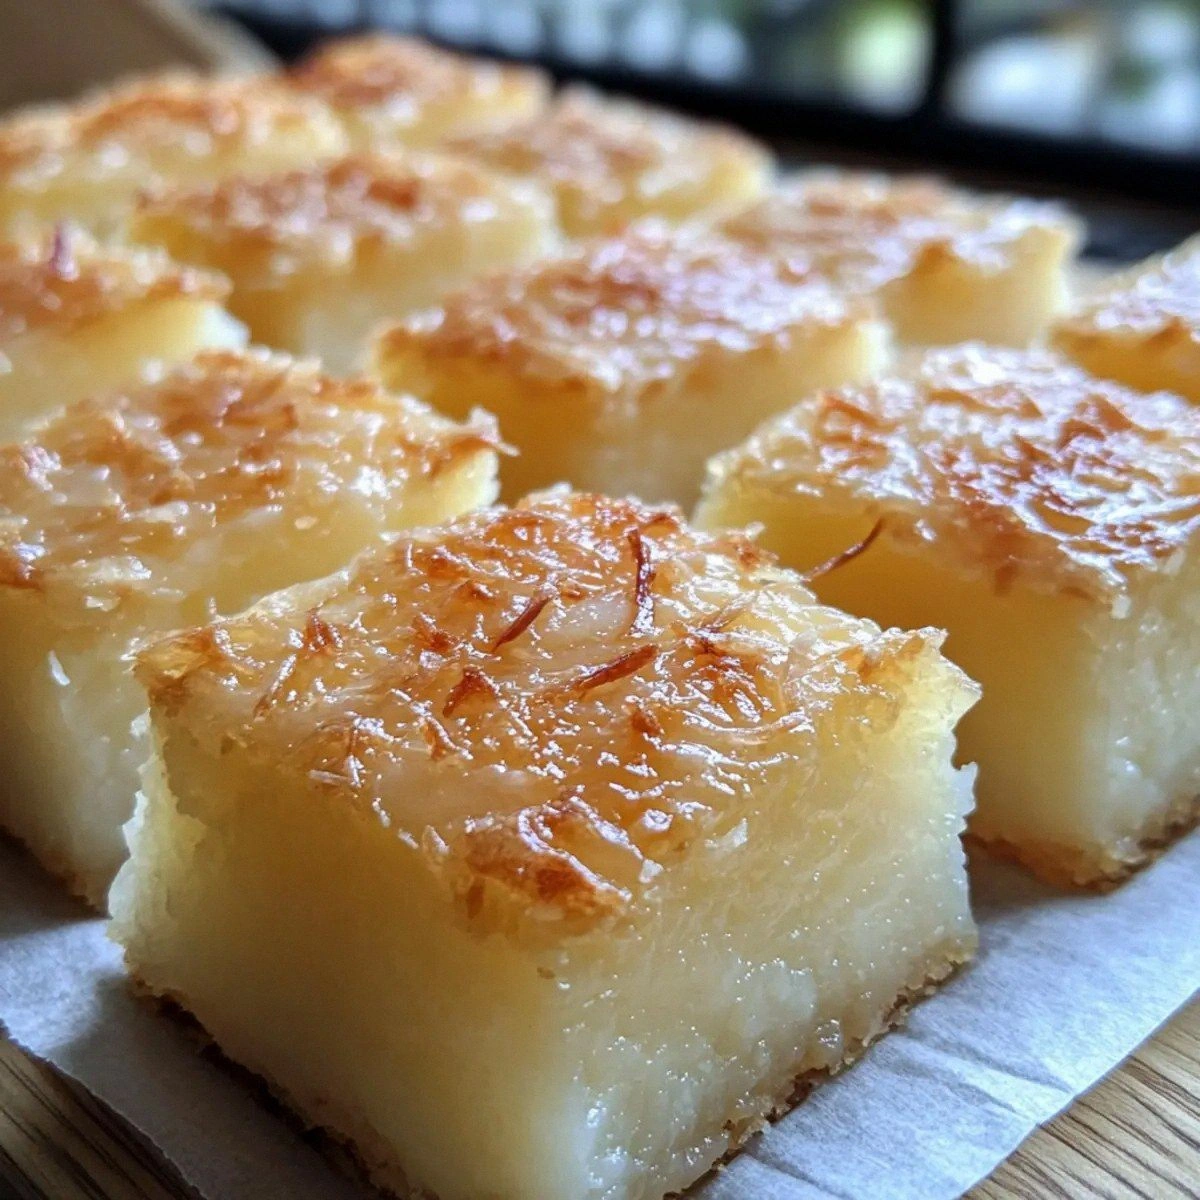
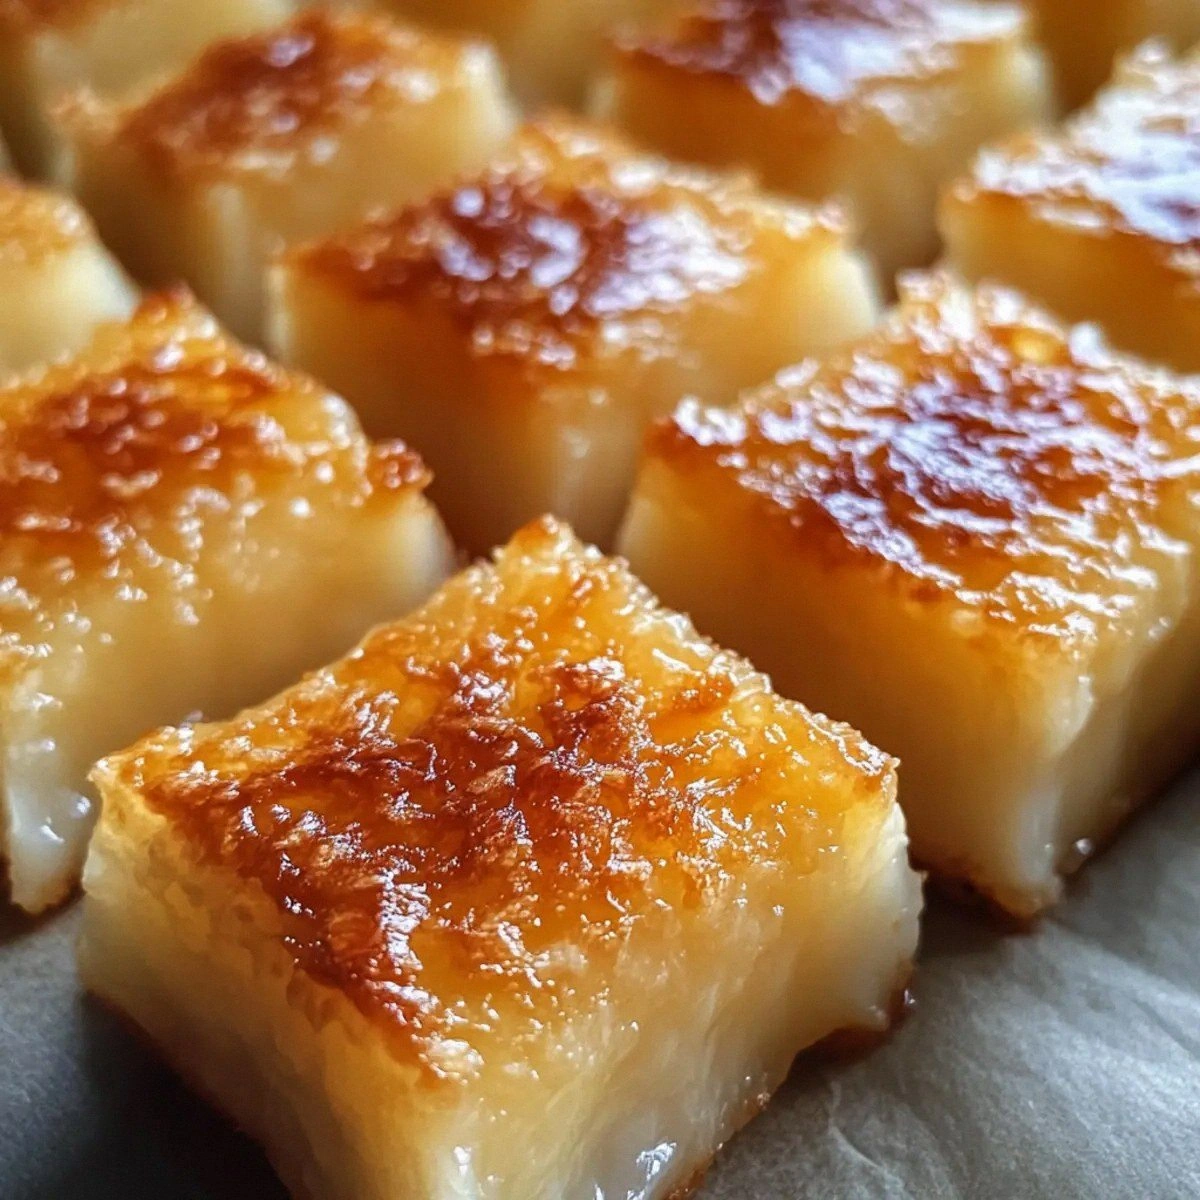
Picture this: a golden‑brown slab sliding out of the oven, the kitchen awash with the warm aroma of toasted coconut and melted butter, a faint whisper of vanilla dancing in the air. The surface gleams like a sun‑kissed lagoon, and when you cut into it, the interior reveals a soft, almost melt‑in‑your‑mouth texture that stretches just enough to give that satisfying pull. The first bite is a symphony—sweet rice flour’s subtle nuttiness, the creamy richness of butter, and the tropical kiss of coconut milk, all wrapped up in a delicate crumb that’s both chewy and tender. It’s the kind of dessert that makes you close your eyes and imagine you’re on a Hawaiian beach, waves crashing, palm trees swaying, and a ukulele playing somewhere in the distance.
Most recipes out there either over‑sweeten the mochi, miss the buttery depth, or forget the coconut’s star power entirely. This version flips the script by marrying the classic sweet rice flour base with a generous splash of coconut milk and a pat of salted butter that caramelizes just enough to give a buttery crunch on the edges. And because I love a little surprise, I’ve slipped in a whisper of ube and matcha—two vibrant pigments that turn each slice into a piece of edible art while adding a subtle earthy undertone. Trust me, this isn’t just a dessert; it’s a conversation starter, a party trick, a reason to brag at your next gathering.
Let me walk you through every single step — by the end, you’ll wonder how you ever made it any other way. Okay, ready for the game‑changer? This next part? Pure magic. I dare you to taste this and not go back for seconds.
What Makes This Version Stand Out
- Chewy Texture: The sweet rice flour creates that signature mochi chew, while the butter adds a glossy, tender finish that’s impossible to replicate with oil alone.
- Coconut Aroma: Coconut milk infuses the batter from the inside out, giving a fragrant, tropical perfume that fills the kitchen the moment it hits the pan.
- Butter Burst: Salted butter caramelizes on the edges, delivering a crisp, buttery snap that contrasts beautifully with the soft interior.
- Simple Technique: No fancy equipment—just a whisk, a mixing bowl, and a trusty oven. If you can boil water, you can master this.
- Eye‑Catching Colors: The ube and matcha swirls turn each piece into a visual masterpiece, perfect for Instagram feeds or impressing guests.
- Make‑Ahead Friendly: This mochi keeps its chew for days, and you can freeze portions without losing texture.
- Universal Appeal: Sweet, buttery, slightly salty, and lightly coconut‑tinged—every palate finds something to love.
- Ingredient Quality: Using real coconut milk and high‑quality butter makes the flavor pop; no artificial shortcuts here.
Inside the Ingredient List
The Flavor Base
Sweet rice flour is the heart of any mochi, providing that unmistakable elasticity. It’s milled from glutinous rice, which means it absorbs liquid differently than regular flour, creating a dough that stretches without tearing. Skipping it would turn this dish into a dry cake rather than a chewy delight. If you can’t find sweet rice flour, try a 1:1 substitution with mochiko flour, but expect a slightly firmer bite.
The Richness Crew
Salted butter is the secret weapon that elevates this mochi from good to legendary. The salt balances the sweetness while the butter’s milk solids brown in the oven, forming that coveted caramelized edge. Using unsalted butter will still work, but add an extra pinch of sea salt to keep the flavor equilibrium. For a dairy‑free twist, try coconut oil, but know you’ll lose some of that buttery depth.
The Unexpected Star
Ube extract and matcha powder aren’t just for color; they bring subtle earthy notes that cut through the richness. Ube adds a sweet, nutty undertone reminiscent of vanilla, while matcha contributes a gentle grassy bitterness that brightens the palate. If you’re allergic to either, swap ube for a dash of raspberry puree and matcha for cocoa powder for a chocolate‑coconut combo.
The Final Flourish
Granulated sugar and baking powder work together to give the mochi a delicate lift without compromising its dense chew. The sugar caramelizes slightly, enhancing the buttery crust, while the baking powder adds a whisper of airiness, preventing a gummy texture. If you prefer less sweetness, reduce the sugar by a quarter; the mochi will still hold together thanks to the butter and coconut milk.
Everything’s prepped? Good. Let’s get into the real action…
The Method — Step by Step
Preheat your oven to 350°F (175°C) and line a 9×13 inch baking pan with parchment paper. The parchment not only prevents sticking but also makes it easier to lift the whole slab later. While the oven warms, give yourself a mental high‑five—this is the first win.
In a medium saucepan, melt the salted butter over low heat until it’s a shimmering pool. Add the shredded coconut and toast it gently for 2‑3 minutes, stirring constantly. You’ll hear a faint sizzle; that’s the coconut releasing its natural oils, a sound that says “we’re on the right track.”
In a large mixing bowl, whisk together the sweet rice flour, baking powder, and a pinch of sea salt. The dry mixture should look like fine sand. Kitchen Hack: Sift the flour and baking powder together; it prevents clumps and ensures an even rise.
In a separate bowl, beat the three large eggs until they’re light and frothy, about 1‑2 minutes. Add the granulated sugar, vanilla extract, ube extract, and matcha powder, whisking until the mixture is uniformly colored. The swirl of purple and green should look like a tropical sunrise.
Now comes the crucial combine. Pour the melted butter‑coconut mixture into the egg‑sugar blend, then slowly whisk in the coconut milk. Watch Out: If the batter is too hot, it can scramble the eggs. Let the melted butter cool for a minute before adding, and you’ll avoid that disaster.
Gradually fold the dry flour mixture into the wet batter, stirring with a silicone spatula. The batter will be thick, almost like a soft dough, and that’s exactly what you want. If it looks too stiff, drizzle in an extra tablespoon of coconut milk; if too runny, sprinkle a bit more flour.
Transfer the batter to the prepared pan, smoothing the top with an offset spatula. The surface should be level, but a few gentle peaks are okay—they’ll become the caramelized ridges we love. Kitchen Hack: Tap the pan on the counter three times to release any trapped air bubbles.
Bake for 25‑30 minutes, or until the edges turn a deep golden brown and the center springs back lightly when pressed. Around the 20‑minute mark, rotate the pan 180 degrees for an even bake. You’ll know it’s done when a faint nutty aroma fills the kitchen, and the top looks slightly cracked.
Remove the pan from the oven and let the mochi rest for 10 minutes. This resting period allows the interior to set, giving you that perfect chew. While you wait, wipe down your counters—this is the moment to admire your work.
Finally, lift the parchment paper and transfer the slab onto a cutting board. Slice into 2‑inch squares using a sharp, warm knife (dip the blade in hot water for a clean cut). Serve warm or at room temperature; the flavor is spectacular either way. And now the fun part—watch your guests devour them.
That’s it — you did it. But hold on, I’ve got a few more tricks that'll take this to another level…
Insider Tricks for Flawless Results
The Temperature Rule Nobody Follows
Never bake mochi at a temperature higher than 350°F. Higher heat creates a crust too quickly, leaving the interior gummy. I once cranked the oven to 400°F hoping for a faster bake; the result was a hard, rubbery slab that tasted like overcooked rubber bands. Keep it steady, and you’ll get that perfect golden edge with a tender center.
Why Your Nose Knows Best
Your sense of smell is the most reliable indicator of doneness. Around the 20‑minute mark, you’ll notice a sweet‑coconut caramel scent wafting from the oven. If that aroma isn’t there yet, give it another 5 minutes. Trust the nose more than the timer; ovens vary.
The 5‑Minute Rest That Changes Everything
Allowing the mochi to rest for at least five minutes after baking lets the starches fully hydrate, creating that iconic chew. Skipping this step yields a crumbly texture that falls apart when you try to cut it. I’ve seen newcomers rush to the cutting board and end up with a sad, dry mess. Patience is a virtue, especially in dessert land.
The Butter‑Coconut Emulsion Trick
When melting butter with coconut, whisk them together until a smooth emulsion forms. This ensures the butter distributes evenly, preventing pockets of oil that could make the mochi greasy. If you see any separation, lower the heat and keep whisking—this tiny step makes a massive difference in mouthfeel.
The Slice‑Warm Knife Method
A warm knife slices through mochi like a hot knife through butter. Dip the blade in hot water, wipe dry, and cut. This prevents the edges from sticking and keeps each piece looking pristine. I’ve watched novices struggle with ragged cuts; a warm blade solves that instantly.
Creative Twists and Variations
This recipe is a playground. Here are some of my favorite ways to switch things up:
Mango‑Marble Madness
Swap the ube extract for mango puree and add a swirl of fresh mango chunks before baking. The result is a sun‑kissed orange hue with a juicy burst that pairs perfectly with the coconut base. Ideal for summer picnics.
Chocolate‑Coconut Fusion
Replace the matcha powder with cocoa powder and drizzle melted dark chocolate over the finished squares. The bittersweet chocolate contrasts the sweet coconut, creating a sophisticated flavor that’s perfect for date night.
Spiced Rum Rum‑Runner
Add a tablespoon of dark rum and a pinch of ground cinnamon to the batter. The rum deepens the buttery flavor, while the cinnamon adds a warm spice note—great for holiday gatherings.
Nutty Crunch Delight
Fold in toasted macadamia nuts or chopped almonds into the batter for added texture. The nuts give a pleasant crunch that balances the chew, and their buttery flavor complements the coconut beautifully.
Vegan Coconut Dream
Replace the butter with coconut oil and use a flax‑egg mixture (1 tbsp flaxseed + 3 tbsp water) for the eggs. The flavor stays coconut‑forward, and the texture remains delightfully chewy—perfect for plant‑based guests.
Storing and Bringing It Back to Life
Fridge Storage
Place the cooled mochi in an airtight container with a damp paper towel on top to maintain moisture. It will stay fresh for up to 5 days, and the chew will actually improve as the starches continue to hydrate.
Freezer Friendly
Wrap individual squares in parchment, then seal them in a zip‑top bag. Freeze for up to 2 months. When you’re ready to enjoy, let them thaw in the fridge overnight and then warm them briefly in a 300°F oven for 5 minutes.
Best Reheating Method
Add a tiny splash of water (about a teaspoon per square) before microwaving for 15‑20 seconds. The steam revives the chewy interior, while the buttered top remains soft. If you prefer oven reheating, a quick 3‑minute blast at 350°F does the trick.