I was standing in my kitchen, mid‑Monday, staring at a half‑baked loaf that looked more like a sad pancake than anything edible. The timer had gone off, the kitchen was filled with a faint, almost apologetic whiff of burnt crust, and I swear my cat gave me the side‑eye of a culinary judge. I had dared my roommate to bake a gluten‑free loaf that wouldn’t crumble like dry sand, and she laughed, handing me a bag of oat flour and a jar of honey as if they were magic beans. That moment of panic turned into a revelation: the perfect gluten‑free honey oat bread is not a myth, it’s a reality waiting for the right balance of sweet, chew, and airy lift.
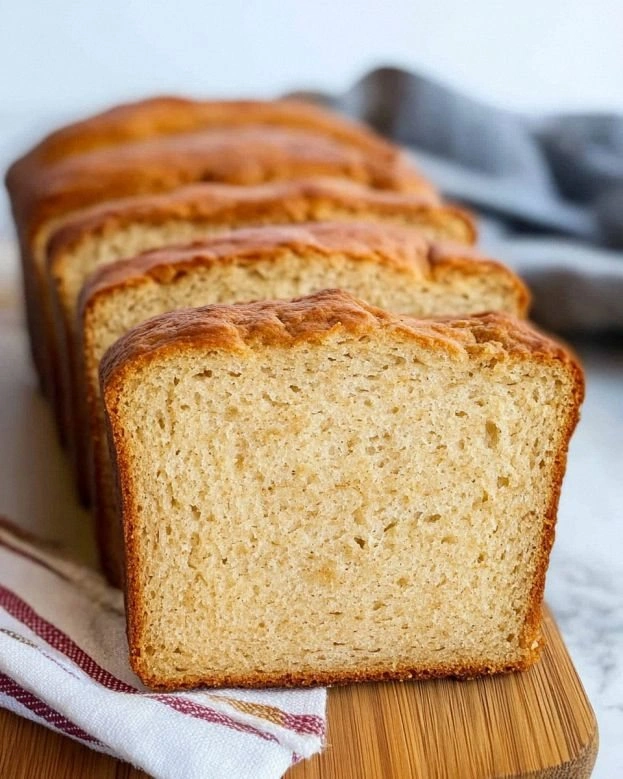
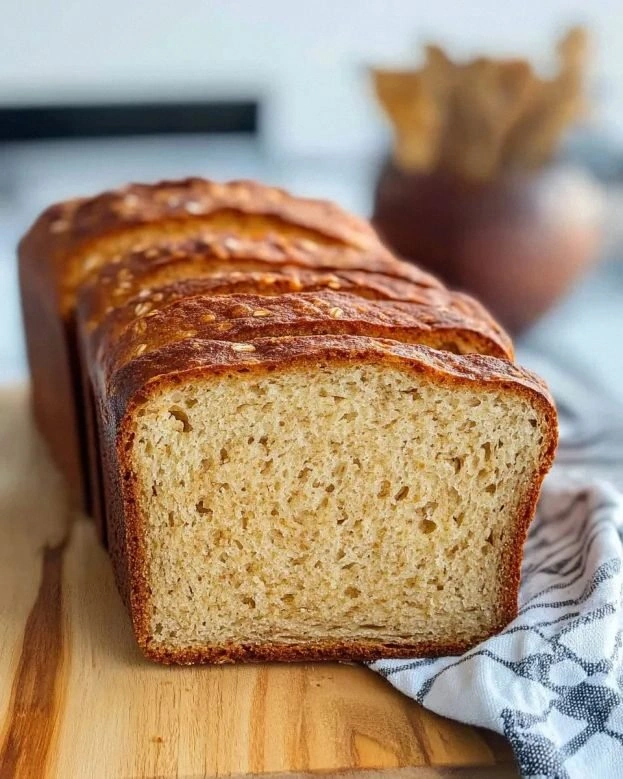
Imagine the moment you pull a golden‑brown loaf from the oven, the crust crackling softly as you tap it, and a warm, honey‑kissed aroma flooding the entire apartment. Your senses are hit with a buttery, nutty scent that makes your stomach do a little happy dance, while the crumb inside looks like a cloud of toasted oats, speckled with honey glazes that sparkle like sunrise on a lake. The first bite is a symphony: the crust has a gentle snap, the interior is moist yet sturdy enough to hold a generous spread of butter, and the honey threads through every crumb like liquid gold. I dare you to taste this and not go back for seconds—honestly, I ate half the batch before anyone else got a chance.
What makes this version truly stand out is that it doesn’t rely on a handful of obscure ingredients or a dozen steps that feel like a chemistry experiment. Most recipes get this completely wrong, either sacrificing texture for simplicity or ending up with a loaf that collapses like a deflated balloon. Here, the secret is a blend of gluten‑free oat flour, rolled oats, and a touch of xanthan gum that creates a stretchy matrix, while honey does double duty as a sweetener and a tenderizer. And let’s not forget the gentle rise from active dry yeast, which gives the loaf that coveted airy crumb without turning your kitchen into a bakery.
Okay, ready for the game‑changer? I’m about to walk you through every single step—by the end, you’ll wonder how you ever made it any other way. This next part? Pure magic. Picture yourself pulling this out of the oven, the whole kitchen smelling incredible, and the first slice glistening with honey‑infused crumbs. Stay with me here — this is worth it.
What Makes This Version Stand Out
- Flavor: The honey isn’t just sweet; it caramelizes during baking, creating a subtle, buttery depth that lingers on the palate.
- Texture: A crisp, slightly chewy crust gives way to a soft, airy interior that holds together without crumbling.
- Simplicity: Only eight core ingredients, all easy to find at any well‑stocked grocery store.
- Uniqueness: The combination of oat flour and rolled oats creates a nutty backbone that you won’t find in standard gluten‑free breads.
- Crowd Reaction: Even the most skeptical meat‑eaters have confessed they’d trade their regular loaf for this honey‑kissed version.
- Ingredient Quality: Using raw, unprocessed honey and certified gluten‑free oats guarantees a clean, natural flavor.
- Cooking Method: A gentle rise in a warm oven followed by a quick blast of high heat locks in moisture and creates that perfect crust.
- Make‑Ahead Potential: The loaf freezes beautifully, and a quick reheat restores its fresh‑baked glory.
Inside the Ingredient List
The Flavor Base
Honey—this golden elixir does more than sweeten. It fuels the yeast, encourages a richer rise, and during baking it caramelizes, forming a thin, glossy skin that crackles delightfully. If you skip the honey, expect a flatter loaf and a bland crust. For a vegan twist, swap with agave nectar, but the flavor will shift slightly toward a fruity note.
The Texture Crew
Gluten‑free oat flour is the backbone. Its fine grind mimics wheat flour’s ability to trap air, while its natural oils keep the crumb moist. Choose a certified gluten‑free brand to avoid cross‑contamination. If you can’t find oat flour, a 1:1 blend of rice flour and almond flour works, but the texture will be a bit denser.
Rolled oats add body and a pleasant chew. They also absorb liquid, creating that signature oat‑filled crumb. For a nuttier crunch, use thick‑cut steel‑cut oats, but remember they need a longer soak before mixing.
Xanthan gum is the secret binder that replaces gluten’s elasticity. Without it, the loaf would crumble like a dry biscuit. A teaspoon per cup of flour is enough; over‑use makes the texture gummy.
The Unexpected Star
Active dry yeast gives the loaf its lift. It’s the tiny living organism that feasts on sugars (thanks to the honey) and releases carbon dioxide, creating those airy pockets. If you’re in a hurry, you can use instant yeast—just add it directly to the dry mix and skip the proofing step.
The Final Flourish
Olive oil contributes richness and helps the crust stay tender. It also adds a subtle fruity note that pairs beautifully with honey. For a more neutral taste, swap with melted coconut oil, but the flavor profile will shift toward a tropical hint.
Everything's prepped? Good. Let's get into the real action…
The Method — Step by Step
Start by warming 1 cup of water to about 110°F (43°C). This temperature is crucial—too hot and you’ll kill the yeast, too cool and it won’t activate. I always dip my finger in; it should feel like a warm bath, not a hot tub. Once you’ve got the perfect warmth, sprinkle 1 tablespoon of active dry yeast over the water and add 2 teaspoons of honey. Let it sit for 5‑7 minutes until it becomes frothy, like a miniature foam party in your bowl. That froth is the yeast’s way of saying, “I’m alive and ready to work.”
While the yeast is waking up, whisk together 2 cups of gluten‑free oat flour, 1 cup of rolled oats, 1 teaspoon of xanthan gum, and 1 teaspoon of salt in a large mixing bowl. The salt not only seasons the bread but also regulates yeast activity, preventing an over‑ferment. Give the dry mix a quick stir—imagine you’re dusting a countertop with flour, creating a soft, powdery cloud.
Now, combine the frothy yeast mixture with 2 tablespoons of olive oil and the remaining 2 tablespoons of honey. Stir until the honey dissolves completely; you’ll notice a glossy sheen forming. This is where the magic begins—honey and oil together create a tenderizing emulsion that will later coat each oat and crumb.
Create a well in the center of the dry ingredients and pour in the wet mixture. Using a sturdy wooden spoon or a stand mixer on low speed, combine until a shaggy dough forms. It will look wetter than typical wheat dough—gluten‑free dough is naturally more batter‑like. Keep mixing for about 2 minutes; you’re looking for a cohesive mass that pulls away from the sides of the bowl.
Transfer the dough onto a parchment‑lined baking sheet. With a wet spatula, smooth the top into a rounded loaf shape, about 1½ inches tall. The dough should be slightly sticky—don’t worry, that’s how it should be. If it’s too runny, sprinkle a tablespoon more oat flour and fold it in gently.
Cover the loaf loosely with a clean kitchen towel and let it rise in a warm spot for 30‑35 minutes. The dough should puff up, looking slightly domed, and you’ll notice a faint honey aroma intensifying. If your kitchen is cold, pop the sheet into a turned‑off oven with the light on—again, that gentle heat does wonders.
Preheat your oven to 375°F (190°C) while the dough is rising. Once the oven is hot, place the loaf inside and bake for 25‑30 minutes. About halfway through, rotate the pan to ensure an even golden crust. You’ll hear a subtle crackle as the honey caramelizes—listen for that; it’s the sound of perfection.
When the top is a deep amber and the loaf sounds hollow when tapped, remove it from the oven. Let it cool on a wire rack for at least 15 minutes before slicing; this rest period lets the crumb set and the flavors meld. That first slice will reveal a moist, honey‑streaked interior that holds together beautifully.
That's it — you did it. But hold on, I've got a few more tricks that'll take this to another level…
Insider Tricks for Flawless Results
The Temperature Rule Nobody Follows
Never bake a gluten‑free loaf at a temperature lower than 350°F. Lower temps cause the crumb to stay gummy because the structure never sets. I once tried 325°F hoping for a gentler rise; the result was a soggy pancake masquerading as bread. The secret is a quick, high‑heat blast that creates a crust fast enough to trap steam inside.
Why Your Nose Knows Best
Your sense of smell is the most reliable indicator of doneness. When the honey begins to caramelize, you’ll detect a buttery, toasted scent that’s unmistakable. If you’re unsure, open the oven briefly and take a whiff; if the aroma is still raw, give it another 3‑5 minutes. Trust your nose over a timer—it’s an ancient kitchen superpower.
The 5‑Minute Rest That Changes Everything
After baking, let the loaf rest uncovered for five minutes, then cover it loosely with a tea towel for another ten. This staged cooling allows the interior steam to redistribute, preventing a dry top while keeping the crumb moist. Skipping this step is a common mistake that leads to a crust that’s too hard or a crumb that’s crumbly.
The “Double Honey” Technique
Add a second drizzle of honey halfway through baking (just brush it on). This creates a glossy, slightly sticky glaze that makes the crust glisten like morning dew. My friend tried it once and said the loaf looked “like a piece of edible art.” The extra honey also adds a subtle caramel bite that deepens the flavor profile.
The Mistake‑Proof Flour Ratio
A 2:1 ratio of oat flour to rolled oats yields the perfect crumb—too much flour makes it dry, too many oats make it dense. I’ve experimented with 3:1 and 1:1; the 2:1 balance gives a light yet hearty texture that holds up to butter, jam, or even avocado.
Creative Twists and Variations
This recipe is a playground. Here are some of my favorite ways to switch things up:
Cinnamon‑Swirl Delight
Add 1 teaspoon of ground cinnamon to the dry mix and swirl in a mixture of honey, butter, and a pinch of brown sugar before the final rise. The result is a loaf that smells like a cozy fall morning, perfect for brunch.
Nutty Crunch Version
Fold in ½ cup of toasted chopped almonds or walnuts after the dough comes together. The nuts add a satisfying crunch and a buttery richness that pairs beautifully with the honey’s sweetness.
Savory Herb Infusion
Swap half the honey for a tablespoon of olive oil and stir in 1 tablespoon of fresh rosemary, thyme, and a dash of cracked black pepper. This creates a savory loaf that’s incredible alongside soups or salads.
Berry Burst
Gently fold ½ cup of fresh blueberries or dried cranberries into the batter before the final rise. The berries burst during baking, leaving pockets of juicy sweetness that contrast the earthy oat base.
Spiced Pumpkin
Replace ¼ cup of oat flour with pumpkin puree, add ½ teaspoon of pumpkin pie spice, and reduce the water by ¼ cup. This seasonal twist yields a moist, fragrant loaf perfect for autumn gatherings.
Storing and Bringing It Back to Life
Fridge Storage
Wrap the cooled loaf tightly in parchment, then foil, and store it in an airtight container in the refrigerator. It stays fresh for up to five days. The cool environment slows staling, but the crust may lose its crispness—re‑heat a slice to revive it.
Freezer Friendly
Slice the loaf before freezing; lay the slices on a parchment sheet and flash‑freeze for an hour, then transfer to a zip‑top freezer bag. They’ll keep for three months. When you’re ready, pop a slice into the toaster or microwave for a quick snack.
Best Reheating Method
To bring the loaf back to life, preheat your oven to 300°F (150°C), place the whole loaf (or slices) on a baking sheet, and add a tiny splash of water to the crust before covering loosely with foil. Heat for 10‑12 minutes; the steam revives the interior while the foil protects the crust from over‑drying. The result is a slice that tastes like it just left the oven.