I was standing in my kitchen, mid‑midnight, with a half‑empty bag of dark chocolate and a sudden craving that felt like a snowstorm in July. The kind of craving that makes you stare at the pantry like it’s a crystal ball, daring it to reveal the perfect sweet‑and‑mint fix. I tried the store‑bought peppermint squares, but they were about as exciting as a flat tire on a rainy day—dry, overly sweet, and lacking that punch of mint that makes you gasp. Then I remembered an old college experiment where I mixed condensed milk with melted chocolate, and a wild idea sparked: what if I turned that into a peppermint patty that could be customized any way I wanted?
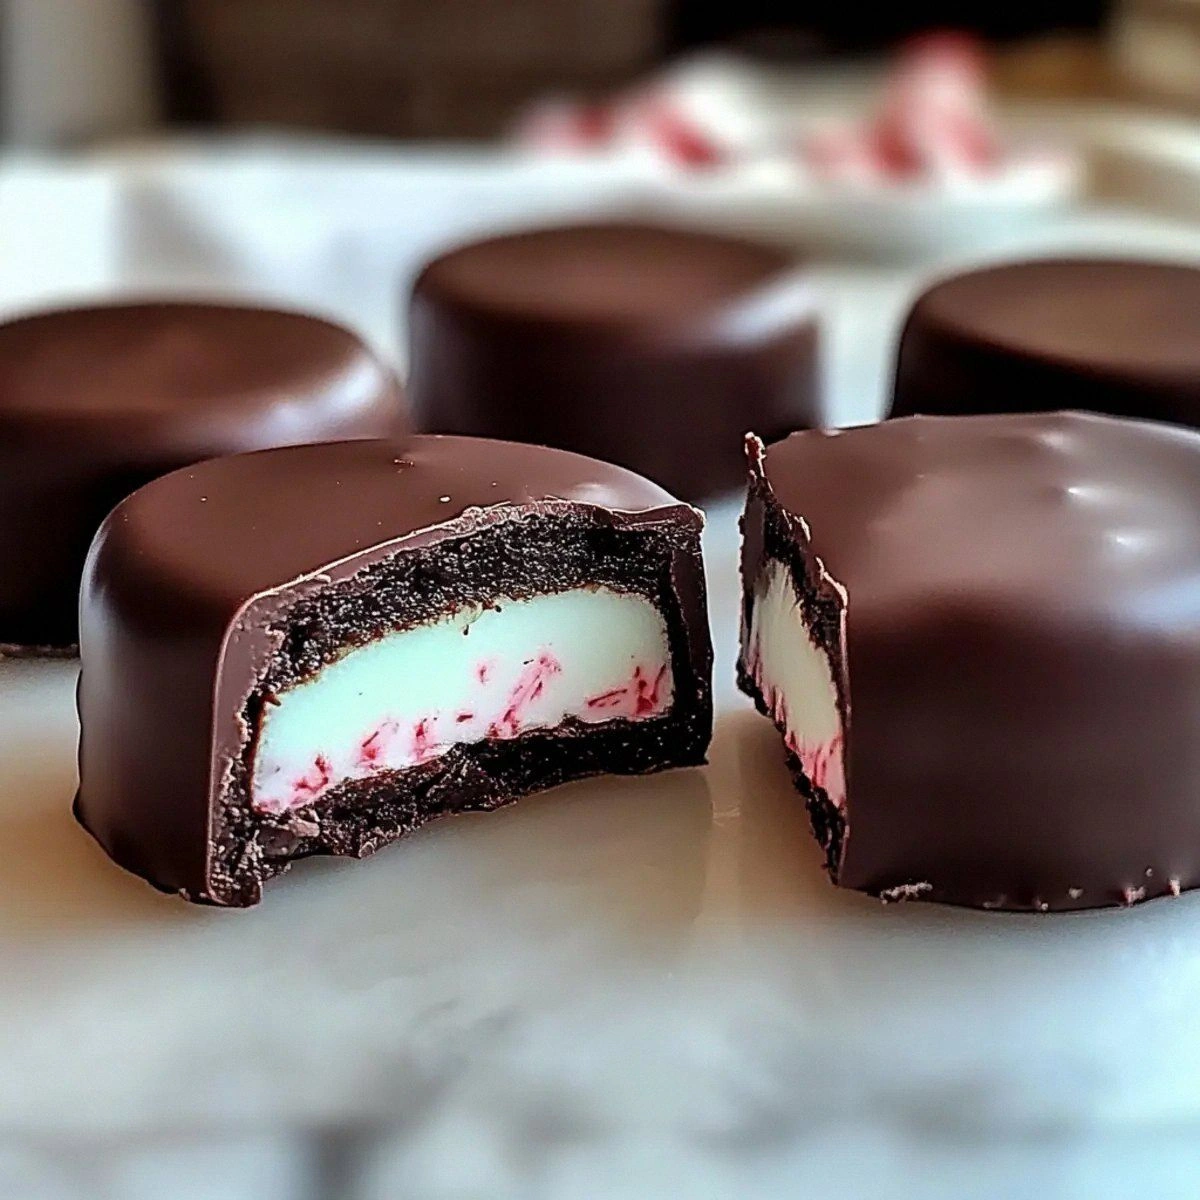
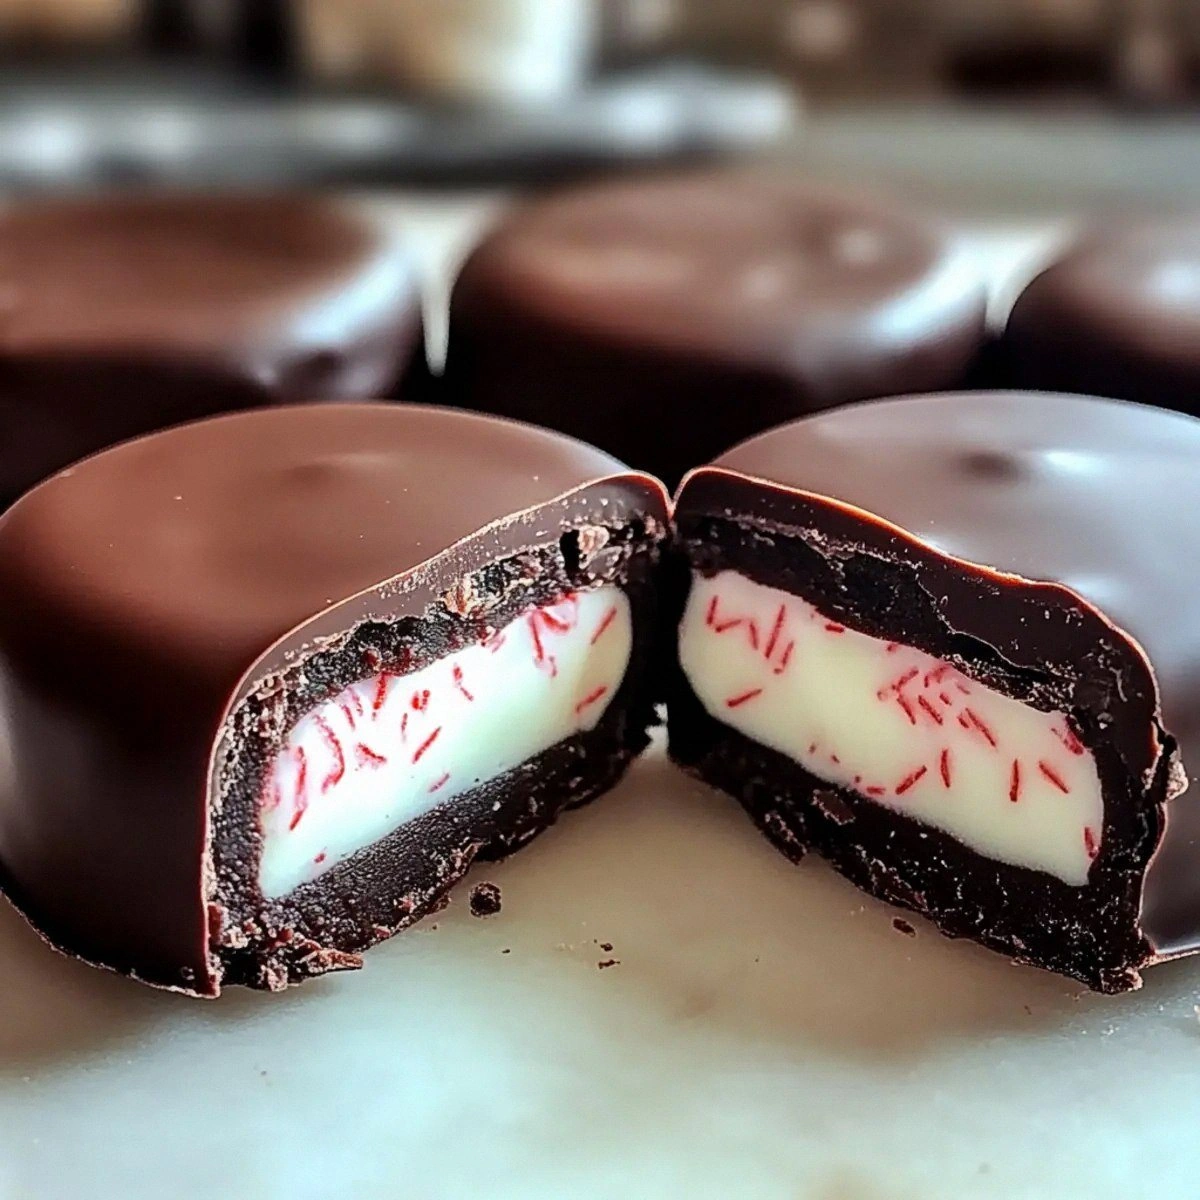
Picture this: a glossy dark chocolate shell that cracks with a gentle snap, revealing a silky, mint‑kissed center that melts on your tongue like a cool breeze on a hot pavement. The aroma hits you first—rich cocoa mingling with peppermint, a scent so intoxicating it could convince a skeptic that you’ve just discovered a new holiday. As you bite, the texture shifts from firm to buttery, the sweet‑condensed milk base hugging the mint like a warm blanket, while the chocolate exterior adds that satisfying crunch. The whole experience is a symphony of senses, each note playing perfectly in time, and the best part? It’s all built from pantry staples that most people already have lying around.
Most peppermint patty recipes out there either skimp on the chocolate, over‑sweeten the filling, or require a laundry list of obscure ingredients that make you wonder if you’re baking or conducting a chemistry experiment. This version throws all that nonsense out the window. I’m using a single can of sweetened condensed milk as the sweet backbone, a splash of vanilla for depth, and just enough peppermint extract to give you that fresh kick without overwhelming the palate. The dark chocolate I melt is 70% cocoa, giving the patty a sophisticated bitterness that balances the sugary interior. And the powdered sugar? It’s the secret weapon that turns the filling into a glossy, melt‑in‑your‑mouth mousse.
But here’s the kicker: I’m going to show you a technique that most recipes completely miss—a gentle tempering method that keeps the chocolate glossy and prevents it from blooming, even if you’re not a professional chocolatier. I’ll also reveal a quick hack for shaping perfect circles without a cookie cutter, because who has time to hunt for the right size? Okay, ready for the game‑changer? Let me walk you through every single step — by the end, you’ll wonder how you ever made it any other way.
What Makes This Version Stand Out
- Flavor: The combination of dark chocolate and peppermint extract creates a bold contrast that’s both refreshing and indulgent, making each bite feel like a mini celebration.
- Texture: A crisp, glossy shell gives way to a silky, mousse‑like center, delivering a satisfying crunch followed by a melt‑away smoothness.
- Simplicity: Only five core ingredients are required, all of which are pantry‑friendly, meaning you won’t need a trip to the specialty store.
- Uniqueness: The use of sweetened condensed milk as the base adds a caramel‑like richness that you won’t find in standard peppermint patty recipes.
- Crowd Reaction: These patties have a reputation for disappearing within minutes—people keep asking for seconds, and you’ll hear the same dare: “I dare you to taste this and not go back for seconds.”
- Ingredient Quality: High‑cocoa dark chocolate ensures a deep flavor, while the peppermint extract provides a clean, aromatic punch without the grainy texture of crushed candy canes.
- Method: A gentle double‑boil tempering technique keeps the chocolate glossy and prevents bloom, even if you’re a kitchen novice.
- Make‑Ahead Potential: Once set, the patties keep beautifully in the fridge or freezer, making them perfect for holiday gifting or a ready‑to‑grab treat.
Inside the Ingredient List
The Flavor Base
Sweetened condensed milk is the unsung hero of this recipe. Its thick, caramel‑like consistency provides the perfect sweet foundation without the graininess that regular sugar can bring. If you skip it, you’ll end up with a watery filling that can’t hold its shape, and the whole patty will collapse like a house of cards. For a dairy‑free twist, you can substitute a can of coconut condensed milk, but be prepared for a subtle coconut undertone that will change the flavor profile.
Peppermint extract is the flash of winter that cuts through the richness. A single teaspoon is enough to deliver that crisp, cooling sensation without turning the filling into a toothpaste‑scented disaster. If you’re using crushed peppermint candies instead, grind them finely and reduce the amount to half a teaspoon to avoid a gritty texture.
The Texture Crew
Dark chocolate, preferably 70% cocoa, does the heavy lifting for the shell. Its high cocoa content ensures a firm snap and a slightly bitter edge that balances the sweet interior. Using milk chocolate will give you a softer shell that can melt too quickly, especially in warm kitchens, and the flavor won’t have that sophisticated depth. When melting, always use a double boiler or a microwave in short bursts to prevent scorching.
Powdered sugar is the secret that turns the condensed milk mixture into a glossy, pliable mousse. It dissolves quickly, preventing any grainy texture, and adds just enough sweetness to complement the dark chocolate. If you’re watching sugar intake, you can replace half of it with a low‑calorie powdered sweetener, but the texture may become slightly less smooth.
The Unexpected Star
Vanilla extract is the quiet partner that rounds out the flavors. Its aromatic warmth lifts the peppermint and chocolate, preventing the mint from sounding too sharp. Skipping vanilla is like playing a song without the bass—something will feel missing. A high‑quality pure vanilla bean paste can be used as a 1‑to‑1 swap for extra depth.
The Final Flourish
A pinch of sea salt (optional) can elevate the entire palate, enhancing both the chocolate and the mint. Salt is the magician that makes sweet taste brighter, and just a tiny grain can make the difference between good and unforgettable. If you’re on a low‑sodium diet, you can omit it, but expect a slightly flatter flavor.
Everything’s prepped? Good. Let’s get into the real action…
The Method — Step by Step
Set up a double boiler: fill a medium saucepan with a couple of inches of water, bring it to a gentle simmer, and place a heat‑proof bowl on top, making sure the bottom of the bowl doesn’t touch the water. Add the dark chocolate, broken into small chunks, and stir constantly with a silicone spatula. The chocolate should melt slowly, becoming a glossy river of cocoa; you’ll hear a faint hiss as the steam rises—That sizzle when it hits the pan? Absolute perfection.
Once the chocolate is fully melted, remove the bowl from heat and let it sit for about 30 seconds. Then whisk in the sweetened condensed milk, peppermint extract, and vanilla extract. The mixture will look thick and glossy, and it will emit a sweet‑mint aroma that fills the kitchen like a winter breeze. This is the moment of truth: if the scent isn’t intoxicating, double‑check your extracts.
Return the bowl to low heat for a brief “cook‑out” phase. Keep the temperature under 115°F (46°C) and stir continuously for 3–4 minutes. You’ll notice the mixture pulling away from the sides of the bowl, forming a smooth, velvety ribbon when you lift the spatula.
Kitchen Hack: Use a rubber spatula with a flat edge; it helps you see the “ribbon” stage more clearly.- After the brief cook‑out, remove the bowl from heat entirely. Let the mixture cool for about 5 minutes—this cooling window is crucial for the powdered sugar to incorporate without clumping.Watch Out: Do not let the mixture boil; overheating will cause the chocolate to seize, turning the mixture grainy and unworkable.
Gradually sift the powdered sugar over the warm mixture, whisking continuously. The sugar will dissolve, turning the mixture into a glossy, thick mousse that holds its shape when lifted with a spoon. If you notice any lumps, keep whisking; the heat will melt them away. The texture should be smooth enough to spread with a spatula but firm enough to hold a scoop.
Cover the bowl with plastic wrap, pressing the wrap directly onto the surface to prevent a skin from forming. Place the bowl in the refrigerator for 20–30 minutes, or until the filling is firm enough to roll into balls.
Kitchen Hack: Pop a small piece of parchment paper under the bowl; it makes cleanup a breeze and keeps the mousse from sticking to the metal.While the filling chills, line a baking sheet with parchment paper and set aside. Once firm, use a small ice‑cream scoop (about 1‑ounce) to portion the mousse onto the sheet. Quickly roll each mound between your palms to form a smooth ball, then gently press the center of each ball with your thumb to create a shallow well for the chocolate coating.
Re‑melt the dark chocolate using the same double‑boiler method, but this time keep the temperature a touch lower (around 105°F/40°C) to maintain a glossy sheen. Dip each mousse ball into the chocolate, allowing excess to drip back into the bowl. Place the coated patty back onto the parchment‑lined sheet, and give it a gentle tap to smooth any uneven spots.
Optional: While the chocolate is still wet, dust each patty with a light sprinkle of powdered sugar or cocoa powder for an extra decorative touch. Let the patties set at room temperature for 10 minutes, then transfer the sheet to the refrigerator for an additional 15 minutes to fully harden the shell.
Once set, lift the patties off the parchment and store them in an airtight container. They’ll keep in the fridge for up to a week, and you can freeze them for up to three months. That moment when you bite into the first patty? Pure, minty bliss that makes every step worth it.
That's it — you did it. But hold on, I've got a few more tricks that'll take this to another level...
Insider Tricks for Flawless Results
The Temperature Rule Nobody Follows
Chocolate is a fickle friend; if it gets too hot it burns, too cold and it blooms. Keep your double boiler water just at a simmer, never a rolling boil, and monitor the bowl temperature with a candy thermometer. Aim for 115°F (46°C) when melting, and drop to 105°F (40°C) for the final coating. This temperature dance ensures a glossy finish that won’t develop white specks. I once tried to speed things up by cranking the heat—let's just say the result looked like a chocolate‑covered disaster.
Why Your Nose Knows Best
When the chocolate is perfectly tempered, it releases a deep cocoa aroma that’s richer than any store‑bought bar. Trust that scent; if it smells buttery or burnt, you’ve gone too far. The minty perfume from the filling should become more pronounced as it cools, signaling that the flavors are marrying properly. If you’re ever in doubt, give the mixture a quick sniff before moving on.
The 5‑Minute Rest That Changes Everything
After whisking in the powdered sugar, let the mixture rest for exactly five minutes before chilling. This short pause allows the sugar to fully hydrate, preventing a gritty texture later. It also lets the condensed milk and chocolate fully integrate, giving you a smoother final mousse. Skipping this rest is a common mistake that leads to a slightly grainy bite.
Silicone Mats Over Parchment
Using a silicone baking mat instead of parchment can make the chocolate set faster and reduces sticking. The non‑stick surface also helps you slide the patties off the sheet in one swift motion, preserving their perfect shape. If you don’t have a mat, a light dusting of cocoa powder on parchment works as a backup.
Freeze‑Then‑Serve for Extra Snap
If you love an extra‑crisp chocolate shell, pop the finished patties in the freezer for 10 minutes just before serving. The cold shock makes the chocolate contract slightly, creating a sharper snap when you bite. Just be careful not to leave them too long, or the minty center can become too firm.
Creative Twists and Variations
This recipe is a playground. Here are some of my favorite ways to switch things up:
Candy Cane Crunch
Fold finely crushed candy canes into the filling after the powdered sugar is fully incorporated. The result is a delightful crunch that adds a festive visual swirl, perfect for holiday parties.
Espresso Edge
Add a teaspoon of instant espresso powder to the chocolate melt. The coffee notes deepen the chocolate’s bitterness, creating a sophisticated flavor that pairs beautifully with the mint.
White Chocolate Whisper
Swap half of the dark chocolate for white chocolate for a milder, creamier shell. This variation is great for kids who find dark chocolate too intense, while still keeping the peppermint punch.
Nutty Delight
Stir in a tablespoon of finely chopped toasted hazelnuts or almonds into the filling. The nutty undertones add texture and a buttery richness that elevates the overall experience.
Spicy Peppermint
Add a pinch of cayenne pepper or a dash of chili powder to the chocolate melt. The subtle heat creates a surprising contrast that makes the mint feel cooler and more refreshing.
Storing and Bringing It Back to Life
Fridge Storage
Place the patties in an airtight container lined with parchment paper, separating layers with additional parchment to avoid sticking. They stay fresh for up to seven days, and the flavors continue to meld, becoming even more harmonious over time.
Freezer Friendly
For longer keeping, arrange the patties on a baking sheet, freeze until solid, then transfer to a zip‑top freezer bag. They’ll keep for up to three months. When you’re ready to enjoy, let them thaw in the fridge for 30 minutes, then give them a quick room‑temperature sit before serving.
Best Reheating Method
If the chocolate shell feels a bit dull after refrigeration, gently warm the patties for 10 seconds in a microwave (or a few seconds in a warm oven) to restore the shine. Adding a tiny splash of water (about a teaspoon) to the chocolate before reheating creates a steam effect that revives the gloss without making the shell soggy.