
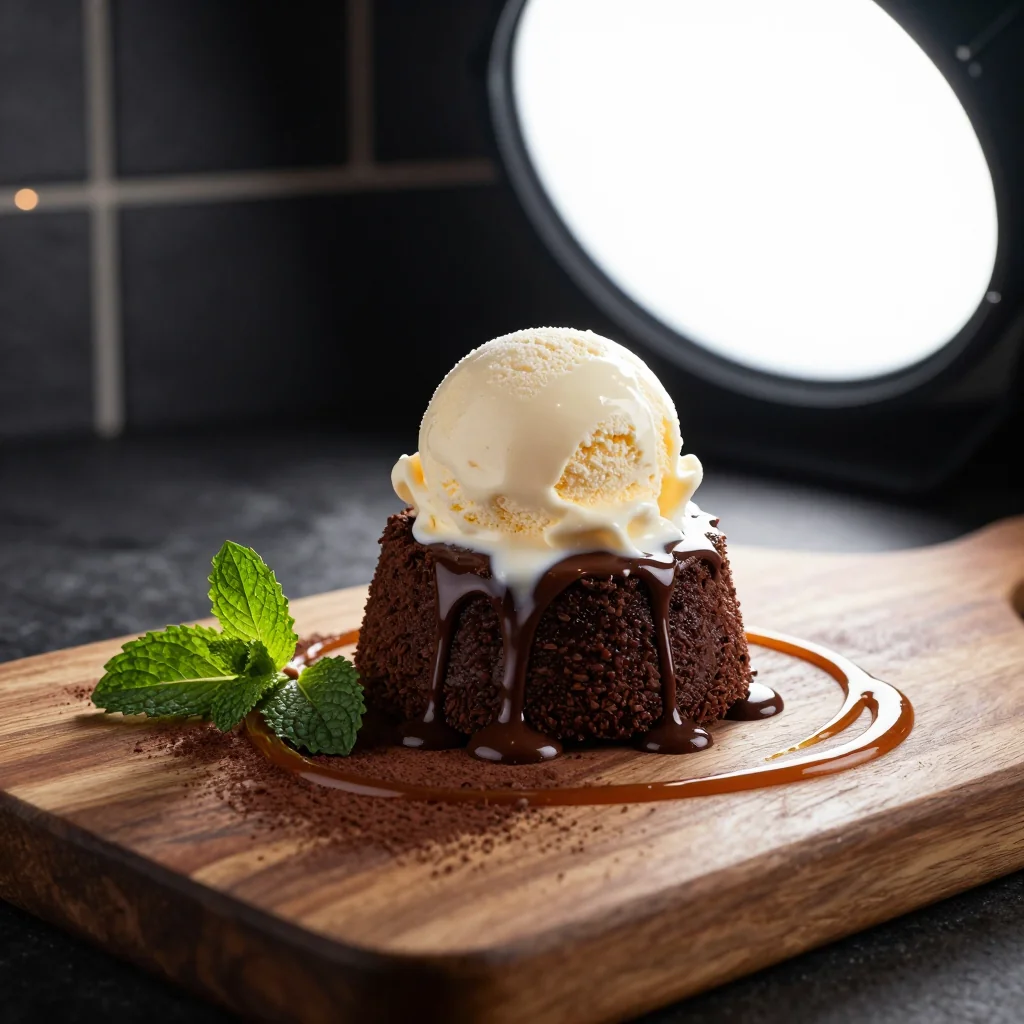
A molten chocolate masterpiece paired with silky vanilla ice cream that melts in your mouth.
There’s a particular kind of magic that happens when a warm, gooey chocolate center meets a cold, fragrant scoop of vanilla ice cream. I first discovered this contrast on a chilly winter evening in Paris, when a close friend surprised me with a single, steaming ramekin that burst open to reveal a river of dark chocolate. The steam curled around the delicate aroma of vanilla, and in that instant I understood why dessert is often called “the finale of a love story.”
Chocolate lava cake, known in French as “coulant au chocolat,” has its roots in the late 20th‑century culinary renaissance, where chefs sought to blend the comfort of a classic brownie with the theatrical flair of a molten core. Paired with homemade vanilla ice cream, the dish becomes a dialogue between hot and cold, bitter and sweet, texture and flavor.
In this article, I’ll walk you through every nuance of the recipe—from selecting the perfect couverture chocolate to mastering the gentle swirl that creates the lava flow. You’ll learn how to time the bake so that the center stays luscious, how to churn a silky ice cream without an ice‑cream maker, and how to plate the dessert for maximum visual impact.
Grab your whisk, preheat your oven, and let’s embark on a delicious journey that will impress both your palate and your guests.
🌟 Why This Recipe Will Captivate You
From the first bite to the lingering after‑taste, this dessert offers a symphony of sensations that keep you coming back for more.
- ✨ Irresistible Contrast: The hot, fluid chocolate core juxtaposed with cool vanilla ice cream creates a temperature and texture dance that delights the senses.
- ✨ Simple Yet Sophisticated: Despite its elegant presentation, the recipe relies on a handful of pantry staples, making it accessible for home cooks.
- ✨ Customizable Flavor Base: By swapping dark chocolate for milk or white chocolate, you can tailor the intensity to your preference.
- ✨ Perfect for Any Occasion: Whether it’s a romantic dinner, a holiday gathering, or a casual weekend treat, this dessert fits every setting.
- ✨ Nutrient‑Rich Indulgence: Using high‑quality dark chocolate provides antioxidants, while the vanilla ice cream adds calcium and protein.
- ✨ Show‑Stopping Presentation: The dramatic “lava” spill is a visual centerpiece that earns applause without any extra effort.
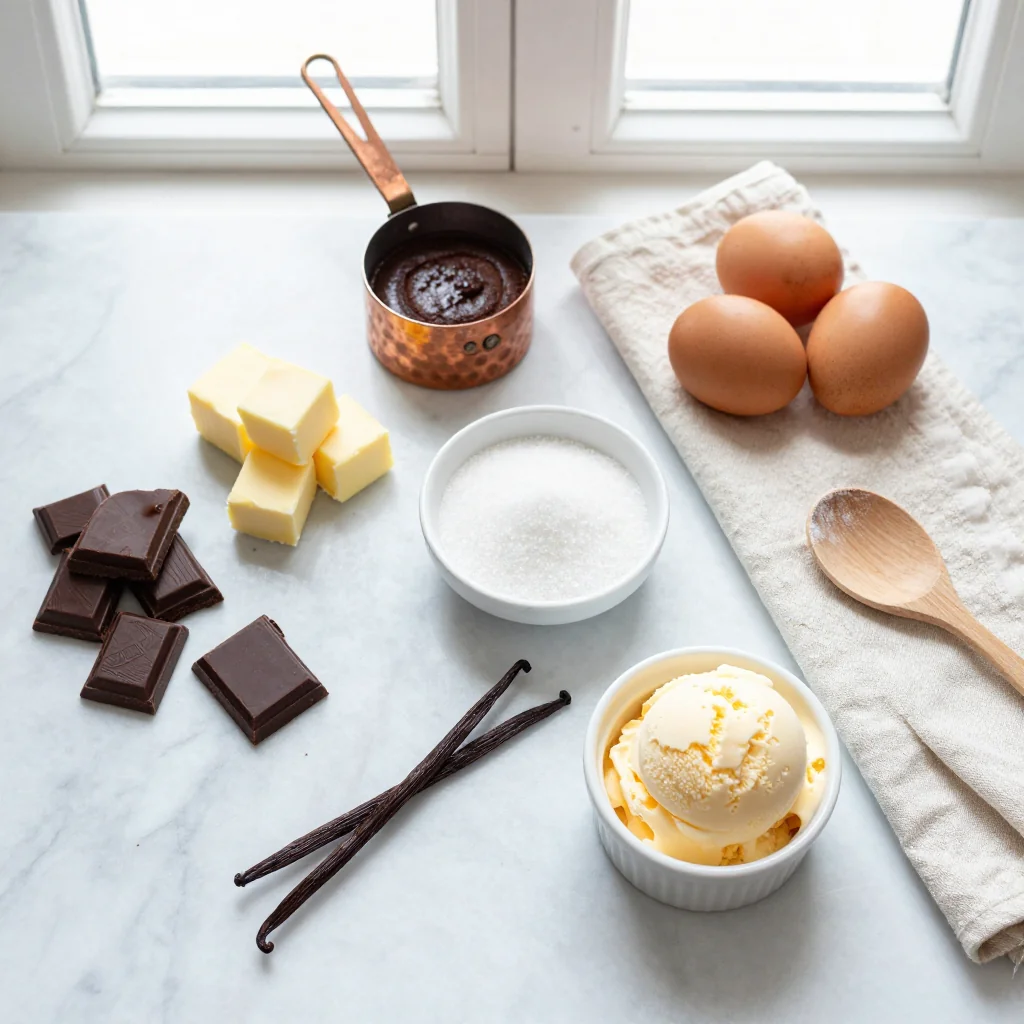
🥗 Ingredients
📝 Complete Ingredient List
For the Chocolate Lava Cake:
- 200 g dark chocolate (70% cacao)
- 100 g unsalted butter
- 2 large eggs
- 2 egg yolks
- 50 g granulated sugar
- 30 g all‑purpose flour
- 1 pinch salt
For the Vanilla Ice Cream:
- 250 ml whole milk
- 250 ml heavy cream
- 100 g granulated sugar
- 1 vanilla bean, split and scraped
- 2 egg yolks
For Garnish:
- A dusting of cocoa powder
- A handful of fresh berries (raspberries or strawberries)
🔍 Focus on Key Ingredients
Dark Chocolate (70% cacao)
The backbone of the lava cake, high‑quality dark chocolate provides a deep, slightly bitter flavor that balances the sweetness of the sugar and the richness of the butter. Look for chocolate that lists cocoa solids as the first ingredient and avoids added vegetable oils. The cocoa butter in good chocolate ensures a glossy, fluid center when baked.
Unsalted Butter
Butter contributes to the cake’s tender crumb and adds a luxurious mouthfeel. Using unsalted butter lets you control the salt level precisely, which is crucial for highlighting the chocolate’s complexity without overwhelming it.
Vanilla Bean
Fresh vanilla beans impart a fragrant, floral note that ice cream made from scratch cannot match. Split the bean lengthwise, scrape out the seeds, and steep them in the milk‑cream mixture for maximum flavor extraction.
🔄 Quick Substitutions
| If you don’t have... | Use instead... |
|---|---|
| Dark chocolate (70% cacao) | Semi‑sweet chocolate (60% cacao) |
| Unsalted butter | Salted butter (reduce added salt) |
| Vanilla bean | 2 tsp pure vanilla extract |
👨🍳 Step‑by‑Step Instructions
Follow these detailed steps to achieve the perfect molten center and a velvety ice cream that complements it beautifully.
📋 Phase 1: Preparation & Mise en Place
Gather and prepare all components before you start heating the oven.
Pre‑heat the oven and butter the ramekins
Set your oven to 200°C (390°F). Generously butter four 6‑ounce ramekins and dust them lightly with cocoa powder, tapping out any excess. This ensures the cakes release easily after baking and adds an extra layer of chocolate flavor.
Melt chocolate and butter together
In a heat‑proof bowl, combine the dark chocolate and butter. Melt over a simmering pot of water (double boiler) while stirring gently. Once smooth, remove from heat and let cool slightly.
🔥 Phase 2: Baking the Lava Cakes
Create the batter, fill the ramekins, and bake to achieve that perfect lava flow.
Whisk eggs, yolks, and sugar
In a separate bowl, whisk together the whole eggs, egg yolks, and granulated sugar until the mixture becomes pale and slightly thickened, about 2 minutes. This incorporates air, giving the cake a light texture.
Combine chocolate mixture with egg mixture
Gently fold the melted chocolate into the egg‑sugar mixture. Add the flour and a pinch of salt, stirring just until incorporated. The batter should be glossy and thick but still pourable.
Fill ramekins and bake
Divide the batter evenly among the prepared ramekins (about ½ cup each). Place them on a baking sheet and bake for 12 minutes. The edges should be set while the center remains soft and wobbly.
✨ Phase 3: Ice Cream & Final Assembly
Prepare the vanilla ice cream, then serve the warm cakes with a cool scoop.
Prepare vanilla ice cream base
Heat milk, cream, half the sugar, and the vanilla bean seeds in a saucepan until just below boiling. Remove from heat, cover, and let steep for 15 minutes to infuse the vanilla flavor.
Temper egg yolks
Whisk the remaining sugar with the egg yolks until pale. Slowly pour a third of the hot milk‑cream mixture into the yolks while whisking continuously, then return the mixture to the saucepan.
Cook custard to thicken
Cook over low heat, stirring constantly, until the custard coats the back of a spoon (around 80°C/175°F). Strain through a fine‑mesh sieve, cool, then churn in an ice‑cream maker for 20‑25 minutes. If you don’t have a machine, place the mixture in a shallow pan, freeze, and stir every 30 minutes for a smoother texture.
💡 Expert Tips & Tricks
🛒 Choosing the Right Ingredients
Always opt for couverture chocolate with a high cocoa butter content; it melts evenly and yields a glossy lava. When buying butter, choose European‑style butter for its higher fat content, which adds richness. Fresh, high‑quality eggs provide structure without making the batter too dense. For vanilla, split the bean and scrape both seeds and pod; the pod contains aromatic compounds that enhance the ice cream.
🔪 Preparation Techniques
Use a silicone spatula to fold the chocolate into the egg mixture to avoid deflating the batter. When buttering ramekins, work quickly to prevent the butter from solidifying. For the ice cream base, whisk continuously while heating to avoid curdling. If you lack a fine sieve, a cheesecloth works well for removing vanilla pods and any cooked egg bits.
🌡️ Mastering the Baking
Every oven behaves slightly differently; use an instant‑read thermometer to verify the internal temperature of the cakes. They should read around 60°C (140°F) at the center for that perfect molten core. Rotate the baking sheet halfway through the bake to ensure even browning.
🍽️ Presentation & Service
Run a thin knife around the rim of each ramekin before inverting onto a plate to release the cake cleanly. Dust with a light layer of cocoa powder and add a few fresh berries for color contrast. Serve immediately while the cake is still warm, pairing with a generous scoop of vanilla ice cream.
🏆 Pro Tips
Elevate your dessert from home‑cooked to restaurant‑quality with these professional insights.
- 🎯 Precise Temperature Control: Using a convection oven can give you a more uniform heat, reducing the risk of over‑cooking the edges while the center stays liquid.
- 🎯 Use a Water Bath: Placing the ramekins in a shallow pan of hot water during baking creates gentle, even heat, helping the lava remain fluid.
- 🎯 Infuse the Butter: Melt the butter with a tiny pinch of sea salt and a dash of espresso powder; the subtle bitterness enhances the chocolate depth.
- 🎯 Ice Cream Texture: Adding a teaspoon of corn syrup to the ice cream base prevents ice crystals, yielding a smoother scoop that melts slower on the hot cake.
- 🎯 Garnish with Textural Contrast: Sprinkle toasted almond slivers or a crumble of caramelized sugar for a delightful crunch against the silky sauce.
- 🎯 Plate Temperature: Chill the plates in the freezer for a few minutes; the cold surface helps the lava flow outward rather than collapsing inward.
"A great dessert is a story told on a plate—each bite should surprise and satisfy." — Chef Dominique Crenn
🔄 Variations & Adaptations
The beauty of this recipe lies in its flexibility; you can tailor it to dietary needs, seasonal flavors, or personal preferences.
🥬 Vegetarian / Vegan Version
Replace dairy butter with coconut oil, use a plant‑based milk (such as oat or almond) for the ice cream, and substitute the eggs with a blend of aquafaba (chickpea water) and silken tofu for the custard base. Use a vegan dark chocolate that contains no dairy.
- Vegan butter alternative (coconut oil) – 100 g
- Aquafaba (3 Tbsp) + ¼ cup silken tofu for egg replacement
🌶️ Flavor Variations
Experiment with complementary flavors to keep the dessert exciting throughout the year.
Spicy Chili Version:
Add a pinch of cayenne pepper or a few drops of chili‑infused chocolate to the batter for a subtle heat that awakens the palate.
Mediterranean Olive‑Olive Oil Twist:
Swap half the butter for high‑quality extra‑virgin olive oil and finish the cake with a drizzle of honey and a sprinkle of sea salt.
Asian Matcha Fusion:
Incorporate 1 tsp of matcha powder into the ice cream base and garnish with toasted sesame seeds for a delicate green tea aroma.
⚠️ Dietary Adaptations
Gluten‑Free:
Replace all‑purpose flour with a 1:1 gluten‑free flour blend; ensure the blend contains xanthan gum for structure.
Lactose‑Free:
Use lactose‑free milk and cream, or substitute with coconut cream and almond milk; choose dairy‑free dark chocolate.
Low‑Calorie:
Reduce butter to 60 g, use a sugar substitute like erythritol, and serve with a light fruit sorbet instead of ice cream.
👶 Family / Kids Version
For younger palates, use milk chocolate instead of dark chocolate for a sweeter, milder flavor. Reduce the amount of espresso or chili additives. Serve with a fun garnish of mini marshmallows or a drizzle of caramel sauce.
📦 Storage & Reheating
🧊 Conservation
In the Refrigerator:
- Duration: 2 days
- Recommended container: airtight glass jar or sealed plastic container
- Tip: Place a sheet of parchment between cakes to prevent sticking.
In the Freezer:
- Duration: 1 month
- Method: Wrap each ramekin tightly in foil, then place in a freezer‑safe bag.
- Defrosting: Transfer to the refrigerator overnight before reheating.
💡 For best texture, reheat only the portion you plan to serve; frozen cakes can become grainy if reheated multiple times.
♨️ Reheating
🔥 In the Oven (Recommended):
- Preheat to 180°C (350°F).
- Cover the ramekin loosely with aluminum foil.
- Reheat for 8‑10 minutes.
- Remove foil and continue for 2‑3 minutes to crisp the edges.
⚡ In the Microwave (Quick):
- Place cake on a microwave‑safe plate.
- Heat on medium power for 30‑45 seconds.
- Check softness; add 10‑second bursts if needed.
🍳 In a Skillet:
Heat a non‑stick skillet over low heat, add a tiny splash of butter, and gently warm each side for 1‑2 minutes; this method preserves the molten center while adding a caramelized crust.
🍷 Perfect Pairings
🥗 Accompaniments
- Fresh Berry Salad: A mix of strawberries, raspberries, and mint adds acidity and bright color.
- Light Citrus Sorbet: A scoop of lemon or orange sorbet balances richness.
- Roasted Almonds: Their crunch provides textural contrast.
🍷 Wine & Beverage Pairings
- Late Harvest Riesling: Its sweetness mirrors the dessert while its acidity cuts through the richness.
- Ruby Port: The deep fruit notes complement the dark chocolate.
- Non‑Alcoholic: Sparkling pomegranate juice adds a festive touch.
🍰 To Complete the Meal
Start with a light citrus‑based appetizer such as a grapefruit salad, follow with a delicate seafood risotto, and finish the dinner with a simple cheese board featuring brie and fig jam. The contrast of savory and sweet will make the lava cake the unforgettable finale.
❓ Frequently Asked Questions
Q: How do I know when the lava cake is perfectly baked?
After the recommended baking time, gently press the edge of a ramekin; it should feel firm while the center gives slightly under pressure. A quick visual cue is a cracked top and a wobbling middle. If you insert a toothpick into the edge and it comes out clean while the center still looks glossy, the cake is ready.
Q: Can I use a different size of ramekin?
Yes, but adjust the baking time accordingly. Smaller 4‑ounce ramekins may need only 8‑9 minutes, while larger 8‑ounce ones could require 14‑15 minutes. Always monitor the edges for firmness and the center for wobbliness.
Q: Is it necessary to make the ice cream from scratch?
No, you can substitute high‑quality store‑bought vanilla ice cream, but homemade ice cream offers a smoother texture and more pronounced vanilla flavor. If using store‑bought, let it soften slightly before serving to avoid a temperature shock with the hot cake.
Q: What if my chocolate “lava” solidifies after baking?
This can happen if the oven temperature is too low or the baking time is too long. Ensure the oven is fully preheated, use a convection setting if available, and keep a close eye on the 12‑minute mark. You can also slightly increase the chocolate‑butter ratio for a more fluid center.
Q: How can I make this recipe dairy‑free?
Swap the dark chocolate for a dairy‑free variety, replace butter with coconut oil, and use coconut milk or oat milk for the ice cream. For the custard, use a mixture of coconut cream and almond milk, and thicken with a cornstarch slurry instead of egg yolks.
Q: Can I prepare the lava cakes ahead of time?
Absolutely. Prepare the batter, fill the ramekins, and refrigerate them uncovered for up to 24 hours. When ready to serve, let them sit at room temperature for 10 minutes before baking to ensure even cooking.
🎉 To Your Oven!
This Chocolate Lava Cake with Vanilla Ice Cream combines the drama of a molten center with the comforting coolness of handcrafted ice cream. By mastering the precise timing, selecting premium ingredients, and using the pro tips above, you’ll create a dessert that feels both luxurious and approachable. Whether you’re impressing guests at a dinner party or treating yourself after a long day, the contrast of textures and flavors makes every bite unforgettable.
Don’t hesitate to experiment with the variations—add a pinch of sea salt, a dash of espresso, or a swirl of caramel. Share your successes, ask questions, and let the community know how you made it your own. Your feedback helps us refine the recipe and inspire others.
Have you tried this recipe?
Leave a comment and rating below! Share your photos on Instagram with #LavaCakeLove to be featured on our blog.
Chocolate Lava Cake with Vanilla Ice Cream
A molten chocolate cake paired with silky vanilla ice cream for a stunning dessert.
📝 Ingredients
Cake Batter
Vanilla Ice Cream
Garnish
👨🍳 Instructions
- Pre‑heat oven to 200°C (390°F) and butter four ramekins.
- Melt chocolate and butter together in a double boiler; set aside.
- Whisk eggs, yolks, and sugar until pale and thick.
- Fold melted chocolate into the egg mixture, then add flour and salt.
- Divide batter among ramekins and bake for 12 minutes.
- Heat milk, cream, half the sugar, and vanilla bean; steep 15 minutes.
- Temper egg yolks with hot milk mixture, return to pan, and cook custard.
- Churn custard into ice cream or freeze, stirring every 30 min.
- Run a knife around each ramekin, invert onto a plate, dust with cocoa, add berries.
- Serve immediately with a generous scoop of vanilla ice cream.
🥗 Nutritional Information (per serving)
*Values are estimates based on typical ingredient brands.
📚 You Might Also Like
Salted Caramel Cheesecake
Raspberry White Chocolate Mousse
Espresso Tiramisu


💬 Comments & Reviews
Leave a Comment
No comments yet. Be the first to share your thoughts!