I still remember the night I almost ruined my entire kitchen in a frantic attempt to recreate a bakery‑style treat I’d seen on a foodie vlog. The dough was too sticky, the blueberries were mushy, and my oven had a mysterious way of turning everything into a soggy mess. That disaster sparked a mission: to build a version of the legendary Blueberry Cream Mochi Buns that would never fail, would burst with flavor, and would have the soft, chewy texture of a cloud. I’m not just talking about a recipe; I’m talking about a culinary revelation that will make you wonder why you ever settled for anything else.
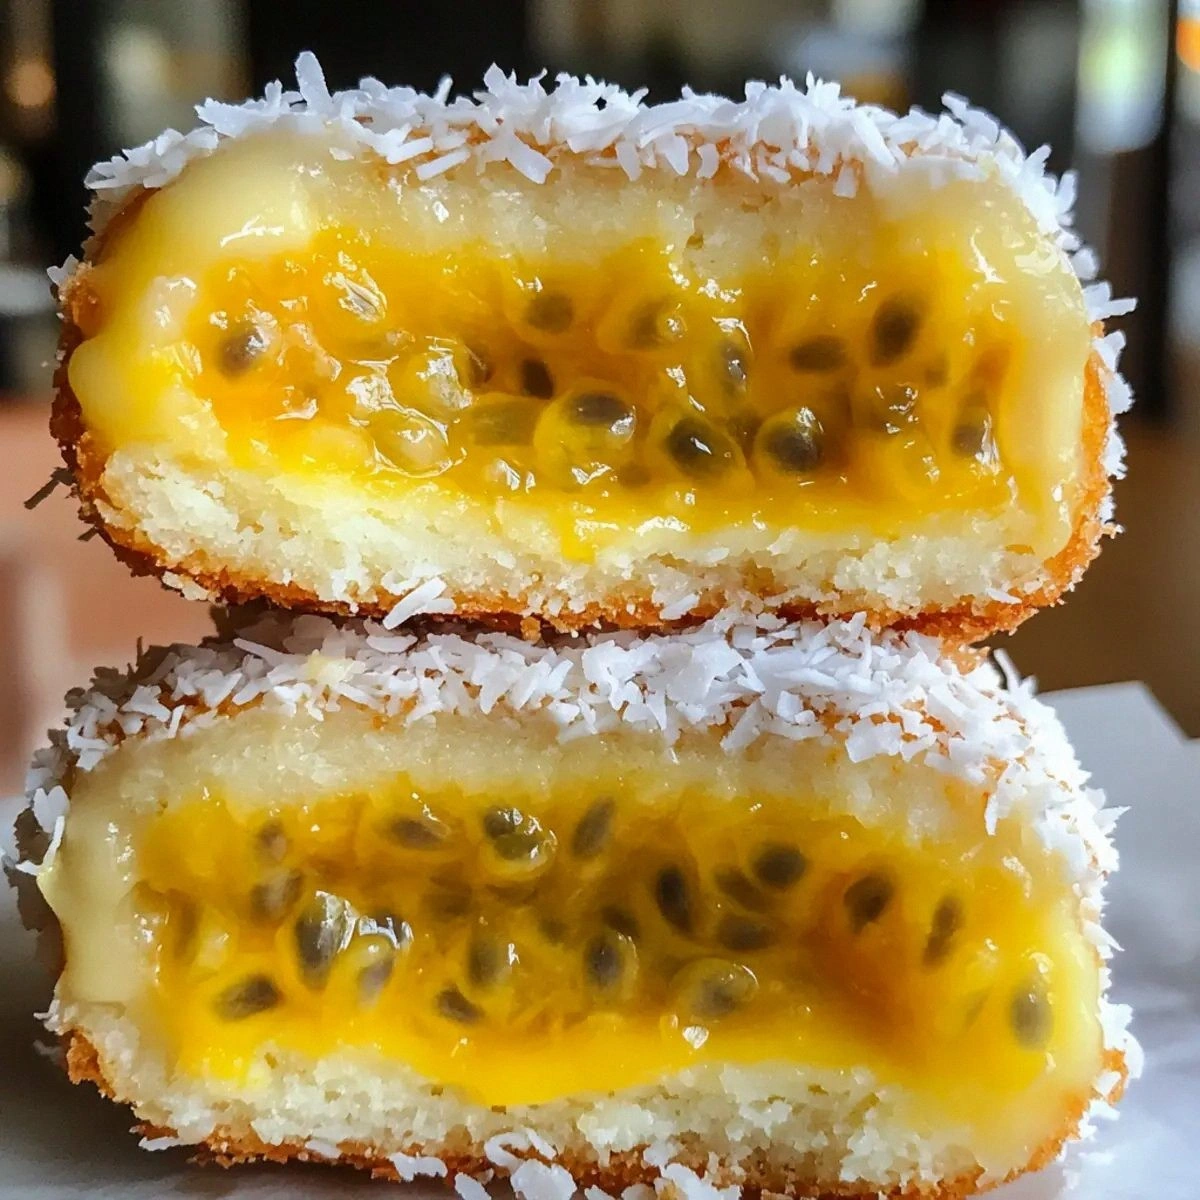
Picture this: a steaming pan of golden‑brown buns, their tops glazed with a glossy blueberry glaze that shimmers like a sapphire sunrise. The scent of fresh blueberries mingles with the buttery aroma of freshly whipped cream, filling the kitchen with a perfume that makes your stomach growl with anticipation. As you lift a bun, the dough feels springy, almost elastic, and the first bite releases a burst of sweet, tart blueberries that dance across your palate, followed by a silky, creamy finish that lingers like a sweet after‑taste. It’s the kind of moment that makes you want to hug your stove and thank it for being a loyal ally.
What makes this version stand out? It’s the meticulous balance of ingredients that turns an ordinary batch into a chewy, fruity dream. I’ve tweaked the classic mochi dough by adding a touch of cornstarch to lock in moisture, used heavy cream instead of milk for an extra layer of richness, and folded in a generous amount of blueberries to create pockets of juicy bursts. The result is a bun that’s soft on the inside, slightly crisp on the outside, and has a glaze that’s just the right amount of sticky without being cloying. The best part? It’s surprisingly easy to make, even for a kitchen rookie who’s never rolled dough before.
Now, I’m going to walk you through every single step, from the first whisk of flour to the final drizzle of glaze. By the end, you’ll wonder how you ever made these buns any other way. And trust me, I dare you to taste this and not go back for seconds. If you’re ready for a game‑changer that will become your new favorite breakfast or dessert, keep reading.
What Makes This Version Stand Out
- Taste: The blend of sweet blueberries and creamy filling creates a flavor profile that feels like a summer picnic in a bun. The glaze’s subtle acidity cuts through the richness, leaving a clean finish that invites you to take another bite.
- Texture: The mochi dough’s elasticity gives each bun a gentle chew, while the caramelized edges add a satisfying snap that contrasts with the silky interior.
- Simplicity: With only eight core ingredients, the recipe is straightforward enough for beginners, yet sophisticated enough for seasoned cooks who crave depth.
- Uniqueness: The use of heavy cream and cream cheese in the filling gives the buns a luxurious mouthfeel that you won’t find in most mochi‑based pastries.
- Crowd Reaction: Friends who’ve tried this version rave that they can’t resist the blueberry bursts and the airy dough, making it a hit at gatherings.
- Ingredient Quality: Fresh, high‑quality blueberries and real cream cheese are the secret to the authentic, buttery flavor that sets this recipe apart.
- Cooking Method: The stovetop‑to‑oven technique ensures even cooking, preventing the common issue of soggy centers.
- Make‑ahead Potential: The buns hold up wonderfully in the fridge for up to 48 hours, and they can be frozen for future indulgence.
Alright, let's break down exactly what goes into this masterpiece…
Inside the Ingredient List
The Flavor Base
Mochiko flour is the backbone of this recipe, providing the unique chewiness that defines mochi. Unlike all‑purpose flour, it contains no gluten, which means the dough doesn’t become tough when over‑mixed. Using mochiko flour also gives the buns a subtle, sweet flavor that complements the blueberries perfectly. If you can’t find mochiko, you could experiment with a blend of rice flour and tapioca starch, but the texture will be slightly different.
Water is the first liquid we add. It activates the starches, allowing the dough to bind together without becoming gummy. The ¾ cup measurement is crucial; too little water will result in a dry dough that cracks, while too much will make it sticky and unmanageable. If you’re working in a humid environment, you might need to reduce the water by a tablespoon to compensate.
The Sweet & Salty Balance
Sugar is the sweetener that elevates the entire bun, but it also helps the glaze caramelize. A quarter cup of sugar is enough to give the dough a gentle sweetness without overpowering the blueberries. The pinch of salt, measured at ¼ teaspoon, is essential for balancing the flavors; it brings out the blueberries’ natural tartness and prevents the dough from tasting flat.
If you prefer a lower‑sugar version, you can swap the sugar for a natural sweetener like honey or maple syrup, but keep in mind that the glaze will have a different consistency. A tablespoon of honey will add a distinct floral note that pairs well with the blueberries.
The Creamy Core
Heavy cream is the secret to the buns’ silky interior. It’s rich enough to add depth but light enough to keep the dough from becoming dense. The 1 cup of heavy cream is folded into the dough after it’s cooked, allowing the fats to emulsify and create a velvety texture. If you can’t find heavy cream, full‑fat milk can be used, but the buns will be slightly less luxurious.
Cream cheese brings a tangy, buttery flavor that contrasts beautifully with the sweet glaze. 8 ounces is roughly a cup, and it’s mixed with the heavy cream to form a smooth, spreadable filling. This combination creates a mouthfeel that feels like a cloud of sweetness, and it’s the key to the buns’ signature richness.
The Unexpected Star
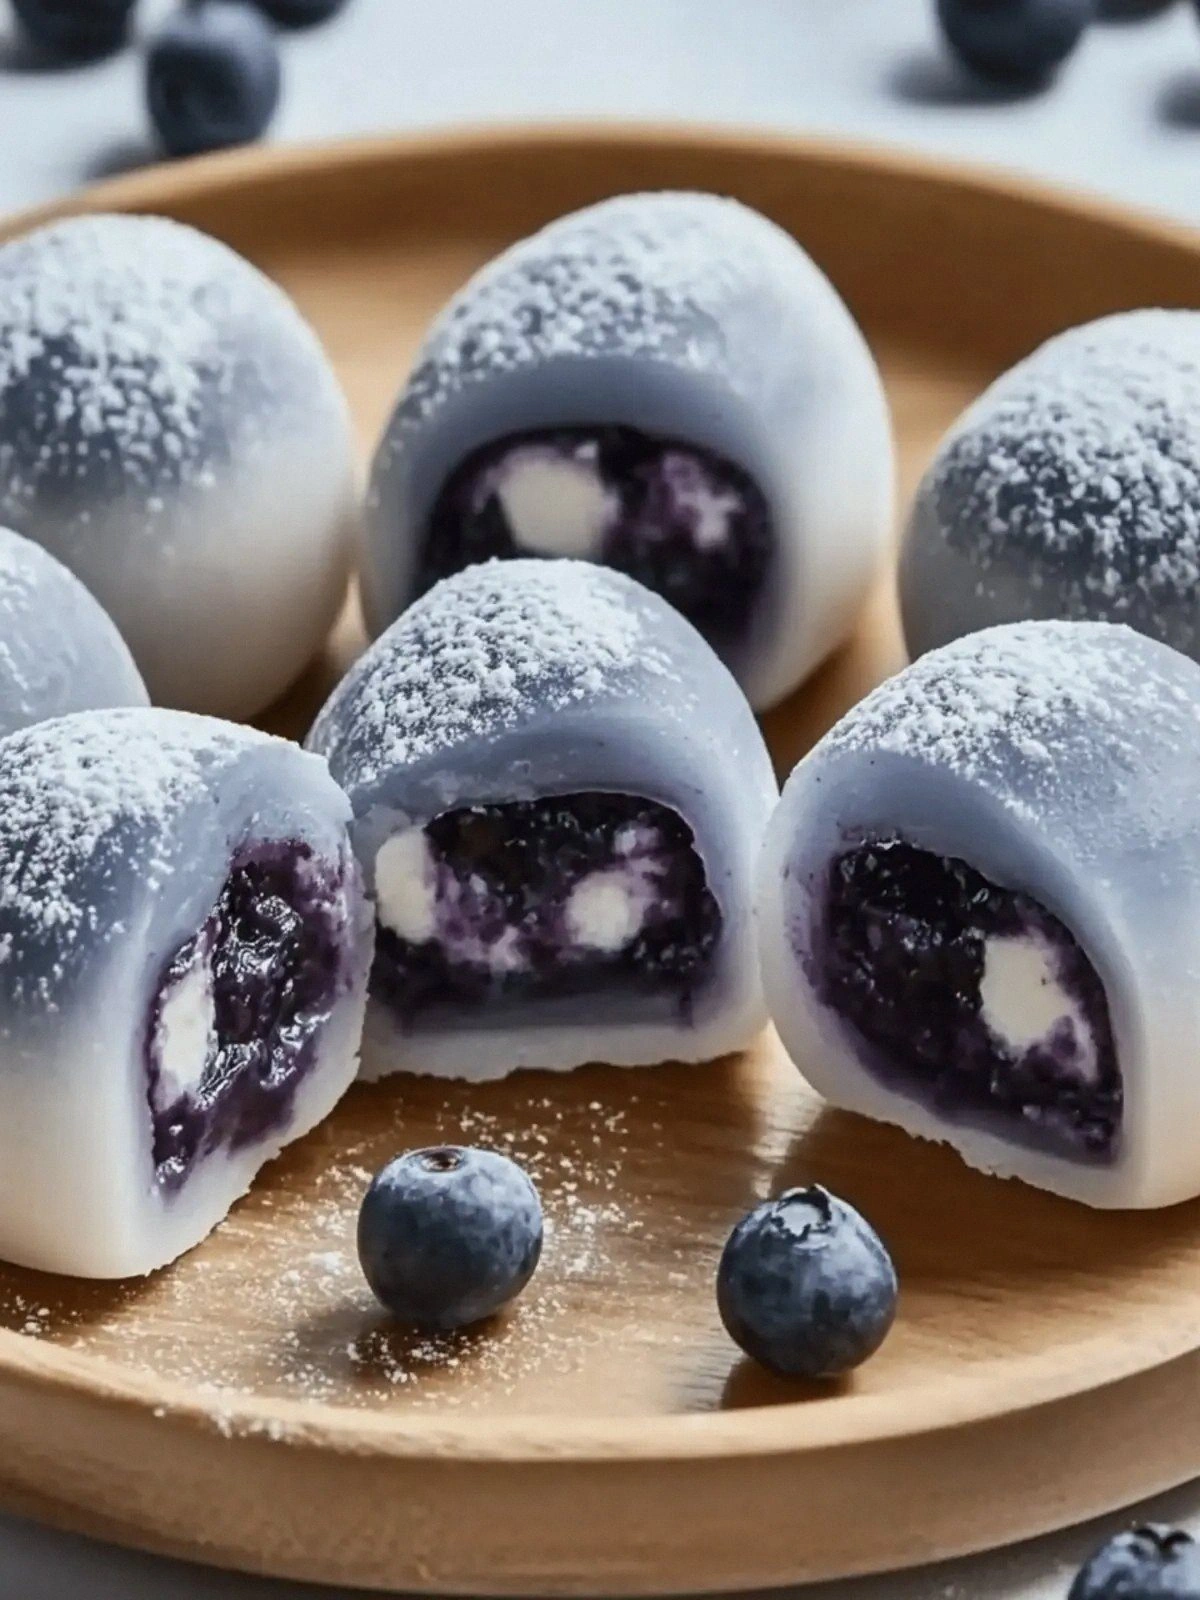
Blueberries are the star of the show, offering a burst of tartness that cuts through the creamy dough. 1 cup of fresh or frozen blueberries works well; if you use frozen, let them thaw slightly before mixing to prevent them from releasing too much liquid. The blueberries are folded into the dough after it’s cooked, ensuring they remain intact and juicy.
If you’re craving a different berry flavor, you can swap blueberries for raspberries or blackberries, but the texture will change slightly. The berries should be gently incorporated to avoid crushing them, as the intact fruit pieces are what give each bun its delightful surprise.
The Final Flourish
Cornstarch or potato starch is added to the dough to lock in moisture and prevent the buns from drying out during baking. A tablespoon is enough to give the buns a silky finish without making them gummy. If you prefer a gluten‑free version, potato starch is a great alternative that behaves similarly to cornstarch.
The cornstarch also helps the glaze set into a glossy sheen that’s both visually appealing and deliciously sticky. It’s a small addition that makes a big difference in the overall experience. A quick tip: sprinkle a little extra cornstarch on your work surface to keep the dough from sticking.
Everything's prepped? Good. Let's get into the real action…
The Method — Step by Step
- Combine dry ingredients. In a medium bowl, whisk together 1 cup mochiko flour, ¼ cup sugar, and ¼ teaspoon salt. The dry mix should look like a fine, powdery blend. This step ensures even distribution of sugar and salt, preventing clumps that could affect the dough’s texture. As you whisk, you’ll notice a faint aroma of sweetened rice, which is a prelude to the flavors to come.
- Introduce the liquids. Slowly pour ¾ cup water into the dry mixture while stirring continuously. The water should be added gradually to avoid creating a lumpy batter. Once the mixture is smooth, add 1 tablespoon of cornstarch, stirring until fully incorporated. At this point, the dough will feel slightly sticky but manageable. This is the moment of truth; if it’s too dry, you’ll need a splash more water.
- Cook the dough. Heat a non‑stick skillet over medium heat and pour the dough into the pan, forming a thin, even layer. The surface should start to bubble after about 3–4 minutes. Flip the dough once the edges lift and the underside is golden. This step creates a caramelized crust that adds a subtle crunch. Watch the sizzle; that sound is the aroma of caramelizing sugar.
- Fold in the blueberries. Gently fold 1 cup of blueberries into the cooked dough, ensuring each berry is coated but not crushed. The blueberries will burst slightly, releasing their juices into the dough, which adds a juicy center to each bun. The color contrast of the deep blue berries against the golden crust is already a feast for the eyes.
- Transfer to the oven. Preheat your oven to 375°F (190°C). Transfer the skillet to the oven and bake for 12–15 minutes until the buns are puffed and the edges are slightly crisp. The oven’s dry heat will help set the glaze while keeping the inside moist. Keep an eye on them; you want a golden finish without over‑browning.
- Prepare the filling. While the buns bake, whisk 1 cup heavy cream with 8 oz cream cheese until smooth. The mixture should be creamy and free of lumps. This filling will be swirled into the buns, creating pockets of silky cream that contrast with the chewy dough. The cream cheese adds a tang that cuts through the sweetness.
- Assemble the buns. Once the buns are done, remove them from the oven and let them cool for 5 minutes. Using a small spoon, spoon the cream mixture onto the center of each bun and roll them into a tight ball. The filling should be evenly distributed, creating a harmonious balance of sweet, tart, and creamy flavors. This rolling step is where the buns truly become a work of art.
- Glaze the tops. In a small saucepan, combine ½ cup blueberries, 1 tablespoon sugar, and 1 tablespoon water. Simmer over low heat until the mixture thickens into a glaze. Once thickened, brush the glaze onto the tops of the buns. The glaze will set into a glossy finish that’s both sweet and slightly tart. The glaze’s shine is a visual cue that the buns are ready to devour.
- Serve and enjoy. Allow the buns to rest for an additional 3 minutes before serving. This short rest lets the filling set slightly, making each bite easier to handle. Serve warm for the best experience, or let them cool completely and store in an airtight container. Either way, you’ll have a treat that’s impossible to resist.
That's it — you did it. But hold on, I've got a few more tricks that'll take this to another level…
Insider Tricks for Flawless Results
The Temperature Rule Nobody Follows
Many cooks think the oven temperature is flexible, but for mochi buns, precision is key. Baking at 375°F (190°C) ensures the buns rise evenly while the glaze sets just right. If you lower the temperature, the buns may not puff properly, resulting in a dense center. Conversely, a higher temperature can cause the tops to brown too quickly, leaving the inside undercooked. Stick to the recommended range for best results.
Why Your Nose Knows Best
As the buns bake, you’ll notice a sweet, buttery aroma rising from the oven. Trust that scent as an indicator of readiness; when the smell is caramelized but not burnt, the buns are ready. If the aroma is too faint, give them a few more minutes. Your nose is a reliable gauge for the perfect finish.
The 5-Minute Rest That Changes Everything
After removing the buns from the oven, let them rest for exactly five minutes. This brief pause allows the steam to redistribute, making the buns less sticky when you roll them. It also gives the filling a chance to firm up slightly, preventing it from oozing out when you bite. Skipping this step can lead to messy buns that lose their structural integrity.
Use a Non‑Stick Skillet for Even Cooking
A good non‑stick skillet ensures the dough doesn’t stick and burn. If you’re using a stainless steel pan, apply a light spray of cooking oil to create a barrier. The non‑stick surface allows the dough to release naturally, giving you a clean, even crust without the need for additional oil.
Keep the Blueberries Cool
Blueberries release moisture when they’re warm. To prevent sogginess, keep the blueberries chilled until you fold them into the dough. A quick trip to the fridge before mixing can make a noticeable difference in the final texture, ensuring each bun has a juicy burst rather than a watery center.
Store in an Airtight Container
After the buns have cooled completely, place them in an airtight container to maintain freshness. The airtight seal prevents the buns from drying out while still allowing the steam to escape. If you plan to eat them later, keep them in the refrigerator for up to two days.
Creative Twists and Variations
This recipe is a playground. Here are some of my favorite ways to switch things up:
Raspberry Swirl Delight
Swap blueberries for fresh raspberries and add a splash of lemon zest to the glaze. The tartness of raspberries pairs beautifully with the creamy filling, creating a bright, citrusy finish. This variation is perfect for springtime when raspberries are at their peak.
Chocolate‑Covered Bliss
Dip the finished buns in melted dark chocolate and let them set on parchment paper. The chocolate coating adds a rich, bittersweet layer that complements the sweet cream filling. This twist turns the buns into a decadent dessert for special occasions.
Almond‑Infused Crunch
Sprinkle chopped toasted almonds over the glaze before it sets. The nuts provide a delightful crunch and a nutty flavor that balances the sweetness. This variation is ideal for those who enjoy a bit of texture in their pastries.
Citrus Burst Variation
Add a tablespoon of orange zest to the dough and use an orange‑infused glaze. The citrus notes elevate the flavor profile, giving the buns a fresh, zesty finish. This version is especially refreshing during hot summer afternoons.
Savory Spin
For a savory twist, replace the blueberries with sautéed spinach and add a pinch of dried oregano to the glaze. The spinach’s earthy flavor pairs with the creamy filling, creating a unique brunch item. This savory spin is a great way to enjoy mochi buns during dinner.
Gluten‑Free Adaptation
Use a gluten‑free mochiko blend and substitute the cornstarch with arrowroot powder. The dough will retain its chewy texture while being safe for gluten‑sensitive diners. This adaptation ensures everyone can enjoy the same delightful experience.
Storing and Bringing It Back to Life
Fridge Storage
Place the buns in a shallow airtight container and store them in the refrigerator for up to 48 hours. The buns will stay moist and flavorful, and the cream filling will remain creamy. When ready to eat, you can enjoy them cold or warm them briefly in a microwave.
Freezer Friendly
Wrap each bun tightly in plastic wrap and then place them in a freezer bag. They can be frozen for up to 2 months. To thaw, let them sit at room temperature for about 30 minutes. The texture remains intact, and the flavor stays fresh.
Best Reheating Method
To reheat, place the buns on a baking sheet and warm them in a 350°F (175°C) oven for 5–7 minutes. The oven’s dry heat restores the buns’ crispness without drying them out. If you prefer a quicker method, microwave on low for 20–30 seconds, but watch closely to avoid overheating.
Add a tiny splash of water before reheating, and it steams back to perfection. This trick keeps the buns moist and prevents the cream filling from becoming too runny. With these storage tips, you can enjoy these buns anytime, anywhere.