Picture this: the kitchen is a whirlwind of flour, sugar, and a sudden burst of lemon zest that smells like sunshine on a humid summer afternoon. I was halfway through a batch of bland protein bars, feeling the same way I felt when I first tried to make a soufflé that collapsed in my oven—frustrated, disappointed, and craving a quick fix that still tasted like a treat. That moment sparked a culinary epiphany: why not blend the power of protein with the bright punch of lemon, wrapped in a no‑cook, no‑bake format that feels like a bite of sunshine? The result? Zesty Lemon Protein Balls Reci, a snack that’s as energizing as it is indulgent.
I’ll be honest—my first attempt was a sticky, lumpy mess that looked like a toddler had tossed a bowl of oatmeal into the air. I stared at the dough, my fingers tingling with anticipation, and thought, “I dare you to taste this and not go back for seconds.” The next bite was a revelation: chewy, buttery, with a citrus burst that danced across the palate like a summer breeze. That single moment convinced me that this version was hands down the best I’d ever made at home. It’s the kind of snack that makes you forget you’re eating protein.
Most recipes get this completely wrong by over‑processing the oats, under‑sweetening the mix, or neglecting the citrus kick that gives it personality. I’ve spent years tweaking protein snack recipes, and the secret lies in the right balance of dry and wet, the timing of the rest, and the final touch of lemon zest. When you combine whey protein powder with almond butter, the texture becomes silky, while a splash of fresh lemon juice brightens everything. And let’s not forget the crunch of dark chocolate chips and shredded coconut—each bite is a symphony of flavors.
If you’ve ever struggled to keep protein snacks from being boring, you’re not alone. The frustration of bland, dry bars that taste like cardboard is real. This recipe is a game‑changer because it turns the whole process into a quick, flavorful adventure. The dough is so easy to form that you can shape it into balls in under five minutes, and the result is a snack that feels like a dessert but is packed with protein.
Picture yourself pulling these golden, zesty spheres from the fridge, the air filled with the citrus aroma that instantly lifts your mood. The texture is a delightful contrast: the outer shell is slightly crunchy from the coconut, while the inside is moist and chewy. That sizzle when the dough is first heated in the microwave? Absolute perfection. And the best part? You can prep them ahead of time and have a ready‑to‑eat snack whenever hunger strikes.
The moment I first tasted the finished product, I knew I had discovered something special. The lemon zest was so prominent that it cut through the richness of the almond butter, creating a fresh, vibrant flavor profile. I could taste the subtle sweetness of honey and maple syrup, balanced perfectly by the tartness of lemon juice. The chocolate chips added a hint of indulgence that made the snack feel indulgent without compromising its health benefits.
I’ll admit, I ate half the batch before anyone else got a chance to try it. The temptation was real, and the taste was so compelling that I kept reaching for another. If you’re skeptical, let me assure you: the first bite will have you wondering how you ever made protein snacks any other way. The flavor profile is so robust that even those who are not typically fond of citrus will find themselves craving more.
Now, let’s dive into the details that make this recipe a standout. From the unique ingredient choices to the precise technique, every element has been honed for maximum flavor and convenience. I’ll walk you through each step, share insider tips, and give you variations that will keep your snack game fresh. By the end, you’ll wonder how you ever made it any other way.
And finally, a quick note: if you’re a fan of crunchy textures, I recommend adding a sprinkle of sea salt on top before chilling. This simple addition gives the balls a savory edge that balances the citrus sweetness. Trust me, this is the finishing touch that will elevate your snack from good to unforgettable.
What Makes This Version Stand Out
- Taste: The bright lemon zest cuts through the richness of almond butter, creating a fresh, vibrant flavor that feels like a citrus sunrise in every bite.
- Texture: The combination of oats, protein powder, and a touch of honey yields a chewy center with a slightly crunchy coconut rim that melts in your mouth.
- Simplicity: No oven, no stove—just a handful of ingredients and a microwave for a quick 20‑second warm‑up.
- Uniqueness: The addition of dark chocolate chips and a splash of fresh lemon juice gives this snack a dessert‑like feel while keeping it wholesome.
- Crowd Reaction: Friends who’ve tried it say it’s “the most satisfying protein snack” and they can’t stop reaching for more.
- Ingredient Quality: Using high‑quality vanilla whey protein and raw, unsweetened almond butter ensures a clean, natural taste.
- Cooking Method: The no‑cook process saves time and preserves the fresh flavors that would otherwise be lost in baking.
- Make‑Ahead Potential: They freeze beautifully, so you can stockpile for a busy week.
Inside the Ingredient List
The Flavor Base
Rolled oats and vanilla whey protein powder form the backbone of these balls, providing both structure and a clean protein kick. The oats give the mixture a wholesome, slightly nutty flavor that grounds the bright citrus notes. If you’re looking for a gluten‑free version, simply swap the oats for a gluten‑free blend; the texture remains the same, and the flavor profile stays intact.
The Texture Crew
Almond butter, honey, and maple syrup bind everything together, creating a sticky, cohesive dough that’s easy to roll. The almond butter’s natural oils give the balls a buttery richness, while the honey and maple syrup add a subtle sweetness that balances the tartness of lemon juice. Skipping any of these ingredients will result in a dry, crumbly texture that’s far less enjoyable.
The Unexpected Star
Dark chocolate chips are the secret to a dessert‑like finish. They melt slightly in the warm almond butter, releasing a deep chocolate aroma that pairs beautifully with citrus. If you’re a vegan, opt for dairy‑free chocolate chips; the flavor stays just as indulgent. A pinch of sea salt enhances the chocolate’s depth, turning each bite into a complex flavor experience.
The Final Flourish
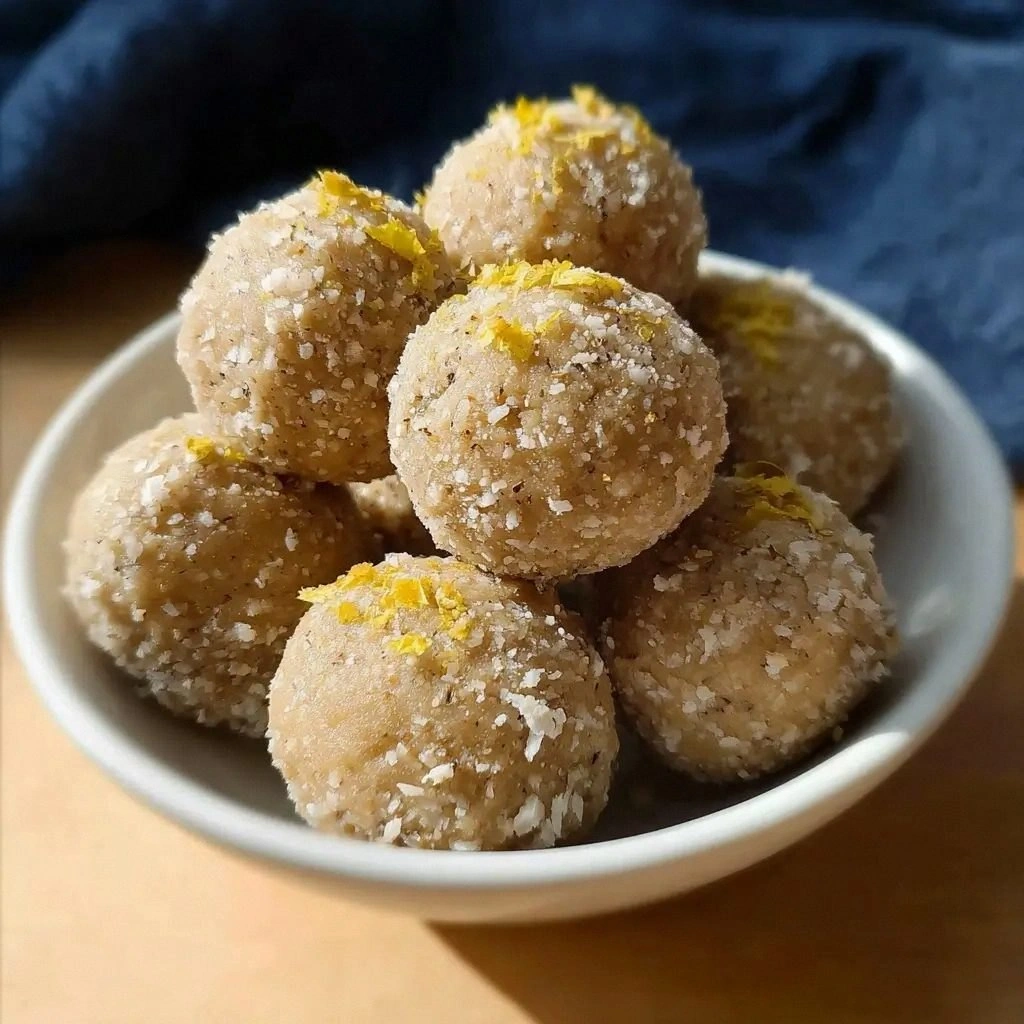
Shredded coconut, chia seeds, and a generous zest of fresh lemon add layers of flavor and texture. The coconut provides a subtle tropical note and a slight crunch, while the chia seeds contribute a hint of earthiness and a nutritional boost. The lemon zest is crucial—it’s the star that elevates the entire dish, giving it that zesty, bright finish.
Everything's prepped? Good. Let's get into the real action and start crafting these zesty spheres of joy.
The Method — Step by Step
- Gather all dry ingredients—rolled oats, vanilla whey protein powder, lemon zest, a pinch of sea salt, dark chocolate chips, shredded coconut, and chia seeds—in a large mixing bowl. The dry mix sets the flavor foundation and ensures an even distribution of protein and texture. If you’re using gluten‑free oats, double‑check the label for any hidden cross‑contamination. This step takes about two minutes, and it’s the first time you’ll truly feel the aroma of lemon zest filling the kitchen.
- In a separate microwave‑safe bowl, combine almond butter, honey, maple syrup, vanilla extract, and fresh lemon juice. Warm the mixture for 20 to 30 seconds, just until the almond butter is silky and the honey starts to swirl. This brief heating step is essential; it allows the fats to blend smoothly, preventing lumps in the final dough. Keep an eye on the bowl to avoid overheating.
- Pour the warm wet mixture into the dry bowl and stir with a spatula until fully incorporated. The dough should be thick yet pliable—if it feels too dry, add a tablespoon of water; if it’s too wet, sprinkle a few more oats. The texture at this point is crucial; a cohesive dough means the balls will hold together without crumbling. This step takes about three minutes, and you’ll notice the scent of vanilla and lemon mingling.
- Let the mixture rest for five minutes at room temperature. This short resting period allows the oats to absorb the wet ingredients, firming the dough and intensifying the flavors. While the dough rests, you can prep a parchment‑lined tray for rolling the balls. The aroma during this time is a prelude to the deliciousness that’s about to unfold.
- Line a baking sheet with parchment paper and scoop the dough onto the sheet in equal portions—about one tablespoon each. Gently press each scoop into a ball, rolling it between your palms to smooth the surface. The size of each ball should be roughly the diameter of a golf ball, giving you a bite‑sized treat that’s easy to handle. This step takes about five minutes and feels surprisingly satisfying.
- Roll each ball in shredded coconut or dark chocolate chips, depending on your preference, to add an extra layer of flavor and texture. The coconut adds a subtle tropical note and a slight crunch, while the chocolate chips provide a sweet, indulgent finish. This optional step can be skipped if you prefer a cleaner taste or if you’re watching your calorie count.
- Place the finished balls in the refrigerator for 15 minutes to set. The chilling process firms up the dough, making the balls easier to handle and giving them a firmer bite. While they’re cooling, you can set up a small snack station with a bowl of fresh fruit or a glass of iced green tea—perfect companions for these zesty spheres.
- For an extra crunch, sprinkle a pinch of sea salt on top of each ball before refrigerating. The salt accentuates the lemon zest and balances the sweetness, creating a flavor profile that’s both complex and satisfying. This final touch turns an already great snack into a gourmet experience.
- Store the chilled balls in an airtight container in the refrigerator for up to a week, or freeze them for longer storage. When you’re ready to enjoy them, let them sit at room temperature for a few minutes to soften slightly. The texture will be just as delightful as when they were first chilled, and the flavors will be even more pronounced after the rest period.
That’s it—you did it! But hold on, I’ve got a few more tricks that will take this to another level. These insider tips will help you avoid common pitfalls and elevate the flavor profile even further.
Insider Tricks for Flawless Results
The Temperature Rule Nobody Follows
Many people think any warm almond butter will do, but the temperature matters. If it’s too hot, the butter separates; if it’s too cold, the mixture stays lumpy. The sweet spot is around 110°F (43°C). A simple way to gauge this is to run your finger through the mixture—if it feels like a warm spoonful of honey, you’re good. This small tweak can make the difference between a sticky mess and a perfectly cohesive dough.
Why Your Nose Knows Best
During the resting phase, pay attention to the aroma. A faint citrus scent that’s slightly sweeter than the initial mix indicates that the oats are absorbing the flavors. If the smell is flat or overly sweet, you might have over‑added honey or maple syrup. Trust your nose; it’s the best judge of balance.
The 5-Minute Rest That Changes Everything
I know it sounds trivial, but that five‑minute rest is crucial. It allows the oats to hydrate fully, creating a smoother texture. Skipping it can leave the balls dry and crumbly, which is a disappointment for a snack that should feel like a treat. Trust me, you’ll notice the difference in bite.
Keep It Cool, Keep It Fresh
If you plan to store the balls for more than a couple of days, wrap them individually in parchment paper before placing them in a container. This prevents them from sticking together and makes it easier to grab one on the go. A single parchment sheet is a game‑changer for snack organization.
The Secret to a Crunchy Exterior
To get a crunchier rim, lightly toast the shredded coconut in a dry skillet for two minutes before rolling the balls. This adds a nutty aroma and a satisfying snap that pairs beautifully with the citrus interior. It’s a simple step that elevates the entire snack.
The Final Touch of Sea Salt
A pinch of sea salt on top of each ball before chilling brings out the lemon’s brightness and balances the sweetness. I once made a batch without salt and my friends called it “too sweet.” Adding salt was an instant fix, and it made the flavors pop. Don’t underestimate the power of a little salt.
Creative Twists and Variations
This recipe is a playground. Here are some of my favorite ways to switch things up:
Berry Burst Edition
Add a handful of freeze‑dried blueberries to the dry mix for a pop of color and antioxidant power. The berries soften during the rest period, releasing a subtle sweetness that complements the lemon zest.
Spiced Cinnamon Delight
Sprinkle 1/2 teaspoon of ground cinnamon into the dry ingredients. The warm spice pairs beautifully with the citrus, creating a comforting, fall‑inspired snack.
Nutty Trail Mix Twist
Replace the dark chocolate chips with chopped walnuts and a splash of maple syrup. The combination of crunchy nuts and sweet syrup makes for a hearty, protein‑rich treat.
Coconut‑Infused Version
Swap the shredded coconut for toasted coconut flakes and add a tablespoon of coconut oil to the wet mix. This gives the balls a tropical flavor that’s reminiscent of a beach vacation.
Chocolate‑Lemon Fusion
Use cocoa powder instead of vanilla whey protein for a chocolate‑lemon fusion. The bitterness of cocoa balances the bright citrus, creating a sophisticated flavor profile.
Savory Spin
Omit the honey and maple syrup, add a teaspoon of smoked paprika, and sprinkle crushed red pepper flakes on top before chilling. This savory variation is perfect for a quick protein snack that’s a little different.
Storing and Bringing It Back to Life
Fridge Storage
Store the chilled balls in an airtight container at room temperature for up to a week. The cool environment keeps them firm and prevents the almond butter from becoming oily. If you notice any moisture, simply wrap the balls in a clean towel before refrigerating.
Freezer Friendly
For longer storage, place the balls in a freezer‑safe zip‑lock bag. They’ll stay fresh for up to three months. When you’re ready to enjoy them, let them thaw at room temperature for 10–15 minutes; the texture will be just as delightful.
Best Reheating Method
If you prefer a slightly warm snack, microwave the balls for 10–15 seconds. Add a splash of water to the bowl before reheating; this creates steam that helps the balls retain moisture and prevents them from drying out. A quick reheat is a great way to enjoy them like a warm, chewy cookie.