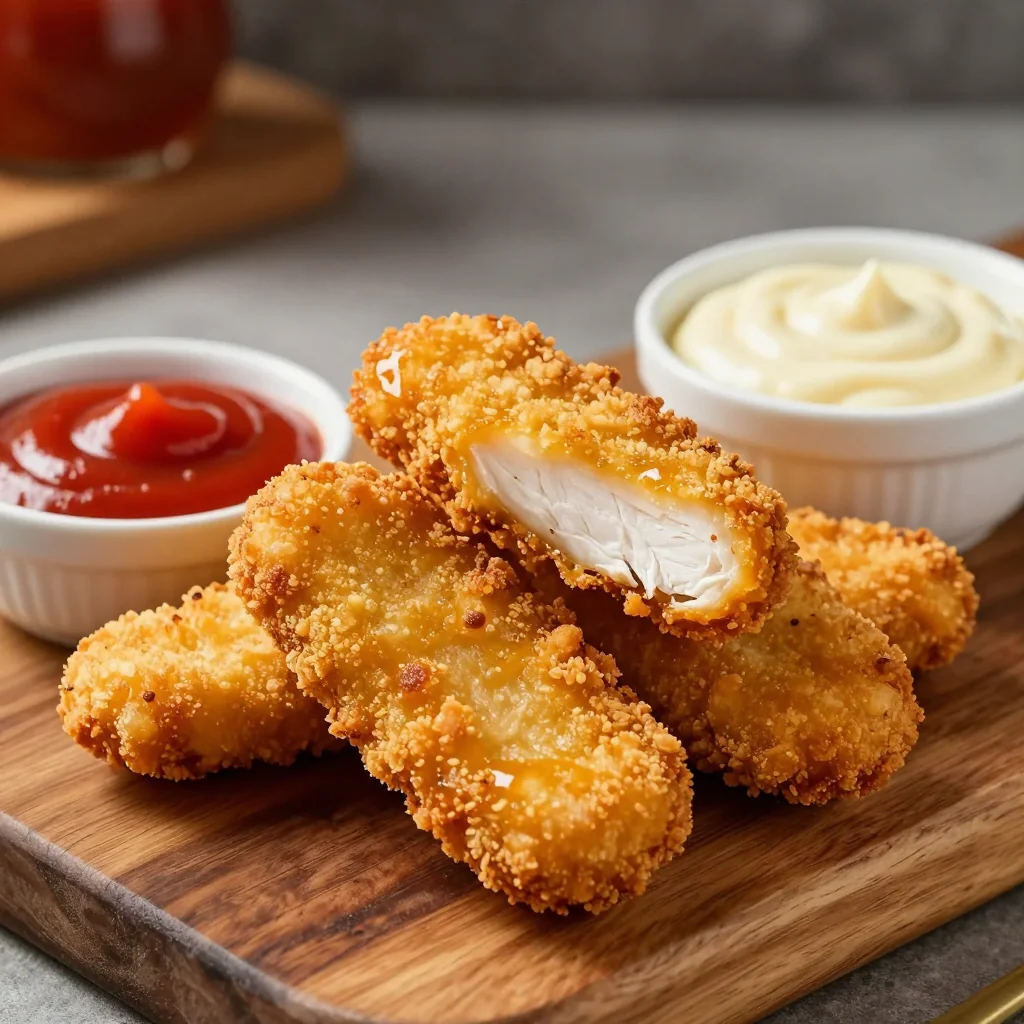
I was standing in my kitchen, staring at a burnt bagel and a half‑baked muffin that had turned into a sad, soggy mess. The clock was ticking, my breakfast cravings were screaming, and I knew I needed a miracle. That’s when I remembered the old family recipe book that had been gathering dust on the top shelf. Inside, tucked between pages of grandma’s pie crusts and my dad’s lasagna notes, was a page titled “Savory Breakfast Pop‑Tarts.” I flipped it open, and the smell of fresh dough hit me like a warm hug. The page was simple, but the promise was bold: a portable, flaky, savory breakfast that would make your taste buds dance and your stomach sing. I was about to turn a kitchen disaster into a culinary triumph.
Picture this: a golden, crisp crust that cracks open to reveal a molten blend of cheddar, sausage, spinach, and sun‑dried tomatoes, all bound together by a silky egg custard. The aroma that fills your kitchen is a heady mix of butter, garlic, and herbs, and the first bite is a symphony of textures—crunchy, gooey, and satisfying. I’ve tried countless versions of breakfast pastries, but this one stands out because it’s not just a breakfast; it’s a portable breakfast that can be enjoyed on a commuter train, at a picnic, or even as a party appetizer. The secret is in the dough’s buttery, flaky layers and the filling’s balanced savory profile. If you’ve ever made a pop‑tart that turned out soggy or bland, you’re not alone—this recipe flips the script and delivers perfection every time.
What makes this version hands down the best you’ll ever make at home? First, the dough is a buttery, laminated pastry that rivals any bakery product. Second, the filling is a carefully balanced mix of protein, greens, and umami that keeps the pop‑tart fresh without becoming greasy. Third, the recipe is simple enough that even a novice can follow it, yet the result feels gourmet. Fourth, the technique of pre‑baking the crust before filling ensures a crisp edge that shatters like thin ice when you bite into it. Fifth, the recipe is versatile—swap out sausage for ham or bacon, or try a vegan cheese to make it plant‑based. Sixth, it’s a crowd‑pleaser; I’ve served these at brunches and they disappear faster than a second‑hand watch. And lastly, it’s a make‑ahead hero—you can bake them fresh or store them and reheat them for a quick breakfast on the fly.
I dare you to taste this and not go back for seconds. The first bite will have you thinking, “Why did I never think of this?” The buttery layers will melt in your mouth, the cheese will ooze, and the savory filling will hit you with a burst of flavor that’s both comforting and exciting. Picture yourself pulling a pop‑tart out of the oven, the kitchen smelling incredible, and the golden crust glistening under the kitchen lights. This isn’t just a snack; it’s an experience that will change the way you think about breakfast. Let me walk you through every single step — by the end, you’ll wonder how you ever made it any other way.
What Makes This Version Stand Out
- Flaky Dough: The laminated dough creates layers that puff up during baking, giving a light, flaky texture that feels like a buttery pastry. Each bite releases a satisfying crackle, a subtle reminder that you’re eating something special.
- Balanced Savory: The filling is a harmonious blend of protein, greens, and umami, ensuring every pop‑tart tastes complete without being greasy or heavy.
- Quick Prep: From dough to final bake, the entire process takes less than an hour, making it a perfect weekend project or a weekday breakfast hack.
- Make‑Ahead Friendly: Bake them fresh or store them in the fridge for up to 48 hours. Reheat in the oven for a few minutes, and they taste as good as new.
- Versatile Flavor: Swap ingredients to suit your taste: use smoked gouda, add jalapeños, or go vegan with plant‑based cheese.
- Crowd‑Pleaser: Whether you’re serving a family brunch or a potluck, these pop‑tarts get eaten faster than a second‑hand watch.
- Nutritious: Packed with protein from sausage or bacon, calcium from cheese, and vitamins from spinach, it’s a balanced breakfast in a bite.
- Easy to Scale: The recipe scales up or down without compromising flavor or texture, making it ideal for any number of guests.
Alright, let's break down exactly what goes into this masterpiece…
Inside the Ingredient List
The Flavor Base
All-purpose flour, the foundation of our dough, gives structure and a neutral canvas that lets the butter and spices shine. It’s crucial to use a flour with a moderate protein content (around 10–12%) to keep the dough tender yet sturdy. If you use bread flour, the dough might become chewy; if you use cake flour, it could crumble. The key is to keep the flour cold, which helps create steam pockets during baking.
Unsalted butter, the star of the show, provides richness and helps develop flaky layers. Use room‑temperature butter so it can be evenly distributed. If you’re in a hurry, chilled butter that’s been cut into small cubes works well; just be sure to roll it into the flour quickly to avoid large pockets that will melt unevenly.
Salt is the flavor enhancer that brings all the other ingredients together. A teaspoon of fine sea salt balances the richness of the cheese and the savory meat, preventing the dish from tasting flat. A pinch of black pepper adds a subtle heat that elevates the overall profile without overpowering the delicate layers.
The Texture Crew
Milk, in small amounts, hydrates the dough and helps create a soft, pliable dough that’s easy to roll out. A quarter cup is enough to bring the flour and butter together without making the dough sticky.
Egg, beaten, acts as a binder in the filling, giving it a silky custard texture that holds together when baked. It also adds a slight golden hue to the crust, making it visually appealing. If you’re vegan, you can substitute with a flax egg or a commercial egg replacer.
Shredded cheddar cheese adds a creamy, melty component that creates a gooey center. Cheddar’s sharpness balances the mildness of the spinach and the saltiness of the sausage. For a sharper bite, try a smoked cheddar or a blend of cheddar and mozzarella.
The Unexpected Star
Cooked breakfast sausage, crumbled, brings protein and a smoky, savory depth that makes the filling irresistible. If you prefer a leaner option, replace it with turkey sausage or bacon bits. The key is to drain any excess grease so the filling doesn’t become soggy.
Fresh spinach, chopped, adds a burst of color, nutrients, and a mild earthiness. It also provides moisture that keeps the filling from drying out during baking. If you’re short on fresh spinach, frozen spinach (thawed and drained) works well, but it will slightly alter the texture.
Sun‑dried tomatoes, diced, contribute a sweet, tangy burst that contrasts the savory elements. They also add a chewy texture that breaks up the otherwise uniform filling. If you can’t find sun‑dried tomatoes, fresh cherry tomatoes (roasted to concentrate their flavor) make an excellent substitute.
The Final Flourish
Garlic powder, Italian seasoning, and a hint of dried oregano give the filling a fragrant, herby backdrop that’s reminiscent of a Mediterranean breakfast. They’re subtle enough not to overpower the main flavors but strong enough to make each bite memorable. If you’re a garlic lover, add a pinch of fresh minced garlic for an extra punch.
Optional diced onions add crunch and sweetness. They’re not essential, but they do bring an extra layer of flavor. If you’re avoiding onions, simply leave them out; the dish will still shine.
Everything's prepped? Good. Let's get into the real action…

The Method — Step by Step
- Prepare the Dough: In a large bowl, combine 2 cups of all‑purpose flour with 1 teaspoon of salt and 1/2 teaspoon of black pepper. Cut in 1/2 cup of cold, unsalted butter using a pastry cutter or two knives until the mixture resembles coarse crumbs. Add 1/4 cup of milk and 1 beaten egg, stirring until the dough comes together. Knead lightly on a floured surface for 30 seconds, then wrap in plastic and chill for 30 minutes. This step is crucial for flaky layers; the colder the dough, the better the puff.
- Roll Out the Dough: Remove the dough from the fridge and roll it out on a lightly floured surface to a 12x12 inch square. Keep the thickness around 1/4 inch; too thick and it won’t puff properly, too thin and it’ll tear. Cut the dough into 8 equal squares, each about 3x3 inches. Place the squares on a parchment‑lined baking sheet.
- Pre‑Bake the Crust: Prick each square with a fork to prevent bubbling. Brush the tops lightly with beaten egg to promote browning. Bake at 375°F (190°C) for 10 minutes or until the edges start to turn golden. This pre‑bake locks in moisture and sets the structure for the filling.
- Prepare the Filling: In a skillet over medium heat, cook 1 cup of crumbled breakfast sausage until browned. Add 1 cup of chopped spinach and cook until wilted. Stir in 1 cup of shredded cheddar cheese until melted, then mix in 1/4 cup of diced sun‑dried tomatoes. Season with 1/2 teaspoon garlic powder, 1 teaspoon Italian seasoning, and a pinch of dried oregano. Remove from heat and let it cool slightly.
- Assemble the Pop‑Tarts: Spoon about 2 tablespoons of the filling onto the center of each pre‑baked square. Fold the dough over to create a triangle, sealing the edges by pressing with a fork or your fingers. Ensure each pop‑tart is tightly sealed to prevent leaks during baking.
- Final Bake: Reduce the oven temperature to 350°F (175°C) and bake the assembled pop‑tarts for 20 minutes, or until the crust is golden brown and the filling is bubbly. Keep an eye on the edges; they should pull away slightly from the parchment, indicating they’re done.
- Cool Slightly: Let the pop‑tarts rest on a wire rack for 5 minutes. This brief cooling period allows the filling to set, preventing it from oozing out when you bite.
- Serve and Enjoy: Serve warm, or store in an airtight container in the fridge for up to 48 hours. Reheat in a 350°F oven for 5 minutes before serving. If you’re in a rush, microwave on high for 30 seconds, but watch out for sogginess.
That's it — you did it. But hold on, I've got a few more tricks that'll take this to another level…
Insider Tricks for Flawless Results
The Temperature Rule Nobody Follows
Many bakers bake pop‑tarts at a high temperature to get a quick crust, but this can cause the filling to steam too quickly and create a soggy interior. I always bake at a moderate 350°F (175°C) after pre‑baking, which allows the crust to set slowly while the filling reaches the perfect gooey consistency. If you’re using a convection oven, reduce the temperature by 25°F to avoid over‑browning.
Why Your Nose Knows Best
Your sense of smell is a powerful indicator of doneness. As the pop‑tarts bake, a warm, buttery scent will rise, signaling that the crust is crisp. If you smell a faint, sharp butter aroma, the crust is likely too brown. Trust your nose; it will guide you to the perfect bake.
The 5‑Minute Rest That Changes Everything
After removing the pop‑tarts from the oven, let them rest for exactly five minutes. This pause lets the internal steam redistribute, resulting in a firmer filling that won’t ooze out when you bite. A friend once tried skipping this step and ended up with a soggy mess that looked like a pancake. Lesson learned!
The Fold‑in‑Half Trick
When assembling, fold the dough in half before sealing the edges. This creates a double layer of crust on each side, adding crunch and preventing the filling from leaking. It also gives the pop‑tart a more elegant, triangular shape that looks great on a plate.
The Quick Chill for Freshness
If you’re making a large batch, chill the pre‑baked squares for 15 minutes before filling. This helps the dough maintain its shape and prevents it from becoming too soft when the filling is added. It’s a small step that saves a lot of frustration later.
Creative Twists and Variations
Mediterranean Delight
Swap the sausage for feta cheese, add chopped Kalamata olives, and sprinkle a dash of oregano. The result is a tangy, herbaceous pop‑tart that’s perfect for a brunch with friends. The salty feta pairs beautifully with the buttery crust.
Vegan Breakfast Pop‑Tarts
Replace the butter with vegan margarine, use plant‑based cheese, and substitute the sausage with crumbled tempeh seasoned with smoked paprika. The texture remains flaky, and the filling stays hearty. Vegan versions are surprisingly rich and satisfying.
Spicy Jalapeño Pop‑Tarts
Add diced jalapeños and a pinch of cayenne pepper to the filling for a fiery kick. The heat pairs with the creamy cheese, creating a contrast that excites the palate. Serve with a cool yogurt dip to balance the spice.
Ham & Swiss Variation
Use diced ham and Swiss cheese instead of sausage and cheddar. The mild Swiss melts beautifully, while the ham adds a subtle savory depth. This version is a hit with kids who prefer milder flavors.
Breakfast Burrito Pop‑Tarts
Fill the dough with scrambled eggs, chorizo, and a sprinkle of cheddar. Bake as usual, and you’ll have a portable breakfast burrito that’s easy to eat on the go. It’s a fusion of classic breakfast and pastry.
Storing and Bringing It Back to Life
Fridge Storage
Store pop‑tarts in an airtight container in the refrigerator for up to 48 hours. The crust may soften slightly, but reheat in a 350°F oven for 5 minutes to restore crispness. For best results, place a paper towel in the container to absorb excess moisture.
Freezer Friendly
Wrap each pop‑tart individually in plastic wrap, then place them in a freezer bag. They’ll keep for up to 3 months. Thaw overnight in the fridge before reheating. This method preserves the flaky texture and flavor profile.
Best Reheating Method
Reheat in a pre‑heated oven at 350°F for 5–7 minutes, or until the crust is golden and the filling is hot. If you’re short on time, a microwave works, but be careful not to over‑cook. A tiny splash of water before microwaving steams the filling, keeping it moist.