I still remember the first time I attempted salmon cakes. It was a rainy Tuesday, the kind that makes your socks feel damp even when they're technically dry, and I was staring at a can of salmon like it had personally offended me. My grandmother's voice echoed in my head—"Fish cakes should never come from a can, dear"—but my bank account had other opinions. Thirty minutes later, I was eating what could only be described as fishy hockey pucks, complete with rubbery edges and a center that tasted like disappointment. That failure haunted me for months, until a friend dared me to try again, promising that homemade salmon cakes could be crispy, tender, and actually crave-worthy. Challenge accepted.
Picture this: golden patties that shatter like thin ice when your fork hits them, revealing a center so moist and flaky it practically sighs. The aroma of fresh herbs dancing with lemon zest, the gentle sizzle as they hit the pan, the way the edges caramelize into deep amber perfection. This isn't just another recipe—this is the salmon cake redemption story you didn't know you needed. I've spent three years perfecting this method, testing everything from panko to potato chips as binders, and I'm here to tell you that most recipes get the fundamentals completely wrong. They treat salmon cakes like a way to hide fish, when really, they should celebrate it.
What you're about to make will ruin you for restaurant versions forever. These salmon cakes have converted self-proclaimed fish haters, impressed dinner guests who "don't do seafood," and become my go-to emergency dinner when I want something that tastes like I planned ahead. The secret isn't fancy ingredients—it's understanding exactly how to handle the salmon, when to add each component, and the one technique that guarantees those crispy edges without drying out the center. If you've ever struggled with salmon cakes that fall apart, taste bland, or have the texture of cat food, you're not alone—and I've got the fix.
Let me walk you through every single step—by the end, you'll wonder how you ever made it any other way.
What Makes This Version Stand Out
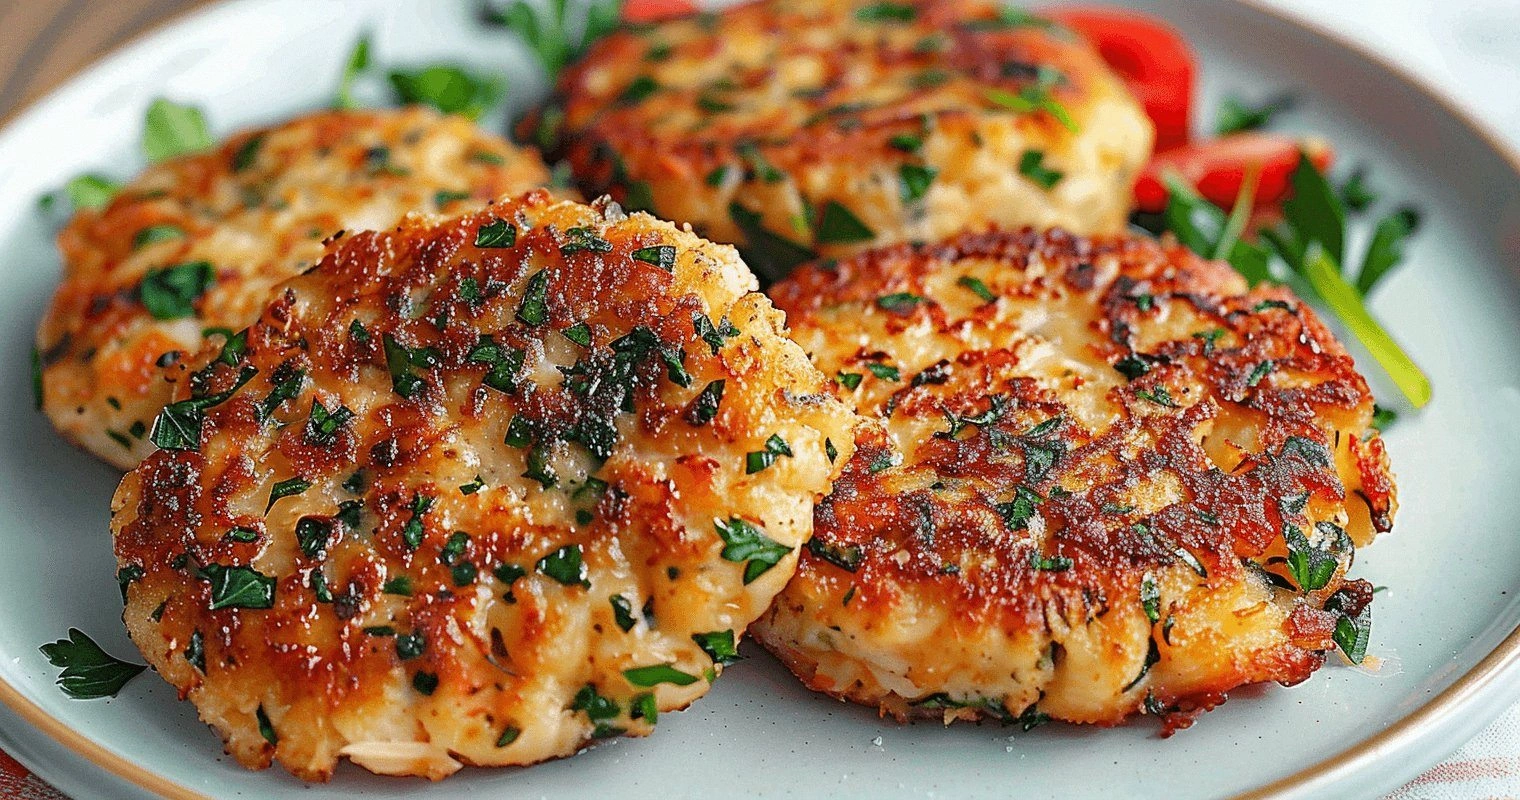
Restaurant-Quality Crust: The exterior develops a shatteringly crisp shell that sounds like breaking ice when you bite into it, thanks to a double-coating method I discovered by accident. First, a light dusting of seasoned flour creates a glue for the panko, which then fries into golden shards that stay crispy even after cooling. Most recipes skip this step and end up with soggy bottoms that stick to the plate.
Moisture-Lock Technique: Instead of mixing everything into a homogenous paste, we fold the salmon in last, keeping distinct flakes that provide texture and prevent that dreaded fish-loaf situation. The binder is just enough to hold things together without turning everything into baby food. Your fork will meet actual pieces of salmon, not just flavored mush.
Flavor Bomb Seasoning: We're not shy here—fresh dill, lemon zest, Old Bay, and a whisper of smoked paprika create layers that complement rather than mask the salmon. The seasoning hits early and often, building complexity instead of dumping everything in at the end like an afterthought.
Make-Ahead Magic: These freeze beautifully and cook from frozen in under 12 minutes, making them perfect for those "what's for dinner" emergencies. Shape them on Sunday, and you've got instant gourmet meals all week. They even travel well for picnics and potlucks.
One-Bowl Wonder: Despite tasting like you spent hours, everything comes together in one bowl with minimal cleanup. No food processors, no multiple pans, no complicated techniques. If you can mix meatloaf, you can make these salmon cakes.
Leftover Transformation: Got leftover cooked salmon? This recipe doubles as the best second-act transformation ever, turning yesterday's dinner into something entirely new. Even people who hate leftovers will ask for this again.
Crowd-Pleasing Flexible: Serve them as fancy appetizers with aioli, casual sandwiches on brioche, or elegant entrées over greens. They adapt to any occasion, from game day to date night, without feeling out of place.
Alright, let's break down exactly what goes into this masterpiece...
Inside the Ingredient List
The Flavor Base
Fresh salmon is the star here, and please don't even think about using that sad canned stuff. You want about a pound of skinless salmon fillet, preferably wild-caught if your budget allows. The fish should smell like the ocean, not fishy—if it makes you wrinkle your nose, walk away. Cut it into small cubes and give it a rough chop; we're looking for pieces about the size of peas, not salmon puree. This texture is what separates restaurant-quality cakes from the cafeteria version your grandma warned you about.
Shallots bring a subtle sweetness that onions can't match, and they melt into the background without overwhelming the salmon. One medium shallot, minced finer than you think necessary, distributes flavor evenly throughout each cake. If you only have onion, use half the amount and soak it in ice water for ten minutes to tame the bite. The goal is aromatic background, not onion with fish.
Lemon zest might seem like a garnish, but it's actually doing serious work here. The oils in the zest contain aromatic compounds that bind to the fish, brightening everything without adding acidity that could break down the proteins. Use a microplane and only the yellow part—white pith brings bitterness that no amount of sauce can hide. One lemon gives you enough zest for the cakes plus a squeeze over the top at the end.
The Texture Crew
Panko breadcrumbs are non-negotiable if you want that shatteringly crisp exterior. Regular breadcrumbs absorb too much moisture and create dense, heavy cakes that sit in your stomach like rocks. Panko stays light and crispy, creating little air pockets that make each bite interesting. Don't substitute with cracker crumbs unless you enjoy eating fish-flavored cardboard.
Egg acts as the glue, but one is plenty—too much egg and you're making salmon quiche. Beat it separately before adding so you don't get streaks of cooked egg white in your cakes. The egg should coat everything lightly, not pool at the bottom of the bowl. Think of it as a light jacket, not a winter coat.
Mayonnaise might seem weird, but it's the secret to moist cakes that don't taste like mayo. Just two tablespoons add richness and prevent the salmon from drying out during cooking. Use real mayo, not the low-fat stuff that's mostly water and sadness. The fat in the mayo keeps everything tender without adding obvious flavor.
The Unexpected Star
Old Bay seasoning is the game-changer that makes people ask "what's in these?" It brings celery salt, paprika, and mysterious spices that complement seafood without overwhelming it. If you don't have Old Bay, a mix of celery salt, paprika, and a pinch of cayenne gets you close. The seasoning should whisper, not shout—you want people to taste salmon first, spices second.
Dijon mustard adds complexity and a subtle tang that cuts through the richness. Just a teaspoon distributes throughout the mixture, enhancing everything without announcing itself. Skip the yellow mustard—it's too aggressive and makes the cakes taste like ballpark food. Good Dijon should have wine in the ingredient list.
The Final Flourish
Fresh dill is worth seeking out; dried dill tastes like hay and disappointment. The frilly herb brings an almost anise-like quality that makes salmon taste more like itself, somehow. Chop it just before using—dill loses its punch faster than gossip spreads in a small town. If you absolutely must substitute, fresh tarragon works, but use half as much.
Butter for frying is non-negotiable. Oil works, but butter creates those nutty brown edges that make people fight over the last cake. Use a mix of butter and oil—butter for flavor, oil to raise the smoke point so nothing burns. The pan should sizzle when you add the cakes, not smoke like a bad cigar.
Everything's prepped? Good. Let's get into the real action...
The Method — Step by Step
- Start by patting your salmon cubes absolutely dry with paper towels—this is the moment of truth where many recipes go wrong. Moisture is the enemy of browning, and wet salmon steams instead of sears. Lay the cubes on fresh paper towels, top with another layer, and press gently but firmly. You want to remove surface moisture without mashing the fish into paste. This step takes two minutes but makes the difference between sad gray cakes and golden perfection.
- In a large bowl, whisk together the egg, mayonnaise, Dijon, Old Bay, and lemon zest until it looks like a unified sauce. This is your flavor base, and whisking now prevents streaks of seasoning later. The mixture should be pale yellow and slightly thick, coating the back of a spoon. Don't overthink it—just whisk until everything is smooth and no mayo lumps remain. This sauce is going to coat every piece of salmon, so make it count.
- Add the chopped salmon, shallot, and dill to the bowl, but don't mix yet. Here's where most people mess up—they start stirring like they're mixing cement, ending up with salmon paste. Instead, use a rubber spatula to fold everything together gently, scooping from the bottom and turning over the top. You want distinct pieces of salmon visible, not baby food. The mixture should hold together when squeezed, but still look like it has texture.
- Sprinkle the panko over the salmon mixture and fold just until combined. The breadcrumbs should absorb some moisture but not turn the mixture dry—think of it as adding structure, not making stuffing. If the mixture feels wet, add another tablespoon of panko, but resist the urge to add too much or your cakes will taste like bread. The texture should be similar to loose meatloaf that just barely holds together when formed.
- Divide the mixture into eight portions using a 1/3 cup measure—this ensures even cooking and prevents the "why is this one raw in the middle" problem. Roll each portion into a ball, then flatten gently into patties about 3/4-inch thick. They should be uniform in size for even cooking, but don't stress about perfect circles—rustic looks homemade and tastes better anyway. Place the formed cakes on a parchment-lined plate and refrigerate for at least 15 minutes.
- While the cakes chill, set up your coating station with two shallow dishes. In the first, mix 1/4 cup flour with a pinch of salt and pepper. In the second, spread out 1/2 cup panko. This double-coat creates the shatteringly crisp exterior that makes people ask for your secret. The flour helps the panko stick, and the panko creates those golden shards that stay crispy even after cooling.
- Remove cakes from the fridge and coat each one first in flour (shake off excess), then press into panko to coat completely. The flour should be a whisper-thin layer, just enough to make the panko stick. Press the panko on gently but firmly—you want it to adhere but not form a thick armor. Place the coated cakes back on the plate while you heat the pan.
- Heat a large skillet over medium-high heat and add 2 tablespoons butter and 1 tablespoon oil. When the butter foams and just starts to brown, the pan is ready. Don't walk away from the stove here—this is the critical moment where perfect meets burnt. The fat should sizzle when you add a cake, but not smoke. If it smokes, your heat is too high and you'll have bitter edges.
- Cook the cakes in batches without crowding the pan—four at a time is perfect for a 12-inch skillet. Resist the urge to move them around; let them develop that golden crust for 3-4 minutes before peeking. When the edges look golden and the bottoms release easily from the pan, flip gently and cook another 3-4 minutes. The second side cooks faster, so watch closely. Transfer to a wire rack set over a baking sheet to keep them crispy while you cook the remaining cakes.
That's it—you did it. But hold on, I've got a few more tricks that'll take this to another level...
Insider Tricks for Flawless Results
The Temperature Rule Nobody Follows
Your salmon mixture should be cold when it hits the pan—room temperature salmon releases more moisture, creating steam that prevents browning. Keep the formed cakes in the fridge until the moment you're ready to cook. If you're making these for company, form them the night before and keep them covered—they actually get better as the flavors meld. A friend tried skipping this step once and ended up with pale, soggy cakes that tasted like disappointment. Don't be that friend.
Why Your Nose Knows Best
Trust your sense of smell over the clock when cooking these. When the butter starts smelling nutty and the salmon aroma intensifies, it's time to flip. Raw salmon smells like the ocean, cooked salmon smells like dinner, and overcooked salmon smells like the fish counter at closing time. Your nose knows the difference even when your eyes don't. This isn't just poetry—it's science. The Maillard reaction creates aromatic compounds that signal perfect doneness before visual cues appear.
The 5-Minute Rest That Changes Everything
After cooking, let the cakes rest on the wire rack for five minutes before serving. This isn't just chef pretension—the proteins relax, juices redistribute, and the coating sets into that perfect crunch. Cutting into them immediately sends all the moisture running onto the plate, leaving you with dry cakes and sad puddles. Five minutes is enough time to plate your sides, pour a glass of wine, and appreciate your handiwork. Good things come to those who wait, especially when it comes to crispy coatings.
Creative Twists and Variations
This recipe is a playground. Here are some of my favorite ways to switch things up:
The Mediterranean Escape
Swap dill for fresh oregano and mint, add crumbled feta to the mixture, and serve with tzatziki instead of tartar sauce. The briny feta complements the salmon while the herbs transport you to a Greek island. Add sun-dried tomatoes for extra umami, but pat them dry first or they'll add unwanted moisture. These are perfect for summer dinner parties when you want something that feels fancy but takes minimal effort.
The Asian-Inspired Version
Replace Old Bay with a teaspoon of white miso, add grated ginger and garlic to the base, and coat with panko mixed with sesame seeds. Serve with a quick sauce of soy sauce, rice vinegar, and a touch of honey. The miso adds incredible depth without being obviously Asian—these taste like something from a trendy fusion restaurant. Green onions replace shallots for a fresher flavor that works beautifully with the ginger.
The Southern Comfort Style
Add a tablespoon of Creole seasoning, swap panko for crushed saltine crackers, and mix in a handful of corn kernels. Serve with remoulade sauce and watch them disappear faster than you can fry them. The crackers create a different texture—more like crab cakes—and the corn adds sweet pops that complement the spicy seasoning. This version turns casual dinner into a Mardi Gras party.
The Breakfast of Champions
Form the mixture into smaller patties and serve topped with poached eggs and hollandaise for the most decadent brunch ever. The richness of the salmon pairs beautifully with buttery hollandaise, and the crispy cakes hold up to the runny yolk without getting soggy. Add everything bagel seasoning to the coating for extra breakfast vibes. Your brunch guests will cancel all other plans when they taste these.
The Kids-Approved Version
Replace the salmon with an equal amount of canned tuna (drained well) and add a handful of shredded cheddar to the mixture. Kids who won't touch "fancy fish" devour these tuna cakes, and parents appreciate the hidden vegetables. Shape them into fun sizes—mini for little hands, regular for grown-ups. Serve with ketchup for dipping and watch even picky eaters clean their plates.
The Luxurious Holiday Version
Use equal parts salmon and lump crab meat, add a splash of champagne to the mixture, and serve with lemon-chive aioli. These are special occasion cakes that taste like money but cost less than takeout. The crab adds sweetness and luxury while the salmon provides structure and flavor. Form them smaller for elegant appetizers that'll make your mother-in-law finally admit you can cook.
Storing and Bringing It Back to Life
Fridge Storage
Cooked salmon cakes keep beautifully in an airtight container for up to three days, but here's the key: separate layers with parchment paper to prevent them from sticking together and getting soggy. Store them uncoated if possible—if you've already coated with panko, they'll still be good but lose some crunch. The flavor actually improves after a day as the seasonings meld, making these perfect for meal prep. Just reheat in a dry skillet for best results—microwaves turn the coating into rubber.
Freezer Friendly
These freeze like champions both before and after cooking. For uncooked cakes, flash-freeze them on a baking sheet until solid, then transfer to freezer bags with parchment between layers. They'll keep for three months and cook from frozen in just 8-10 minutes—add them to the pan frozen and adjust heat slightly lower so the centers cook through. For cooked cakes, cool completely, wrap individually in plastic wrap, then freeze. Thaw overnight in the fridge and reheat in a skillet for nearly fresh results. I've fed unexpected guests with freezer cakes more times than I can count.
Best Reheating Method
Forget the microwave—it steams the coating and turns everything rubbery. Instead, heat a dry skillet over medium heat and add the cakes straight from the fridge. Cover with a lid for the first 2 minutes to warm the centers, then remove the lid and cook another 2-3 minutes until the bottoms crisp up. Flip and repeat on the second side. They'll taste almost as good as fresh, with crispy edges and tender centers. For a large batch, reheat on a wire rack set over a baking sheet in a 375°F oven for 10-12 minutes.