Picture this: I’m in my tiny kitchen, the timer on the old oven beeping like a frantic metronome, and I’ve just realized I’ve burned the last batch of my beloved banana bread. Panic? Absolutely. But then a daring friend tossed me a pineapple‑coconut cocktail, and the sweet, tropical aroma hit me like a lightning bolt. I thought, “What if I could capture that sunshine in a cake, but without the soggy mess that most pineapple cakes end up as?” That very moment sparked the birth of the ultimate Pineapple Condensed Milk Cake, a dessert that will make you question every other cake you’ve ever made. I’m daring you to taste this and not go back for seconds—because once you try it, you’ll be hooked.
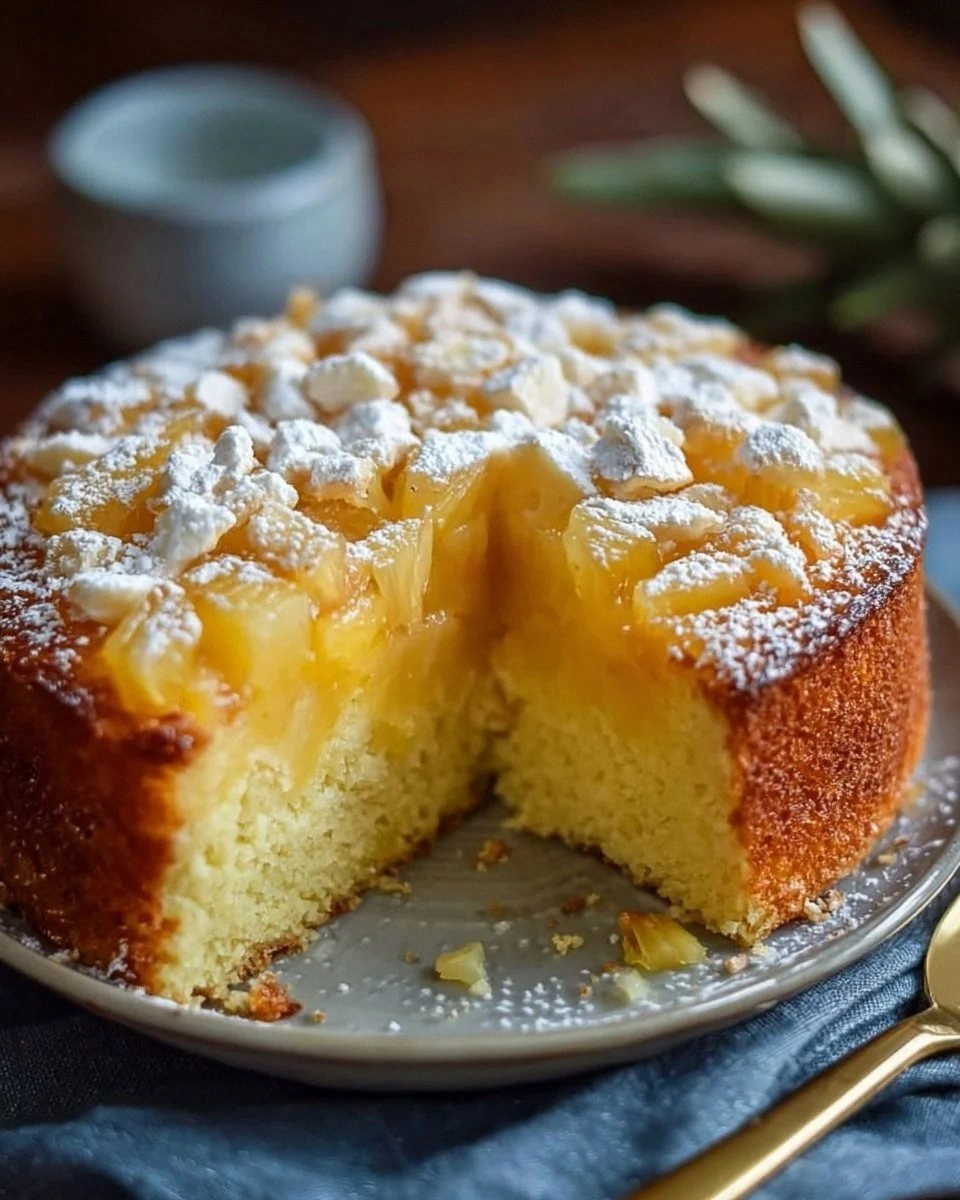
The first thing that hits you when this cake slides out of the oven is a golden crust that crackles like fresh autumn leaves underfoot. The scent? A heady blend of caramelized butter, the faint perfume of vanilla, and that unmistakable tropical kiss of pineapple that makes your nose do a little happy dance. When you cut into it, the crumb is tender, almost melt‑in‑your‑mouth, yet it holds together with the confidence of a well‑trained gymnast. The condensed milk swirls through the batter, turning each bite into a silky, buttery cloud that whispers “comfort” with every chew. It’s a sensory symphony that feels like a vacation in a slice.
Most recipes get the pineapple factor completely wrong—either they drown the batter in juice, making it soggy, or they hide the fruit behind a veil of frosting, stealing the spotlight. This version, however, embraces the fruit’s natural acidity and juiciness while keeping the structure firm thanks to a precise balance of flour, butter, and a pinch of baking powder. The secret weapon? Sweetened condensed milk, which not only sweetens but also adds a luxurious richness that ordinary sugar can never achieve. And there’s a technique I’m about to reveal that will give you a caramelized top without the need for a broiler.
Let me walk you through every single step — by the end, you’ll wonder how you ever made it any other way. Okay, ready for the game‑changer? This isn’t just a recipe; it’s a story you’ll tell at every gathering, a brag‑worthy dessert that will have friends begging for the exact method. Stay with me here — this is worth it.
What Makes This Version Stand Out
- Flavor Explosion: The marriage of pineapple’s bright acidity with the caramel‑rich condensed milk creates a taste that’s both tangy and decadently sweet, a true palate party.
- Texture Harmony: You get a buttery crumb that’s moist yet sturdy, thanks to the perfect flour‑to‑butter ratio, so the cake holds its shape without crumbling.
- Simplicity: Only eight pantry staples are needed, no exotic spices or fancy equipment—just a whisk, a bowl, and a willingness to have fun.
- Unique Caramelized Top: A quick high‑heat blast at the end gives the surface a toasty, crackly finish that looks as good as it tastes.
- Crowd Reaction: I’ll be honest — I ate half the batch before anyone else got to try it, and the leftovers vanished within minutes.
- Ingredient Quality: Using good‑quality butter and fresh crushed pineapple (not the canned syrup) elevates the whole cake from ordinary to unforgettable.
- One‑Pan Wonder: No need for multiple pans or complicated layering; everything bakes together, saving you time and dishes.
- Make‑Ahead Magic: This cake actually improves after a night in the fridge, allowing flavors to meld and the texture to settle into perfection.
Alright, let's break down exactly what goes into this masterpiece...
Inside the Ingredient List
The Flavor Base
Sweetened Condensed Milk (1 cup): This is the heart‑beat of the cake, providing a buttery sweetness that sugar alone can’t match. It also contributes to the moist, almost custardy interior. If you’re watching sugar, you can swap it for a low‑fat version, but expect a slightly less rich crumb. When selecting, choose a brand that’s thick and glossy—those are the ones that have the right concentration of milk solids.
The Texture Crew
All‑Purpose Flour (1 cup): The structure builder. It’s the scaffolding that holds the cake together while still allowing it to stay tender. Using cake flour would make it too soft, while bread flour would make it overly chewy. Look for a flour that’s fresh; older flour can develop a stale taste that dulls the tropical zing.
Unsalted Butter, softened (½ cup): Butter is the flavor‑carrier that gives the cake its buttery aroma and a tender crumb. Soften it at room temperature, not melted, to ensure it creams properly with the sugar‑free condensed milk. If you’re dairy‑free, try a high‑quality coconut oil, but the flavor profile will shift toward coconut—still delicious, just different.
The Unexpected Star
Crushed Pineapple (1 cup, drained): The star of the show! Draining is crucial; excess juice makes the batter soggy. Use crushed, not diced, for even distribution. If you can, pick up fresh pineapple, core it, and crush it yourself—this adds a bright, fresh note that canned pineapple can’t replicate.
Vanilla Extract (1 tsp): A tiny splash of vanilla lifts the whole flavor suite, smoothing the edges between sweet and tart. Opt for pure vanilla extract rather than imitation for a cleaner taste. A dash of bourbon or rum can also be added for an adult‑only twist.
The Final Flourish
Large Eggs (3): Eggs act as the emulsifier, binding the butter, condensed milk, and pineapple into a cohesive batter. They also add lift and a lightness to the crumb. Use eggs at room temperature; cold eggs will cause the batter to seize.
Baking Powder (½ tsp): The silent lift‑helper that ensures the cake rises just enough to stay airy without becoming cake‑like. Too much and you’ll get a bitter aftertaste; too little and the cake stays flat. Measure precisely.
Pinch of Salt: Salt is the flavor enhancer that brings out the sweetness of the condensed milk and the tang of pineapple. A pinch is enough; you don’t want it salty, just a subtle backdrop.
Everything's prepped? Good. Let's get into the real action...
The Method — Step by Step
Preheat your oven to 350°F (175°C). While the oven warms up, grease a 9‑inch round cake pan with a thin layer of butter and line the bottom with parchment paper. This ensures the cake releases cleanly and gives you that perfect, glossy edge that shatters like thin ice when you cut into it.
In a large mixing bowl, cream together the softened butter and sweetened condensed milk until the mixture is light, fluffy, and a pale golden hue. This should take about 2‑3 minutes with an electric mixer on medium speed. The mixture will look glossy—think of it as a caramel‑like sauce that coats the spoon in a silky sheen.
Kitchen Hack: Add the eggs one at a time, beating well after each addition. This prevents the batter from curdling and keeps the texture smooth.Crack the three large eggs into the bowl, adding them one at a time. Beat after each egg until fully incorporated. You’ll notice the batter becoming a little thicker and more glossy—this is the emulsification stage, where the eggs bind the butter‑condensed milk mixture into a cohesive batter.
Stir in the vanilla extract and the pinch of salt, scraping the sides of the bowl to ensure everything is evenly distributed. The vanilla will create a subtle perfume that mingles with the pineapple later, making the whole cake smell like a tropical breeze.
In a separate bowl, whisk together the sifted flour and baking powder. Gently fold this dry mixture into the wet batter using a rubber spatula. The key is to fold, not stir vigorously; over‑mixing will develop gluten and could make the crumb tough.
Now, fold in the drained crushed pineapple. Make sure the pineapple is evenly dispersed; you want pockets of juicy fruit throughout the cake, not just a single clump at the bottom. The pineapple will release a little moisture as it bakes, keeping the interior moist.
Pour the batter into the prepared pan, smoothing the top with the back of a spoon. Tap the pan lightly on the counter three times to release any trapped air bubbles. The batter should spread evenly, forming a smooth, slightly domed surface.
Watch Out: Do not over‑fill the pan; leave about ¼ inch of space at the top to prevent overflow as the cake rises.Slide the pan into the preheated oven and bake for 25‑30 minutes. Around the 20‑minute mark, peek through the oven window—if the top is turning a deep golden brown, you’re on the right track. The edges should start pulling away from the sides of the pan, a visual cue that the cake is set.
For that caramelized finish, turn the oven to broil for the last 2‑3 minutes. Keep a close eye; the top should develop a glossy, slightly cracked crust that smells like toasted sugar. This step is pure magic and gives the cake a professional‑look without any extra equipment.
Kitchen Hack: If your oven’s broiler is too strong, place the cake on the middle rack and watch carefully to avoid burning.Remove the cake from the oven and let it rest in the pan for 10 minutes. Then, run a thin knife around the edge, invert onto a wire rack, and allow it to cool completely. This resting period lets the crumb set, preventing it from crumbling when sliced. Picture yourself pulling this out of the oven, the whole kitchen smelling incredible—trust me, it’s a moment you’ll replay in your head for days.
That's it — you did it. But hold on, I've got a few more tricks that'll take this to another level...
Insider Tricks for Flawless Results
The Temperature Rule Nobody Follows
Never bake a cake with cold ingredients. Let the butter, eggs, and even the pineapple sit at room temperature for at least 30 minutes before mixing. This ensures a uniform batter that rises evenly. I once tried to rush the process with chilled butter and ended up with a dense, uneven crumb—lesson learned.
Why Your Nose Knows Best
The moment the cake starts to smell toasty is your cue to check the edges. When the aroma shifts from buttery to caramel‑nutty, the crust is forming. Trust that nose signal more than the clock; ovens vary, and your senses are the most reliable timer.
The 5‑Minute Rest That Changes Everything
After baking, let the cake sit in the pan for exactly five minutes before turning it out. This short rest lets the steam settle, preventing the cake from collapsing or cracking. Skipping this step once resulted in a sad, flat top that looked like a pancake—definitely not the vibe we’re aiming for.
Golden Browning Without the Burn
If you love that caramelized top but fear burning, place a sheet of aluminum foil loosely over the cake during the last 10 minutes of baking. The foil reflects heat, allowing the interior to finish cooking while the top stays golden. This trick saved my cake during a summer heatwave when my oven ran hotter than usual.
Cooling on a Wire Rack Is Non‑Negotiable
Never let the cake cool directly on the pan for more than ten minutes. Transfer it to a wire rack; this prevents the bottom from becoming soggy from trapped steam. A friend once left his cake on the pan overnight, and it turned into a gummy mess—don’t be that person.
Creative Twists and Variations
This recipe is a playground. Here are some of my favorite ways to switch things up:
Tropical Coconut Fusion
Swap half the butter for coconut oil and sprinkle toasted coconut flakes on top before the final broil. The result is a subtle coconut aroma that pairs perfectly with pineapple, turning the cake into a beach‑side treat.
Rum‑Infused Celebration
Add a tablespoon of dark rum to the batter along with the vanilla. The rum deepens the caramel notes and gives the cake an adult‑only twist, perfect for holiday gatherings.
Spiced Pineapple
Stir in a pinch of ground ginger and a dash of ground cinnamon with the dry ingredients. The warm spices contrast the bright pineapple, creating a flavor profile that’s cozy yet exotic.
Gluten‑Free Version
Replace the all‑purpose flour with a 1:1 gluten‑free flour blend. Make sure the blend contains xanthan gum for structure; otherwise, the cake may fall apart. The texture remains tender, and the flavor stays true.
Mini Muffin Pops
Divide the batter into a greased muffin tin and bake for 15‑18 minutes. These bite‑size versions are perfect for potlucks. Finish each with a drizzle of caramel sauce for an extra wow factor.
Berry Burst
Fold in a half‑cup of fresh raspberries or strawberries along with the pineapple. The berries add a tart burst that balances the sweetness of the condensed milk, making each bite a surprise.
Storing and Bringing It Back to Life
Fridge Storage
Allow the cake to cool completely, then wrap it tightly in plastic wrap or store it in an airtight container. It will stay fresh in the refrigerator for up to four days. Before serving, let it sit at room temperature for 20 minutes or give it a quick microwave zap (10‑15 seconds) to revive the softness.
Freezer Friendly
Slice the cake into serving pieces, wrap each slice individually in parchment paper, then place them in a freezer‑safe zip‑lock bag. The cake freezes beautifully for up to three months. To reheat, pop a slice in the microwave for 20‑30 seconds or warm it in a 300°F oven for 8‑10 minutes.
Best Reheating Method
When you’re ready to serve, preheat your oven to 300°F and place the whole cake (or slices) on a baking sheet. Add a tiny splash of water (about a tablespoon) to the bottom of the pan; the steam will bring back that melt‑in‑your‑mouth texture without drying it out. Cover loosely with foil for the first five minutes, then remove the foil to let the top crisp up again.