I still remember the year I swore off Halloween cookies forever. There I was, elbow-deep in neon food coloring, trying to make those trendy marbled cookies I'd seen online. The result? A tray of grayish blobs that looked like they'd been through a washing machine. My guests politely nibbled them while I died inside. But here's the thing — I couldn't stop thinking about what they could have been. The potential for something magical haunted me like a stubborn ghost.
Fast forward through three weeks of obsessive testing, three pounds of butter, and one very patient family who ate every failed attempt. I cracked the code. These Halloween Swirl Sugar Cookies aren't just pretty faces — they're the perfect balance of tender and crisp, with colors that stay vibrant even after baking. The secret? It's all in the temperature control and a technique I call the "color sandwich" method. Trust me, once you try this approach, you'll never go back to those dull, lifeless cookies again.
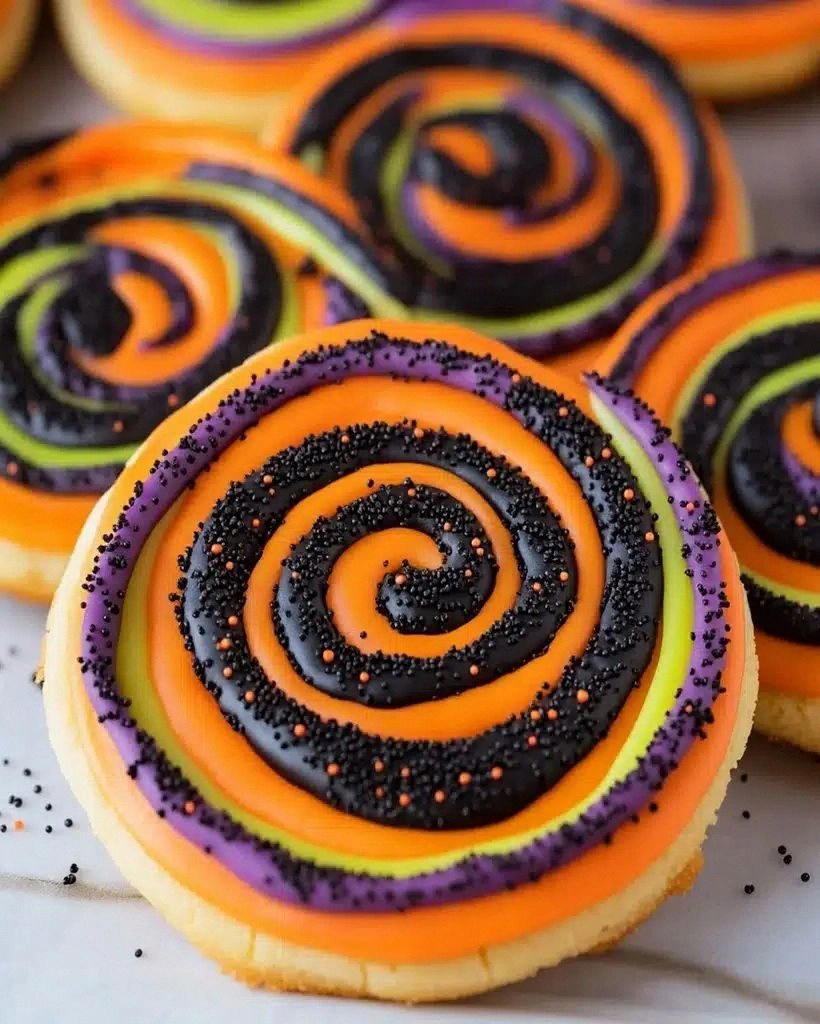
Picture this: It's October 31st, your kitchen smells like vanilla and warm sugar, and you're pulling out a tray of cookies that look like edible art. The orange and purple spirals are so vivid they practically glow. Your neighbor drops by "just to say hi" (we all know they're cookie-scouting), takes one bite, and their eyes go wide. "These can't be homemade," they whisper. Oh, but they are — and you're about to become the Halloween hero of your block.
The best part? While everyone else is wrestling with royal icing and candy eyes that won't stick, you'll be sipping apple cider watching your colorful creations cool. No piping bags, no food-safe markers, no Pinterest fails. Just gorgeous, professional-looking cookies that taste even better than they look. Let me walk you through every single step — by the end, you'll wonder how you ever made it any other way.
What Makes This Version Stand Out
Color-Locked Swirls: Unlike other recipes where colors bleed into muddy messes, these cookies maintain sharp, defined spirals from mixing bowl to cookie jar. The trick lies in chilling the dough at exactly the right temperature, creating distinct color boundaries that stay crisp even after baking.
Buttery Perfection: We're using a higher ratio of butter to flour than traditional recipes, resulting in cookies that melt on your tongue like sweet autumn snow. The edges get lightly golden while the centers stay tender — that perfect sugar cookie texture that makes it impossible to eat just one.
One-Bowl Wonder: Despite looking like a professional bakery creation, this entire recipe comes together in one bowl and one baking sheet. No special equipment, no complicated techniques — just smart layering that creates maximum visual impact with minimum effort.
Make-Ahead Magic: The dough keeps beautifully in the freezer for up to three months, so you can prep in September and bake fresh cookies all through October. Slice and bake whenever the mood strikes — because nothing beats warm cookies on a crisp fall evening.
Flavor That Matches the Hype: These aren't just pretty faces. We're using real vanilla bean paste and a touch of almond extract to create depth that makes people close their eyes when they take a bite. It's like capturing the essence of autumn bakeries in one perfect cookie.
Customizable Colors: While I'll show you the classic Halloween orange and purple, this technique works with any color combination. Think pastels for Easter, red and green for Christmas, or school colors for graduation parties. One recipe, endless possibilities.
Kid-Friendly Process: Little hands love rolling the dough into ropes and creating the swirls. It's like edible play-dough that results in actual cookies, not just a mess to clean up. Plus, what child doesn't love seeing bright colors transform in the oven?
Alright, let's break down exactly what goes into this masterpiece...
Inside the Ingredient List
The Flavor Foundation
Butter is the star here, and not just any butter — I'm talking about the good European-style stuff with higher fat content. It creates that impossible tenderness that makes people wonder if you secretly went to culinary school. When creamed properly with sugar, it traps air that expands in the oven, giving you those perfect edges that snap delicately when you bite into them. Skip the cheap margarine here — these cookies are all about celebrating real ingredients, and your taste buds will absolutely know the difference.
The Texture Team
Egg yolks are our secret weapon for richness, but we're using just one whole egg plus an extra yolk. This gives us the binding power we need without making the cookies cakey. The yolk adds a beautiful golden color to the base dough, which helps our orange food coloring pop even more vibrantly. Cream of tartar might seem old-fashioned, but it's the key to that perfect sugar cookie texture — slightly crisp edges with a tender, almost shortbread-like center.
The Color Champions
Gel food coloring is non-negotiable here. Those little bottles of liquid food dye from the grocery store? Leave them for Easter eggs. We're using concentrated gel colors that deliver intense pigment without adding extra liquid to our carefully balanced dough. Americolor and Chefmaster are my go-to brands — they stay vibrant even after baking and won't leave your tongue looking like a rainbow. A tiny amount goes incredibly far, so invest in quality colors and they'll last you through countless batches.
The Finishing Touch
Vanilla bean paste might seem like an unnecessary splurge, but here's the thing — those little black specks throughout your cookies signal quality like nothing else. They tell your guests that you care about flavor, not just appearance. If you can't find paste, scrape the seeds from half a vanilla bean. In a pinch, pure vanilla extract works, but you'll miss those gorgeous flavor flecks that make people think you spent all day in the kitchen.
Everything's prepped? Good. Let's get into the real action...
The Method — Step by Step
- Start with butter that's been out of the fridge for exactly 45 minutes — it should give slightly when pressed but still hold its shape. Too soft and your cookies will spread; too cold and you won't get proper aeration. Beat it alone for a full minute before adding anything else — this creates the perfect base for trapping air. The sound changes from a dull thud to a lighter whipping noise when it's ready for the sugar.
- Add your sugar in a slow stream while the mixer runs on medium. Don't dump it all at once — we're creating thousands of tiny air pockets here, and patience pays off. The mixture should lighten in color and increase in volume by about a third. When you rub it between your fingers, it should feel smooth, not gritty — that's how you know the sugar is properly dissolved into the butter.
- Now for the eggs — crack them into a separate bowl first (always crack into a bowl, never directly into your mixture). Add the whole egg and beat just until incorporated, then add the yolk and vanilla. The mixture might look slightly curdled at this stage — don't panic, that's normal. It'll come together when we add the flour.
- Whisk together your dry ingredients in a separate bowl, but here's the key — we're adding them in thirds. Start the mixer on its lowest setting and add the first third. Let it incorporate completely before adding the second third. When you add the final portion, stop the mixer as soon as the last streak of flour disappears. Overmixing develops gluten, and gluten is the enemy of tender cookies.
- Divide your dough into three equal portions — use a scale if you have one, but eyeballing works fine. Leave one portion plain for contrast, and color the other two with your gel colors. Start with just a tiny amount on a toothpick — you can always add more, but you can't take it away. Knead the color in gently, just until evenly distributed. The dough should still feel cool and pliable, not warm from overhandling.
- Roll each colored dough into a rectangle between parchment paper sheets — aim for about 1/4 inch thick and roughly the same size for each color. Stack them in whatever order pleases you, but I like putting the plain dough in the middle for maximum contrast. Press gently to adhere, then roll the whole stack up like a jelly roll. The key here is rolling tightly enough to eliminate air pockets but not so tight that the spirals distort when sliced.
- Wrap your dough log tightly in plastic wrap and chill for at least two hours, preferably overnight. This isn't just about firming the butter — it's about allowing the flour to fully hydrate and the flavors to meld. The dough will actually taste better after an overnight rest, developing a more complex, bakery-like flavor that you can't achieve with a quick chill.
- When you're ready to bake, preheat your oven to 350°F and position a rack in the center. Line your baking sheet with parchment — not wax paper, not a silicone mat, parchment. It creates the perfect surface for even browning. Slice your cookies with a sharp knife, rotating the log as you go to maintain perfect circles. Aim for 1/4 inch thick — any thinner and they'll be too crisp, any thicker and the colors won't pop as dramatically.
- Bake for exactly 10-12 minutes, but start checking at 9. The edges should be just barely golden, and the centers should look slightly underdone. They'll continue cooking on the hot sheet after you pull them out — this is called carryover cooking, and it's crucial for that perfect chewy center. If you wait until they're fully golden, they'll be overbaked by the time they cool.
- Let them cool on the sheet for 5 minutes before transferring to a rack. This brief rest allows them to set properly — move them too soon and they'll bend and break, wait too long and they'll stick to the parchment. When you do move them, use a thin metal spatula and support the entire cookie. They'll finish cooling in about 15 minutes, but good luck waiting that long.
That's it — you did it. But hold on, I've got a few more tricks that'll take this to another level...
Insider Tricks for Flawless Results
The Temperature Rule Nobody Follows
Here's what separates amateur cookies from bakery-quality ones — temperature discipline. Your butter should be between 65-68°F when you start creaming. Too cold and it won't incorporate air properly, too warm and your cookies will spread into sad puddles. I keep a cheap instant-read thermometer in my drawer and check every time. It takes two seconds and saves countless batches of disappointment. The same goes for your eggs — room temperature eggs incorporate more evenly, creating a smoother, more uniform dough.
Why Your Nose Knows Best
Professional bakers don't just set timers — they use all their senses. When your cookies are perfectly baked, your kitchen will smell like vanilla and warm butter with just a hint of caramel. If you start smelling something toasty or nutty, you've gone too far. The visual cues matter too — look for edges that are just barely golden, like the color of a perfectly toasted marshmallow. The centers should still look slightly pale and soft. They'll finish setting as they cool, giving you that perfect contrast between crisp edges and tender centers.
The 5-Minute Rest That Changes Everything
After mixing your dough, let it rest for exactly five minutes before dividing and coloring. This brief pause allows the flour to fully hydrate, which prevents your cookies from spreading too much in the oven. It also gives the butter a chance to firm up slightly, making the dough easier to handle when you're creating those perfect spirals. I discovered this by accident when I got distracted by a phone call, and the difference was immediately obvious — the rested dough held its shape beautifully while the un-rested batch spread into colorful blobs.
The Slice Thickness Sweet Spot
Everyone wants to know the secret to professional-looking cookies, and here's mine — consistency in thickness. Use a ruler if you need to, but aim for exactly 1/4 inch thick slices. Any thinner and you'll lose that beautiful contrast between the crisp edge and tender center. Any thicker and the colors won't pop as dramatically. I mark my knife with a piece of tape at the 1/4 inch mark, ensuring every cookie is identical. It might seem obsessive, but when you pull out a tray of perfectly uniform spirals, you'll understand why it matters.
Creative Twists and Variations
This recipe is a playground. Here are some of my favorite ways to switch things up:
Black Cat Cookies
Replace half the vanilla with black cocoa powder for a dramatic black dough, then swirl with orange for a sophisticated Halloween look. The black cocoa adds a cookies-and-cream flavor that's absolutely addictive. Top with edible gold dust for extra glamour. These look incredibly chic on a black platter with gold accents — perfect for an adult Halloween party that still embraces the spooky spirit.
Pastel Spring Spirals
Switch to soft gel colors in lavender, mint, and peach for Easter or spring celebrations. Add a teaspoon of lemon zest to the dough for a bright, sunny flavor that matches the cheerful colors. These are perfect for baby showers or Mother's Day brunch — they look like they came from a fancy French bakery but require zero decorating skills.
School Spirit Cookies
Use your local team's colors for game day treats. I've made these in every color combination imaginable — they always disappear faster than the actual game snacks. Add a drop of matching flavor extract to each color section — orange becomes orange-flavored, red becomes cherry, blue becomes blueberry. It's like a flavor surprise in every bite.
Winter Wonderland
Create white dough by omitting the egg yolks and using only the whites, then swirl with deep blue and silver for Hanukkah or winter parties. Add peppermint extract instead of vanilla for a cool, refreshing flavor that pairs perfectly with hot cocoa. Dust with powdered sugar right after baking for a snowy finish that makes everyone feel cozy.
Gender Reveal Surprise
Make the center dough either pink or blue, keeping the outer layers neutral. When guests bite in, they get the surprise reveal. It's become my most requested variation — way more personal than cutting a cake, and everyone gets to participate in the moment. Use white chocolate chips in the neutral dough for extra sweetness and celebration.
Fourth of July Fireworks
Red, white, and blue spirals that look like tiny edible fireworks. Add pop rocks to the dough (after coloring) for a surprising crackle that makes people smile. These are always the hit of summer barbecues — kids love the colors, adults love the nostalgia, and everyone loves the unexpected pop rocks sensation.
Storing and Bringing It Back to Life
Fridge Storage
These cookies stay fresh in an airtight container at room temperature for up to five days — longer than most sugar cookies thanks to the higher butter content. Store them in a single layer between sheets of parchment paper if you need to stack them. Whatever you do, don't store them while they're still warm — the trapped steam will make them soggy and sad. I learned this the hard way when I rushed to clean up after a party and ended up with a container full of colorful mush the next morning.
Freezer Friendly
Both the dough and finished cookies freeze beautifully. Wrap the dough log tightly in plastic wrap, then in foil — it'll keep for up to three months in the freezer. Thaw overnight in the fridge before slicing and baking. For finished cookies, freeze them in a single layer first, then transfer to a freezer bag. They'll keep for two months and thaw in about 15 minutes at room temperature. Pro tip: freeze them slightly underbaked, then refresh in a 300°F oven for 5 minutes — they'll taste like you just pulled them from the oven.
Best Reheating Method
If your cookies have lost their just-baked magic, here's how to bring them back: Preheat your oven to 275°F, place cookies on a parchment-lined sheet, and warm for exactly 3-4 minutes. They'll crisp up on the outside while staying tender inside. Don't microwave them — the colors will fade and the texture turns rubbery. For an extra treat, serve them warm with a scoop of vanilla ice cream. The contrast between the warm, colorful cookies and cold ice cream creates a dessert that makes people close their eyes in happiness.