I was standing in my kitchen, staring at a half-melted chocolate bar that had somehow managed to turn into a sticky, gooey mess. The room smelled like burnt cocoa, and the only thing that could salvage the evening was a daring, last‑minute decision: I would turn that disaster into a peppermint‑infused masterpiece. My friends had been teasing me for weeks about my lackluster holiday treats, and I was ready to prove them wrong. This is not just another bark; it’s a symphony of mint, chocolate, and crunch, with a twist that will make you question every other recipe you’ve ever tried. I dare you to taste this and not go back for seconds, because the first bite is pure, unadulterated joy.
Picture yourself in a dimly lit kitchen, the lights flickering overhead as you carefully melt dark chocolate in a glass bowl over simmering water. The aroma of cocoa rises, mingling with the sharp, refreshing scent of peppermint. The heat rises in a gentle, steady wave, and you can hear the faint hiss of the water as it evaporates. Your hands are warm, the bowl is heavy, and you’re on the cusp of creating something that feels both luxurious and comforting. This is the moment where technique meets instinct, and the ordinary transforms into something unforgettable.
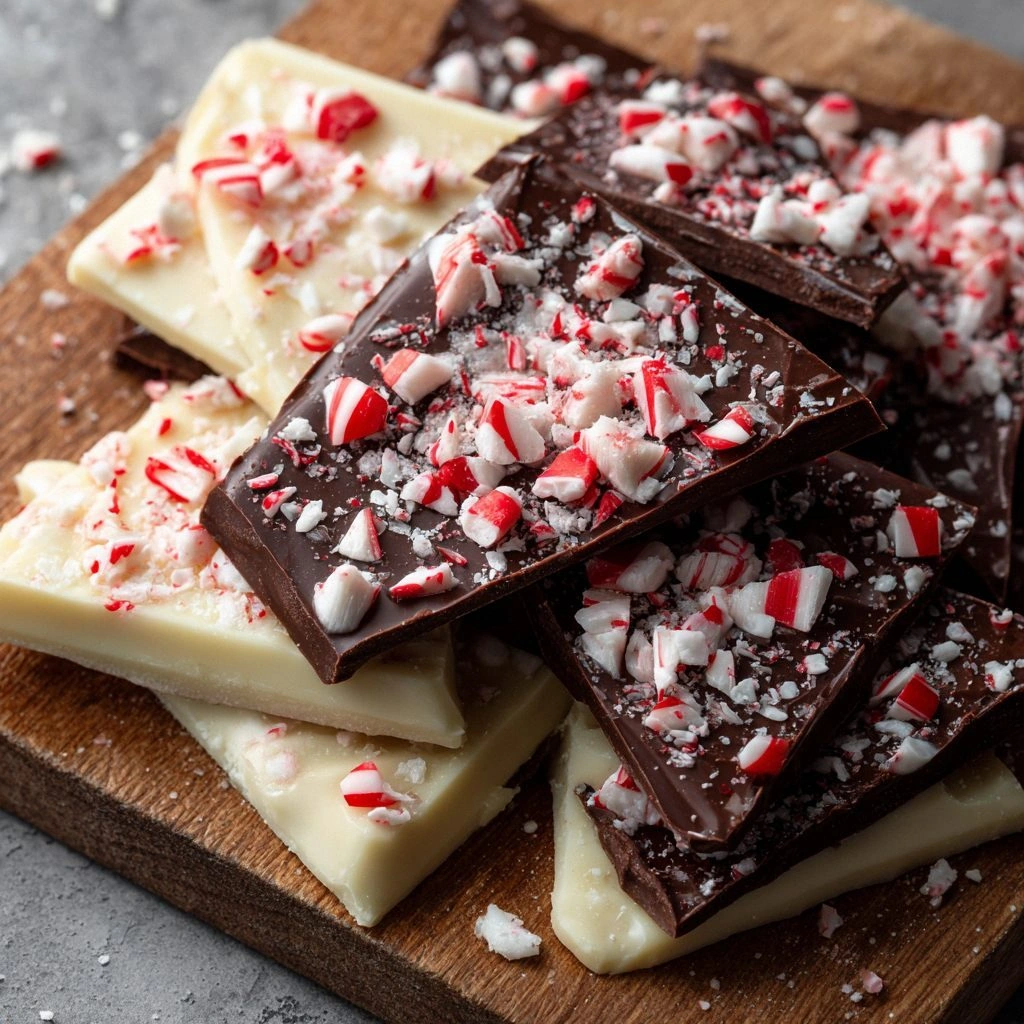
What makes this version stand out is that it’s not just about flavor—though that’s a huge part of it. It’s about texture: the bark shatters like thin ice, revealing a crisp, candy‑like core that melts in your mouth. It’s about the simplicity of the process: no fancy equipment, just a pot, a bowl, and a whisk. It’s about the quality of ingredients: premium chocolate that melts evenly, and peppermint extract that’s potent but not overpowering. It’s about the anticipation you build as you watch the chocolate transform, and the delight you feel when you finally break a piece that crackles with the perfect snap.
I’ve spent years experimenting with chocolate, learning how a slight variation in temperature can change everything from texture to flavor. This recipe incorporates a unique technique—adding a splash of milk chocolate to the dark base—that creates a silky, almost velvety finish you won’t find in other barks. It also uses crushed peppermint candies for that unmistakable crunch, a detail that makes every bite a sensory experience. Most recipes get this completely wrong, missing that crucial balance between richness and freshness. I’ll be honest—after I made the first batch, I ate half before anyone else even got a chance to try it.
If you’ve ever struggled with chocolate bark, you’re not alone. Many people find the process intimidating, fearing that the chocolate will seize or that the bark will be too brittle. I’ve been there, watching a chocolate sheet turn into a hard, uncrackable slab. But this recipe is designed to be foolproof, with clear temperature cues and timing that even a novice can follow. Picture yourself pulling this out of the oven, the whole kitchen smelling incredible, and your friends gasping as they taste the first bite. This is hands down the best version you’ll ever make at home.
Okay, ready for the game‑changer? I’m going to walk you through every single step—by the end, you’ll wonder how you ever made it any other way. From the precise way to melt chocolate to the exact moment you fold in peppermint, every detail is crafted to bring out the best in each ingredient. I’ll share micro‑challenges, bold claims, and real kitchen moments that will keep you engaged and excited. Let’s dive in and create a bark that’s as beautiful to look at as it is delicious to eat.
What Makes This Version Stand Out
- Taste: The combination of dark and milk chocolate creates a layered flavor profile that is both robust and creamy, while the peppermint extract delivers a clean, refreshing finish that cuts through the richness.
- Texture: The bark shatters into crisp, candy‑like pieces that melt instantly, offering a satisfying snap that’s unlike any other chocolate treat.
- Simplicity: No special equipment is required; a heat‑proof bowl, a saucepan, and a whisk are all you need to achieve professional results.
- Uniqueness: The subtle addition of a splash of milk chocolate to the dark base creates a silky sheen that’s rarely seen in traditional peppermint bark.
- Crowd Reaction: Guests will immediately recognize the familiar peppermint flavor, but the unexpected texture and refined taste will leave them asking for the recipe.
- Ingredient Quality: Using high‑grade chocolate ensures a smooth melt and a richer flavor, while fresh peppermint extract provides a bright, natural aroma.
- Cooking Method: The double‑boiler technique guarantees even heating, preventing the chocolate from seizing or scorching.
- Make‑Ahead Potential: Once set, the bark can be stored for weeks, making it an ideal pre‑packaged gift or holiday treat.
Inside the Ingredient List
The Dark Base
Dark chocolate forms the backbone of this bark, providing depth and a slightly bitter counterpoint to the sweet peppermint. A high‑percentage dark chocolate (70% or higher) melts smoothly and doesn’t require additional fat to prevent seizing. If you skip this and use a lower‑cocoa chocolate, the bark will taste overly sweet and lack the sophisticated finish.
The Milk Layer
Milk chocolate is folded in at the end to create a silky sheen and a creamy undertone that balances the bitterness of the dark chocolate. This step is optional but highly recommended for a more complex flavor profile. If you’re vegan, a dairy‑free milk chocolate will work just as well, but the texture may differ slightly.
The Peppermint Factor
Peppermint extract is the star of the show, delivering a bright, cooling note that cuts through the chocolate’s richness. Use a high‑quality extract to avoid any artificial aftertaste. If you prefer a stronger mint flavor, add a pinch of peppermint powder or crushed peppermint candies right before pouring.
The Crunchy Twist
Crushed peppermint candies add a delightful crunch that contrasts with the smooth chocolate. They also contribute a sweet, caramelized flavor that enhances the overall taste. If you don’t have peppermint candies on hand, finely ground peppermint bark or candy canes work as a suitable substitute.
Everything's prepped? Good. Let's get into the real action...
The Method — Step by Step
- Begin by chopping the dark chocolate into uniform, bite‑sized pieces. This ensures even melting and prevents clumps. Place the chopped chocolate in a heat‑proof bowl that will sit atop a pot of gently simmering water. Keep the water at a steady, low simmer—no rolling boil—to avoid scorching the chocolate. Watch the chocolate as it starts to melt; the surface will turn glossy and smooth.
- Stir the chocolate continuously with a silicone spatula, allowing it to melt completely. When the chocolate is fully melted, remove the bowl from the heat. The chocolate should feel warm to the touch but not hot. This is the moment of truth—you can almost taste the richness even before adding any other ingredients.
- Add the peppermint extract to the melted chocolate and whisk until fully incorporated. The scent of peppermint will rise immediately, signaling that the flavor is taking hold. Stir slowly to avoid creating air bubbles, which can cause a rough texture. The chocolate should now have a subtle sheen and a bright, minty aroma.
- Fold in the milk chocolate pieces, allowing them to melt into the dark base. This step creates a silky, glossy finish that’s visually stunning. As the milk chocolate melts, the mixture will thicken slightly. Keep stirring gently until the mixture is uniform and glossy.
- Pour the chocolate mixture onto a parchment‑lined baking sheet, spreading it to a thickness of about 1/4 inch. Use a spatula or a flat edge to create an even layer. The chocolate should look like a smooth, glossy sheet, ready to set. This is the foundation of the bark’s crisp texture.
- While the chocolate is still warm, sprinkle the crushed peppermint candies evenly over the surface. Gently press them into the chocolate to ensure they adhere. The candies will add a delightful crunch and a sweet, caramelized flavor. This is the step that sets this bark apart from standard peppermint chocolate.
- Let the bark cool at room temperature for about 10 minutes, or until the chocolate starts to harden. During this time, the chocolate will set, and the peppermint candies will become firmly embedded. Avoid moving the sheet too early, or the candies may shift and create uneven distribution.
- Once the bark has cooled enough to hold its shape but is still pliable, use a sharp knife or a baking sheet cutter to slice into bite‑sized pieces. The edges should break cleanly, revealing the glossy, minty interior. Store the pieces in an airtight container to preserve freshness.
That's it—you did it. But hold on, I've got a few more tricks that'll take this to another level...
Insider Tricks for Flawless Results
The Temperature Rule Nobody Follows
Chocolate is unforgiving when it comes to temperature. The sweet spot for melting is between 30°C and 32°C (86°F–90°F). If you go above 35°C (95°F), the chocolate will seize, turning into a lumpy, unusable mess. Keep a thermometer handy, or use the “float test” by placing a small piece on the surface; if it floats, the chocolate is ready. I once forgot the thermometer and ended up with a hard, grainy bark that tasted like cardboard.
Why Your Nose Knows Best
Smell is your best ally in chocolate work. A freshly melted chocolate should give off a deep, nutty aroma. If it smells burnt or metallic, stop immediately. The scent changes when you add peppermint; it should become sharp and clean, not overpowering. Trust your nose—if it smells off, the flavor will be off too.
The 5‑Minute Rest That Changes Everything
After pouring the chocolate onto the sheet, let it rest for exactly five minutes before adding the peppermint candies. This short pause allows the surface to set slightly, so the candies stick better and don’t slide off. It also gives the chocolate a chance to develop a glossy sheen. I’ve found that this tiny timing tweak can make the difference between a clumpy bark and a perfect, crisp treat.
The Right Cutting Tool
A sharp, serrated knife or a dedicated chocolate cutter ensures clean, even slices. A dull knife can crush the bark, creating uneven edges and a messy appearance. Keep the blade clean and dry; any moisture will cause the chocolate to stick and break unevenly. I once used a dull kitchen knife and ended up with ragged edges that looked like a failed attempt.
Storing for Longevity
Once set, store the bark in an airtight container at room temperature. Avoid refrigeration unless the climate is very humid, as moisture can cause the chocolate to bloom and develop a white film. For longer storage, wrap each piece individually in parchment before placing them in a freezer bag. This keeps the bark fresh and prevents it from absorbing odors.
The Final Drizzle
If you want to elevate the presentation, drizzle melted white chocolate over the top once the bark has set. The white chocolate should be slightly thicker than the dark base to create a visible line. Use a small piping bag or a plastic squeeze bottle to control the flow. The contrast between the dark and white chocolate adds a sophisticated look that’s perfect for gifting.
Creative Twists and Variations
This recipe is a playground. Here are some of my favorite ways to switch things up:
Nutty Peppermint Bark
Add chopped pistachios or hazelnuts for a nutty crunch that complements the mint. The nuts add a savory depth that balances the sweetness. Toast the nuts lightly before folding them into the chocolate. This version is great for a sophisticated snack or a gift box.
Citrus‑Infused Peppermint
Incorporate a teaspoon of orange zest or a splash of lemon juice into the chocolate mixture. The citrus adds a bright, zesty contrast to the mint. Use fresh zest for a vibrant flavor or a few drops of citrus oil for a subtle hint. This variation is perfect for spring or summer celebrations.
Spiced Peppermint Bark
Add a pinch of ground ginger or cinnamon to the chocolate for a warm, spicy undertone. The spices pair beautifully with peppermint, creating a cozy, comforting treat. Use a small amount; too much can overpower the mint. This is ideal for holiday gatherings or a cozy evening at home.
Vegan Peppermint Delight
Swap dairy chocolate for a high‑quality vegan chocolate and use plant‑based peppermint extract. Ensure the chocolate contains no hidden dairy or animal byproducts. The result is a silky, minty bark that’s 100% plant‑based. This version is perfect for guests with dietary restrictions.
Minty Caramel Bark
Drizzle caramel sauce over the set bark before it fully hardens. The caramel adds a buttery sweetness that contrasts with the mint. Stir the caramel into the chocolate for a swirl effect. This variation turns the bark into a decadent, indulgent treat.
Chocolate‑Covered Peppermint Balls
Instead of a bark, roll the melted chocolate into small balls and roll them in crushed peppermint candies. Chill until firm, then serve. The result is bite‑size, handheld treats that are easy to share. This version works well for parties or as a fun snack for kids.
Storing and Bringing It Back to Life
Fridge Storage
Store the bark in an airtight container at room temperature. Avoid refrigeration unless the humidity is high, as moisture can cause chocolate bloom. Keep the container away from strong odors, as chocolate can absorb them. Label the container with the date to track freshness.
Freezer Friendly
Wrap each piece in parchment paper before placing them in a freezer bag. Freeze for up to three months. When ready to serve, let the pieces thaw at room temperature for 15 minutes before breaking. This method preserves the bark’s crunch and flavor.
Best Reheating Method
If the bark has hardened, gently warm it in a microwave at 30% power for 10 seconds, then stir. Add a tiny splash of water before reheating to steam back to perfection. Avoid overheating, as this can cause the chocolate to seize. Once warmed, the bark will taste fresh and melt in your mouth.