It started on a rainy Tuesday when I tried to salvage a half‑cooked chicken thigh that had been left too long in the fridge. The skin was soggy, the meat dry, and the aroma of burnt garlic filled the kitchen. I stared at that sad, pale piece of meat and thought, “I can’t just toss this.” That moment of culinary frustration turned into a spark of creativity, a dare to make something spectacular out of a disaster.
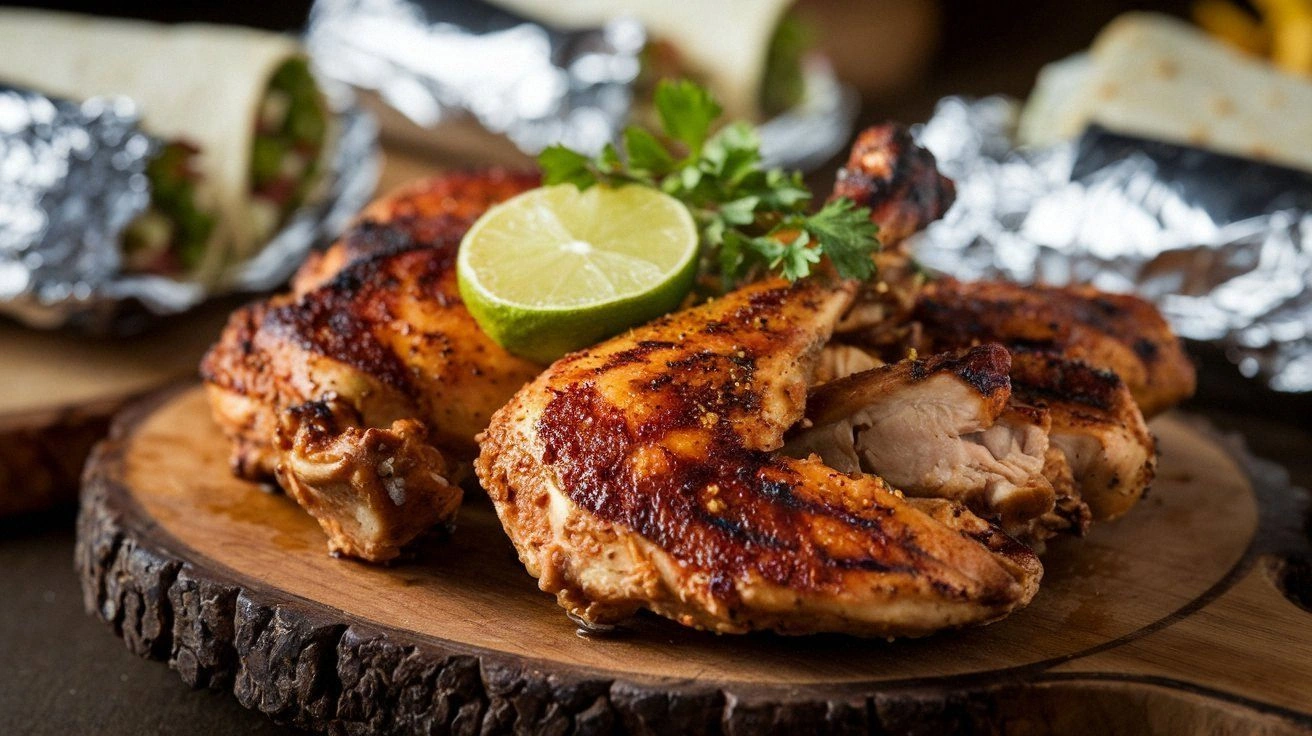
Picture the scene: the skillet hissed as I added a splash of olive oil, the garlic exploded into a fragrant cloud that tickled my nose, and the honey glistened like liquid gold on the sizzling surface. The sound of the sizzling skin was a crackle that promised crispness, while the sweet, savory aroma wafted up to my nose, promising comfort. The texture of the skin was a promise of a buttery crust, while the tender meat beneath was a secret waiting to be revealed. My senses were in a frenzy—taste, smell, sight, sound, and the comforting feel of a well‑seasoned pan. I could almost taste the first bite, the juicy center bursting against the caramelized exterior.
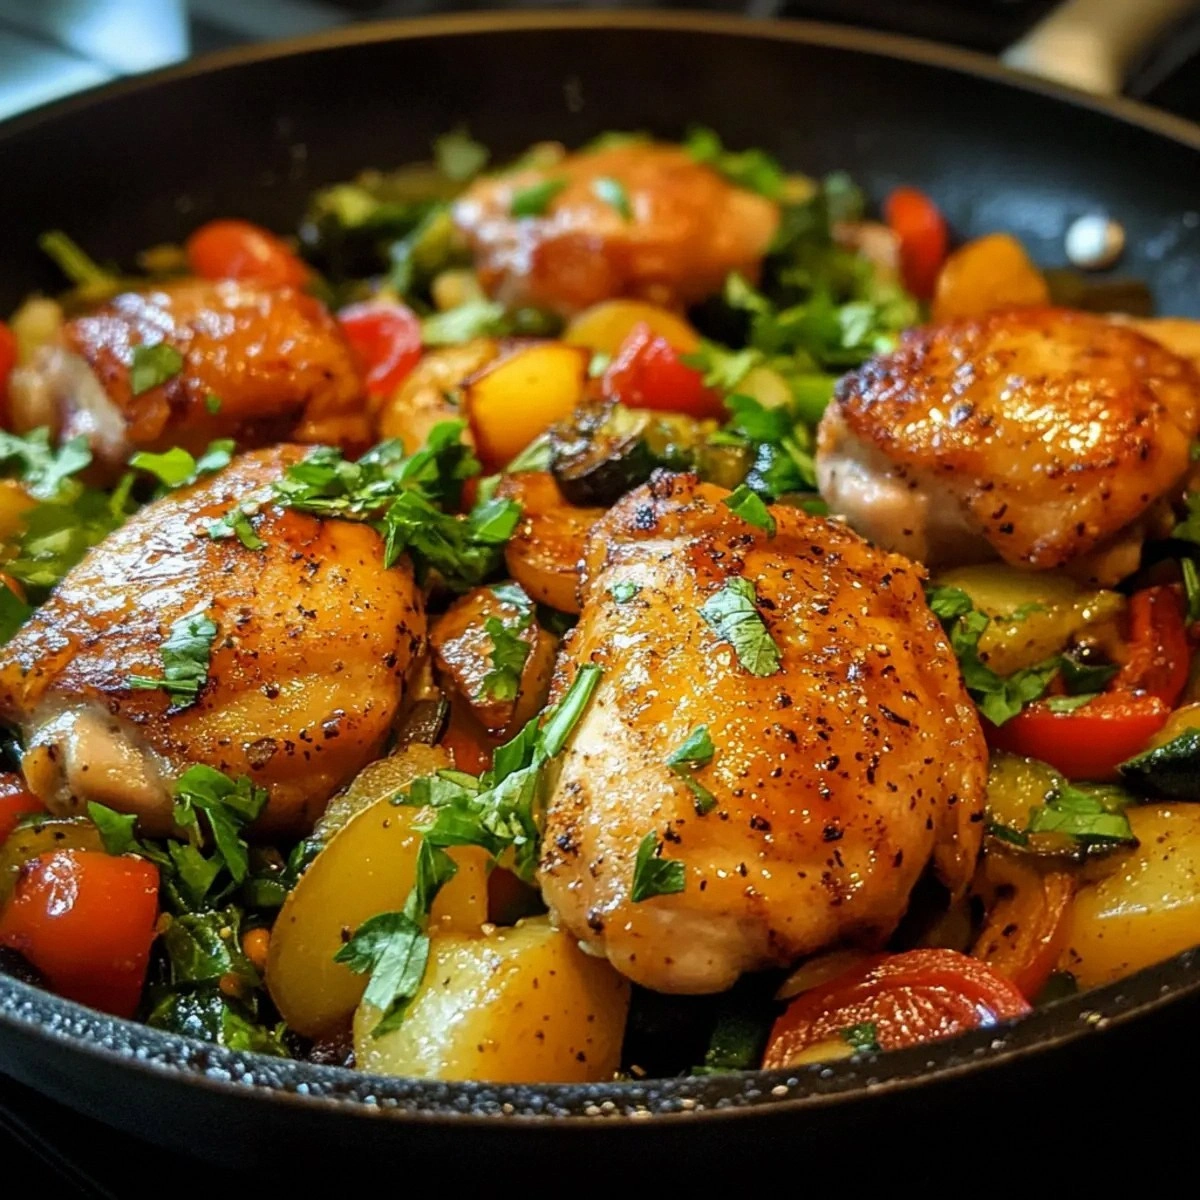
This recipe is not just another honey garlic chicken; it’s a revelation that turns ordinary thighs into a showstopper. The secret lies in a quick sear that locks in juices, a balanced glaze that coats the meat like velvet, and an explosion of veggies that adds crunch and color. Most recipes get this completely wrong by overcooking the chicken or using too much liquid, but here every component sings in harmony. The result is a dish that’s both comforting and restaurant‑quality, with a sauce that clings to every bite and vegetables that provide a satisfying bite‑crunch.
What sets this version apart is a little trick with the honey: I let it caramelize just enough to create a glossy, slightly smoky glaze that deepens the flavor. I also add a splash of sesame oil at the end to give a nutty finish that’s almost impossible to ignore. The combination of soy sauce and garlic creates a umami backbone that lifts the entire dish. And the final touch of fresh parsley or green onions adds a bright, herbal note that cuts through the richness.
Let me walk you through every single step—by the end, you’ll wonder how you ever made it any other way. I’ll show you how to achieve that perfect sear, how to balance sweetness and saltiness, and how to finish the dish with a burst of color and texture. You’ll learn a few kitchen hacks that will save you time and elevate the flavor profile. And if you’re ready for a taste that will make you go back for seconds, keep reading.
Picture yourself pulling this dish out of the skillet, the kitchen filled with a savory, sweet aroma that makes the whole house smell incredible. Imagine the first bite—juicy chicken, crisp skin, a glossy sauce that coats each piece, and vegetables that add crunch. You’ll be the star of the dinner table, and your guests will ask for the recipe. And I dare you to taste this and not go back for seconds.
What Makes This Version Stand Out
- Flavor: The honey and soy sauce create a balanced glaze that is sweet, salty, and umami at once. The glaze caramelizes to a glossy sheen that clings to every surface. This depth of flavor is achieved with a simple ratio that you can tweak to taste.
- Texture: The skin turns a crisp, almost buttery golden brown, while the interior remains tender and juicy. The quick sear locks in moisture, preventing the chicken from drying out. The vegetables stay crisp, offering a satisfying contrast.
- Time Efficiency: You can have a full dinner ready in under 45 minutes from start to finish. The prep is minimal, and the cooking steps are straightforward, making it perfect for busy weeknights.
- Ingredient Quality: Using fresh, high‑quality ingredients—like bone‑in, skin‑on thighs and fresh garlic—makes a noticeable difference in flavor. The sauce’s simplicity means the ingredients shine without being overwhelmed.
- Versatility: Swap out the vegetables for any that you have on hand—broccoli, snap peas, or even mushrooms. The sauce can be tweaked with a splash of lime or a pinch of chili flakes for a different flavor profile.
- Make‑Ahead Potential: The dish can be prepared in advance, refrigerated, and reheated without losing its texture. The glaze will re‑set, giving a fresh, new flavor when you reheat.
- Crowd Reaction: Guests love the glossy sauce and the crispy skin. The dish is both comforting and exciting, making it a hit at dinner parties or family meals.
- Healthful Choice: Despite its indulgent glaze, the dish remains balanced, with lean protein, plenty of veggies, and a modest amount of oil.
Inside the Ingredient List
The Flavor Base
Honey and soy sauce form the heart of the dish, creating a glaze that is both sweet and savory. The honey’s natural sugars caramelize during cooking, giving the sauce a glossy, slightly smoky finish. Soy sauce adds depth, bringing umami that balances the sweetness. If you skip the honey, the dish loses its signature sheen and depth of flavor.
The Texture Crew
Bone‑in, skin‑on chicken thighs are the backbone of this recipe. The bone adds richness, while the skin turns a crisp, buttery golden brown that’s impossible to resist. Olive oil is used to sear the thighs, ensuring a clean, even sear without sticking. If you use boneless thighs, the dish will be leaner but will lose that comforting, meaty depth.
The Unexpected Star
Fresh garlic is the aromatic hero that infuses the sauce and the chicken with a punch of flavor. The cloves should be minced finely to release their oils, creating a fragrant base. If you prefer a milder garlic taste, reduce the cloves to two, but be warned the sauce will be less robust.
The Final Flourish
Vegetables like bell peppers, zucchini, carrots, and green beans add color, crunch, and nutrition. They also absorb the sauce, creating a cohesive bite. If you’re on a low‑carb diet, swap the carrots for cauliflower rice or skip them entirely. Parsley or green onions finish the dish with a fresh, herbal note that cuts through the richness. Sesame seeds add a subtle nutty crunch that completes the experience.
Everything's prepped? Good. Let's get into the real action...

The Method — Step by Step
- First, season the chicken thighs generously with salt and pepper. Pat them dry with paper towels to ensure a crisp skin. Let them rest at room temperature for 10 minutes; this helps the skin separate from the meat during searing.
- Heat a large skillet over medium‑high heat and add the olive oil. Once the oil shimmers, place the thighs skin‑side down. The sizzle should be audible—this is the cue that the pan is hot enough. Cook for 6–7 minutes until the skin turns a deep golden brown and releases easily from the pan.
- Flip the thighs, reduce the heat to medium, and add the minced garlic to the pan. The garlic should release a fragrant aroma within 30 seconds; if it starts to burn, lower the heat. This step infuses the chicken with aromatic depth.
- Stir in the honey and soy sauce, letting the mixture bubble and thicken slightly. The glaze should coat the chicken and the garlic, creating a glossy sheen. This is the moment of truth—watch the sauce thicken as it caramelizes.
- Add the sliced bell peppers, zucchini, carrots, and green beans to the pan. Toss everything together, ensuring the vegetables are coated in the glaze. The vegetables should cook in 5–6 minutes, maintaining a bright color and a slight crunch.
- Reduce the heat to low, cover the pan, and let everything simmer for 10 minutes. This allows the flavors to meld and the chicken to finish cooking through. The sauce will thicken, coating every surface.
- Uncover the pan, increase the heat to medium, and let the sauce reduce further until it reaches a sticky, glossy consistency. This step concentrates the flavors and gives the dish its signature shine.
- Stir in the chopped parsley or green onions and sprinkle sesame seeds over the top. The fresh herbs cut through the sweetness, while the sesame seeds add a subtle crunch. Give everything a final toss to distribute the finishing touches.
- Serve immediately over rice, quinoa, or a bed of sautéed greens. The sauce will cling to the grains, creating a harmonious blend of textures and flavors. Enjoy the moment when the first bite melts the chicken and the glaze in your mouth.
That's it — you did it. But hold on, I've got a few more tricks that'll take this to another level...
Insider Tricks for Flawless Results
The Temperature Rule Nobody Follows
Many cooks think that high heat is always the answer, but the key to juicy chicken is starting with a high heat to sear the skin, then lowering the temperature to finish cooking. This temperature shift allows the meat to cook gently without drying out. I once tried keeping the heat high the entire time, and the result was a dry, over‑cooked thigh.
Why Your Nose Knows Best
When you’re cooking, your sense of smell is your best judge of doneness. As the sauce caramelizes, it will release a nutty aroma that signals it’s ready to thicken. If you wait for the liquid to evaporate completely, the sauce will become too thick and lose its glossy sheen.
The 5‑Minute Rest That Changes Everything
After you remove the dish from heat, let it rest for 5 minutes. This allows the juices to redistribute throughout the chicken, ensuring every bite is moist. Skipping this step often results in a dry center that feels like a disappointment.
Use a Splatter Screen for Clean Cooking
When searing the thighs, a splatter screen keeps oil from splattering all over your stove. It also reduces the chance of flare‑ups that can burn the sauce. I’ve used a cheap silicone screen that works like a charm.
Finish with a Splash of Sesame Oil
Adding a tablespoon of toasted sesame oil at the end of cooking gives the dish a nutty aroma that’s hard to resist. It also enhances the overall flavor profile, giving the sauce a subtle depth that complements the sweetness.
Serve Over the Right Base
While rice is a classic choice, try quinoa or cauliflower rice for a lower‑carb option. The grains will absorb the sauce and add a different texture, making the dish feel fresh and new.
Keep the Vegetables Crisp
Don’t overcook the veggies; they should remain bright and slightly crisp. Overcooked vegetables become mushy and lose the contrast that makes the dish so enjoyable. A quick stir at the end helps them retain their shape.
Creative Twists and Variations
This recipe is a playground. Here are some of my favorite ways to switch things up:
Spicy Honey Garlic Chicken
Add a pinch of red pepper flakes or a dash of sriracha to the glaze. The heat balances the sweetness and gives the dish an exciting kick. This version is perfect for those who love a bit of spice.
Thai‑Inspired Variation
Replace the soy sauce with fish sauce and add a tablespoon of lime juice. Garnish with fresh cilantro and a squeeze of lime. The result is a bright, zesty dish that transports you to a Thai market.
Roasted Vegetable Twist
Instead of sautéing, roast the vegetables in the oven at 425°F for 20 minutes. The caramelized edges add depth, and the chicken can finish on the stovetop for a crisp skin.
Vegan Version
Swap the chicken for tofu or tempeh. Use a plant‑based soy sauce and a drizzle of maple syrup instead of honey. The result is a hearty, plant‑based dish that still delivers that sweet‑savory glaze.
Breakfast Edition
Serve the chicken and veggies over a bed of scrambled eggs or a fluffy omelet. The sauce’s sweetness pairs wonderfully with the savory eggs, creating a unique breakfast experience.
Gluten‑Free Variation
Use tamari instead of soy sauce for a gluten‑free version. The flavor profile remains similar, and the dish stays completely safe for gluten‑sensitive diners.
Low‑Calorie Make‑Over
Reduce the honey by half and use a sugar‑free honey substitute. Use a spray of olive oil instead of a tablespoon. This keeps the dish flavorful while cutting down on calories.
Storing and Bringing It Back to Life
Fridge Storage
Cool the dish completely before transferring it to an airtight container. Store in the refrigerator for up to 3 days. The glaze will firm up slightly, but it will still taste great.
Freezer Friendly
Pack the dish in a freezer‑safe container and freeze for up to 2 months. When ready to eat, thaw overnight in the refrigerator. The sauce will re‑set, giving a fresh, new flavor when you reheat.
Best Reheating Method
Reheat in a skillet over medium heat, adding a splash of water or broth to loosen the glaze. Stir gently until the sauce is hot and bubbly. The result is a dish that tastes as good as when it was first cooked.