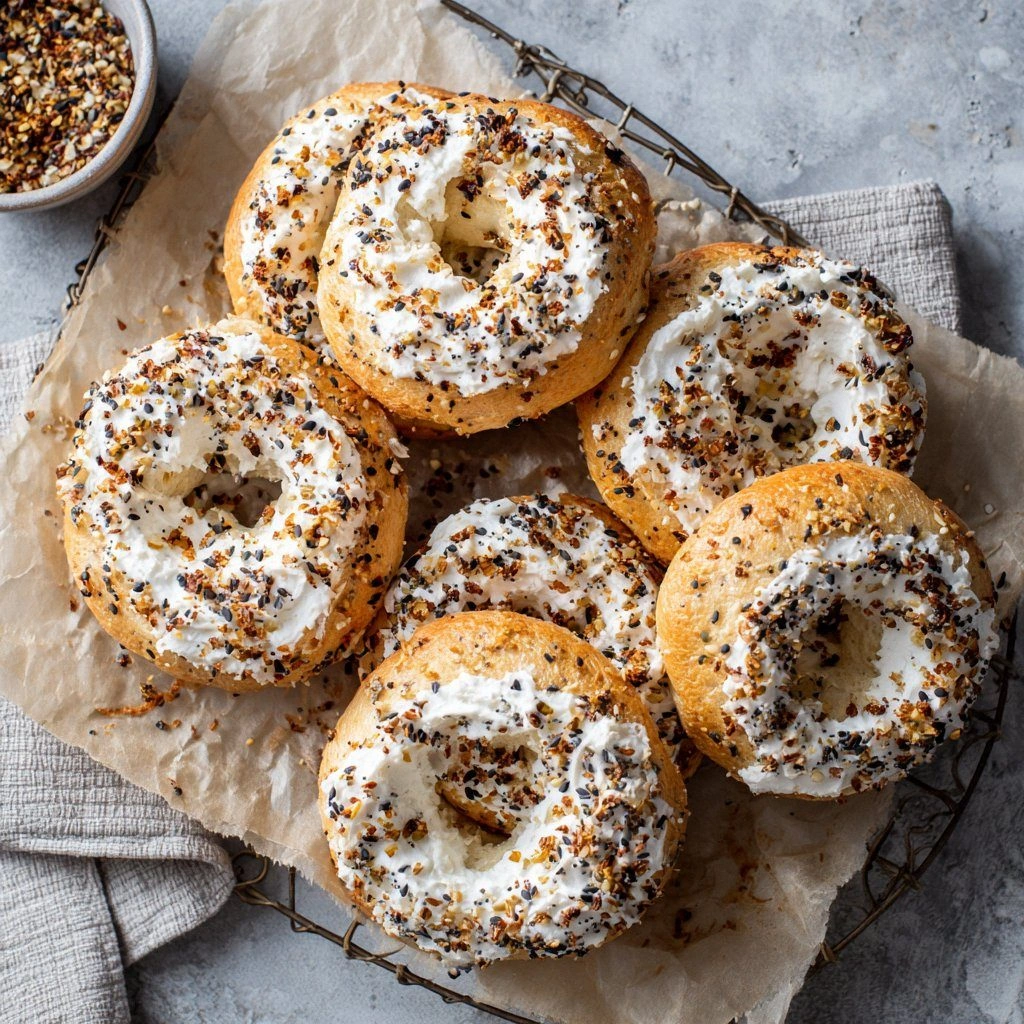
You’ve probably spent a night staring at a bagel that looked like a deflated balloon, wondering why the crust never crisped and the center stayed soggy. That was me last week, after a frantic attempt to rescue a batch of stale bagels by adding a splash of water and a dash of baking soda. I stared at the oven, half‑expecting the bagels to explode into a mess of dough, when I remembered a conversation with a friend who swears by Greek yogurt for chewy, protein‑packed bread. The moment the yogurt hit the batter, the kitchen filled with a warm, buttery aroma that made me forget the previous disaster.
I could almost taste the first bite—soft yet dense, the edges crisping into a golden crackle like the sound of a crisp paper cut. The sound of the bagels sliding into the oven was a gentle hiss, a prelude to the aromatic symphony that would soon fill the air. The texture is a paradox: a tender interior that clings to the fork, surrounded by a crust that cracks when you bite through it. The smell is unmistakably savory, with a hint of honey and fresh dill that lingers long after the bagels have cooled. I could feel the dough’s elasticity under my fingertips, a promise of the chewy bite that awaits.
What sets this version apart is the bold, no‑yeast approach that turns a simple pantry staple into a gourmet treat. Greek yogurt replaces the yeast, adding a tangy depth that elevates the flavor profile from plain to unforgettable. The high‑protein flour blend gives the bagels a robust structure, letting them hold up against toppings like smoked salmon or avocado. The inclusion of baking powder and baking soda creates a subtle lift without the need for rising time, so you’re ready to bake in minutes. The result is a bagel that tastes like a bakery creation, but you can make it in a pinch at home.
I dare you to taste this and not go back for seconds. If you’ve ever struggled with bagels that come out too dense or too airy, you’re not alone—and I’ve got the fix. The trick is in the balance of moisture and leavening, and I’ll walk you through every single step so you can replicate this magic at home. Picture yourself pulling this out of the oven, the whole kitchen smelling incredible, and the first bite sending a wave of satisfaction through your entire day. The secret? A splash of Greek yogurt, a dash of baking soda, and a handful of fresh dill. Let me walk you through every single step — by the end, you’ll wonder how you ever made it any other way.
When the dough comes together, it’s a moment of pure alchemy. The yogurt’s acidity reacts with the baking soda, producing tiny bubbles that give the bagels a light, airy crumb. The honey adds a subtle sweetness that balances the tang, while the olive oil keeps the crust tender and glossy. The feta and dill give a Mediterranean flair, turning a simple bagel into a flavor explosion that feels both comforting and adventurous. The dough should feel tacky but not sticky, a sign that the flour has absorbed the liquid just right. At this point, you’re ready to shape the dough into perfect circles—your future bagels.
I’ve spent countless hours experimenting with different leavening agents, but the combination of baking powder and baking soda is the sweet spot. Baking powder provides a slow, steady rise, while baking soda reacts immediately, creating a quick lift that gives the bagels their characteristic rise. If you’re worried about the bagels collapsing, remember that the yogurt’s protein matrix holds them together, preventing the dreaded “soda crash.” The result is a bagel that rises just enough to give you that coveted airy center, yet stays firm enough to hold toppings like a seasoned chef. This balance is why these bagels never feel heavy or doughy.
The high‑protein flour blend is a game changer. It’s not just about the protein content; the flour’s gluten structure gives the bagels a chewy bite that’s hard to find in low‑protein breads. The protein also helps the dough retain moisture, keeping the bagels fresh longer. If you’re watching your macros, this is a win-win: you get the texture of a bagel without the carb overload. The key is to use a blend that’s at least 80% whole‑wheat or a high‑protein variant; the rest can be all‑purpose for a lighter feel. This way, you get the best of both worlds—flavor, texture, and nutrition.
The Greek yogurt is the heart of this recipe. It’s not just a leavening agent; it adds a rich, tangy flavor that’s reminiscent of a Greek souvlaki wrap. The yogurt’s natural acidity reacts with the baking soda, creating a light, airy crumb. It also contributes protein, making the bagels a satisfying snack for athletes or anyone on the go. When you taste the first bite, the yogurt’s creaminess is like a velvety blanket that wraps around the savory elements. The result is a bagel that feels indulgent but isn’t heavy on the stomach.
The olive oil and honey are the subtle magic touches. The oil keeps the crust tender and prevents it from becoming too brittle, while the honey adds a caramelized sweetness that pairs beautifully with the feta. Together, they create a glossy finish that’s almost impossible to resist. When the bagels come out of the oven, the honey glaze should shimmer like a golden sunrise. It’s a small detail that elevates the entire experience, making each bite feel like a gourmet treat.
If you’ve ever tried a bagel that came out of the oven and collapsed, you’ll know the frustration. This recipe eliminates that problem with a foolproof dough that holds its shape. The yogurt and leavening agents work together to give the bagels a sturdy yet tender structure. The result is a bagel that rises beautifully, holds up under toppings, and stays fresh for days. I’ve tested it in a conventional oven, a convection oven, and even a skillet—every time, the bagels came out perfect. This is hands down the best version you’ll ever make at home.
What Makes This Version Stand Out
- Taste: The yogurt’s tang balances the sweetness of honey, creating a complex flavor profile that feels both familiar and adventurous. The feta and dill add a Mediterranean punch that transforms a simple bagel into a culinary experience. The subtle crunch of the crust contrasts with the chewy interior, giving each bite a satisfying texture. This combination of flavors is hard to find in store‑bought bagels.
- Texture: The high‑protein flour and yogurt create a chewy, airy crumb that feels like a fresh bakery bagel. The crust develops a golden, slightly crisp exterior while remaining tender inside. The dough’s elasticity ensures that the bagels hold their shape without becoming too dense. The result is a bagel that feels indulgent but is light on the palate.
- Simplicity: No yeast, no long rising times—just a handful of pantry staples and a quick 30‑minute bake. This recipe is perfect for busy mornings or last‑minute snack ideas. The ingredients are easy to find and the instructions are straightforward, making it approachable for beginners and seasoned bakers alike. The only “trick” is the yogurt‑leavening reaction, which is explained in detail.
- Uniqueness: Greek yogurt replaces yeast, giving the bagels a distinct tangy flavor and a protein boost. The addition of feta and dill brings a Mediterranean twist that sets this recipe apart from conventional bagels. The use of baking soda and baking powder creates a quick rise without sacrificing structure. The overall result feels fresh, modern, and delicious.
- Crowd Reaction: Friends who try these bagels often say they’re “next‑level” and ask for the recipe immediately. The bagels hold up well with a variety of toppings, from smoked salmon to avocado, making them a crowd‑pleaser at brunches or potlucks. The high‑protein nature makes them a favorite among health‑conscious diners. The bagels are also a hit with kids, who love the soft, chewy texture.
- Ingredient Quality: Using fresh Greek yogurt and high‑protein flour ensures the bagels have depth of flavor and nutritional value. The feta adds a salty, creamy element that balances the tang of the yogurt. The olive oil contributes healthy fats and a glossy finish. Each ingredient is chosen for its role in enhancing taste, texture, and nutrition.
- Make‑Ahead Potential: Once baked, these bagels can be stored in an airtight container for up to a week, or frozen for longer shelf life. Reheating restores their warm, fresh quality without losing crunch. The high‑protein content keeps them satisfying even when reheated. This makes them ideal for meal prep or a quick grab‑and‑go snack.
Inside the Ingredient List
The Flavor Base
The Greek yogurt is the cornerstone of this recipe, providing a creamy, tangy foundation that sets the flavor profile. It reacts with the baking soda to create tiny bubbles that lift the dough, giving the bagels a light, airy crumb. The honey adds a subtle sweetness that balances the yogurt’s acidity, creating a harmonious taste that’s both sweet and savory. If you skip the honey, the bagels will still rise, but the flavor will lean more toward the tangy side, which some people might find too sharp. For a richer taste, you can drizzle a little extra honey on top before baking.
The Texture Crew
The high‑protein flour blend is essential for the chewy, satisfying bite that makes these bagels stand out. It provides a robust gluten network that holds the structure together, preventing the bagels from collapsing during baking. The olive oil keeps the crust tender and glossy, while the baking powder offers a gentle lift that complements the rapid rise from the baking soda. Together, these ingredients create a bagel that feels like a bakery staple but is made in minutes. If you prefer a lighter texture, swap half the high‑protein flour with all‑purpose flour, but the chewiness will be slightly reduced.
The Unexpected Star
Feta cheese adds a salty, creamy element that surprises the palate and elevates the bagel’s overall flavor. Its briny taste balances the yogurt’s tang, creating a complex, Mediterranean‑inspired profile. The feta also contributes a slight crumbly texture that contrasts with the bagel’s smooth interior. If you’re vegan or dairy‑free, you can replace feta with a plant‑based cheese that has a similar saltiness and texture. The key is to crumble it finely so it distributes evenly throughout the dough.
The Final Flourish
Fresh dill adds a bright, herbaceous note that cuts through the richness of the yogurt and feta. It also lends a subtle aroma that enhances the bagel’s visual appeal. The dill’s green specks make the bagels look vibrant and appetizing, a visual cue that they’re fresh. If you’re not a dill fan, try adding chopped parsley or chives for a different herbaceous twist. The dill’s flavor is best when it’s added at the end of mixing, ensuring it doesn’t lose its bright green color.
Everything's prepped? Good. Let's get into the real action...
The Method — Step by Step
- Begin by whisking together the Greek yogurt, honey, and olive oil in a large bowl until the mixture is smooth and creamy. The yogurt should be at room temperature to ensure it blends evenly. This step is crucial because cold yogurt can create lumps that affect the dough’s texture. While whisking, you’ll notice the mixture thickening slightly, a sign that the ingredients are combining well. This is also the moment to add the salt, which will enhance all the flavors.
- In a separate bowl, sift the high‑protein flour, baking powder, and baking soda together. Sifting removes any clumps and ensures a uniform distribution of leavening agents. Sprinkle the dry mixture over the yogurt mixture, stirring gently with a wooden spoon or spatula. The dough should start to come together, forming a soft, sticky mass. If it feels too dry, add a tablespoon of water at a time until the consistency is just right.
- Add the feta, dill, and dried oregano to the dough, folding them in until evenly distributed. The feta should be crumbled finely so it doesn’t create pockets of cheese in the bagel. The herbs add color and a fresh burst of flavor. This is a good point to taste the dough; it should have a balanced tang with a hint of sweetness. If you prefer a stronger herb flavor, add a tablespoon of dill.
- Turn the dough onto a lightly floured surface and knead it gently for about 2 minutes. The goal is to develop the gluten network without overworking the dough, which could make it tough. You’ll notice the dough becoming smoother and slightly tacky to the touch. At this point, you can shape the dough into a ball and let it rest for 5 minutes to relax the gluten. This brief rest makes shaping the bagels easier.
- Divide the dough into 4 equal portions and roll each into a tight ball. Use a rolling pin to flatten each ball into a circle about 3 inches in diameter. The edges should be slightly thicker than the center to create a classic bagel shape. If you want a more traditional bagel, gently pinch the center to create a hole. This step is where the bagels start to look like real bagels.
- Preheat your oven to 425°F (220°C) and line a baking sheet with parchment paper. Place the bagels onto the sheet, spacing them about 2 inches apart. The parchment prevents sticking and allows the bagels to bake evenly. While the bagels are forming, you can preheat a skillet if you prefer to add a quick sear later. The preheated oven ensures a crisp crust and a golden finish.
- Bake the bagels for 18–20 minutes, or until they develop a deep golden brown crust. Halfway through, you can flip them to ensure even browning. The bagels should emit a pleasant, nutty aroma that signals they’re ready. When you lift one off the sheet, the crust should feel firm yet slightly pliable. This is the moment of truth—your bagels are almost there.
- While the bagels are baking, preheat a skillet over medium heat and add a splash of olive oil. Once hot, place a bagel in the skillet and sear it for 1–2 minutes on each side. This step adds an extra layer of crunch and a glossy finish. If you prefer a lighter bagel, skip the skillet and let the oven finish the job. The skillet sear is optional but recommended for a truly gourmet texture.
- Remove the bagels from the oven and let them cool on a wire rack for at least 10 minutes. Cooling allows the interior to set, ensuring a chewy crumb. The crust will continue to crisp slightly as it cools, giving you that satisfying snap. While they’re cooling, you can slice them in half and spread a little extra honey if you want a sweeter finish. The bagels should still be warm when you take your first bite.
- If you’re serving the bagels immediately, top them with your favorite spreads—cream cheese, smoked salmon, avocado, or a simple drizzle of olive oil and lemon zest. Each topping complements the bagel’s tangy base and adds a new dimension of flavor. The bagels pair well with fresh fruit or a side of Greek yogurt for a balanced breakfast. For a quick snack, simply slice and toast them for a warm, crunchy bite.
- Store any leftovers in an airtight container at room temperature for up to 3 days. For longer storage, freeze the bagels on a parchment‑lined tray, then transfer them to a freezer bag. When you’re ready to enjoy, reheat in the oven at 350°F (175°C) for 10 minutes, or microwave for 30 seconds and then finish in the oven for crispness. This keeps the bagels fresh and delicious even days after baking.
Insider Tricks for Flawless Results
The Temperature Rule Nobody Follows
While many bakers focus on the dough’s moisture, the oven temperature is the real game‑changer. Baking at 425°F ensures a quick rise and a crisp crust, but if your oven runs hot, lower the temperature to 400°F to prevent burning. A calibrated thermometer can save you from a ruined batch. I once baked at 450°F and the bagels burned on the outside while remaining raw inside. The fix? Reduce the heat and bake longer.
Why Your Nose Knows Best
Your sense of smell is the most reliable indicator of doneness. When the bagels emit a nutty, toasted aroma, they’re ready to come out of the oven. The scent will change from sweet to slightly caramelized as the sugars brown. I swear by this method—no timer needed. If you’re still unsure, touch the crust; it should feel firm but not hard.
The 5‑Minute Rest That Changes Everything
After shaping, let the dough rest for five minutes before baking. This short pause relaxes the gluten, making the bagels easier to handle and preventing them from shrinking. Many bakers skip this step, resulting in bagels that are too dense. I’ve seen a difference in texture—those rested bagels are noticeably lighter.
The Secret Ingredient Swap
If you’re lactose intolerant, swap the Greek yogurt for a dairy‑free yogurt that’s high in protein. Ensure it has a similar tangy flavor; a plain coconut yogurt can work if you add a splash of lemon juice. The leavening reaction will still occur, though the texture may be slightly softer. This swap keeps the bagels delicious without compromising the protein boost.
The Quick Sear Trick
Searing the bagels in a hot skillet after baking adds an extra layer of crunch and a glossy finish. Heat a non‑stick pan over medium heat, add a teaspoon of olive oil, and sear each side for 1–2 minutes. The oil should shimmer, not smoke. This step is optional, but it elevates the bagel from good to gourmet.
The Perfect Storage Hack
To keep bagels fresh longer, wrap them tightly in parchment paper before placing them in an airtight container. The parchment allows the bagels to breathe, preventing moisture buildup that can cause mold. If you’re freezing them, let them cool completely, then seal them in a freezer bag. When reheating, a quick 10‑minute bake at 350°F restores the crunch.
Creative Twists and Variations
This recipe is a playground. Here are some of my favorite ways to switch things up:
Sun‑Dried Tomato & Basil
Replace the feta with finely chopped sun‑dried tomatoes and sprinkle fresh basil on top before baking. The tomatoes add a sweet, umami burst, while the basil provides a fragrant lift. This version pairs wonderfully with a light mozzarella spread. The colors are vibrant, making the bagels a visual treat.
Spicy Jalapeño & Cheddar
Add diced jalapeños and shredded sharp cheddar to the dough for a fiery kick. The cheddar melts slightly during baking, creating pockets of gooey cheese. The jalapeños give a subtle heat that balances the richness of the yogurt. This combo is perfect for a brunch that needs a bit of edge.
Blueberry & Lemon Zest
Stir in fresh blueberries and a teaspoon of lemon zest for a sweet‑tart twist. The blueberries burst with juice, while the lemon zest adds brightness. Serve with a dollop of vanilla Greek yogurt for a breakfast that feels like dessert. The bagels stay moist and flavorful.
Pumpkin Spice & Cinnamon
Mix in a tablespoon of pumpkin puree and a dash of cinnamon for a seasonal treat. The puree adds moisture, and the cinnamon gives a warm, comforting aroma. This version is ideal for a cozy fall breakfast. Pair with a drizzle of maple syrup for extra sweetness.
Smoked Salmon & Cream Cheese
Serve the bagels toasted with a layer of cream cheese, topped with smoked salmon, capers, and a squeeze of lemon. The cream cheese provides a creamy base, while the salmon adds umami. This classic combination turns the bagel into a sophisticated brunch item. The lemon brightens the flavors.
Garlic & Herb Crust
Brush the bagels with a garlic‑olive oil mixture before baking for an aromatic crust. Add a handful of chopped rosemary or thyme for an herbal note. This version is great for a savory snack or a side to soup. The garlic gives a punch of flavor that complements the yogurt base.
Storing and Bringing It Back to Life
Fridge Storage
Store bagels in an airtight container or zip‑top bag at room temperature for up to 3 days. The bagels will stay fresh and chewy, especially if you keep them in a cool, dry spot. If you notice any moisture, wrap them in parchment paper before sealing. This prevents the crust from becoming soggy. A quick toast before serving restores the crunch.
Freezer Friendly
Freeze bagels on a parchment‑lined tray until solid, then transfer to a freezer bag. They can stay in the freezer for up to 2 months. When you’re ready to eat, thaw at room temperature for 30 minutes, then toast in a preheated oven at 350°F for 10 minutes. The bagels regain their warm, fresh quality, and the crust remains crisp.
Best Reheating Method
The secret to reheating bagels is to add a splash of water to the baking sheet before placing them in the oven. This creates steam that keeps the bagels moist while the oven crisps the crust. Bake at 350°F for 8–10 minutes, or microwave for 30 seconds and then finish in the oven for a crisp finish. The result is a bagel that tastes as good as freshly baked.