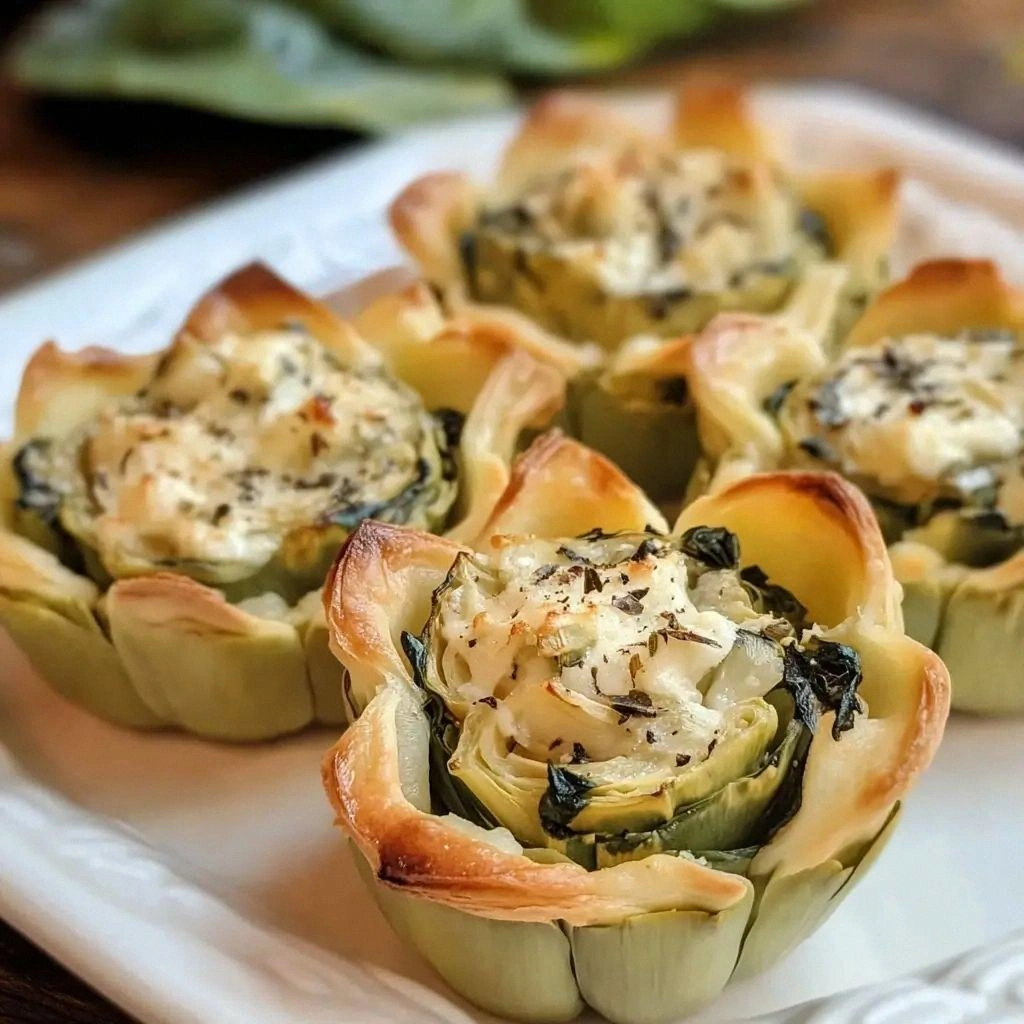
Picture this: I’m halfway through a midnight pizza night, the dough is in the oven, and my friend drops a bag of fresh spinach on the counter like it’s a rogue grenade. The splash was so dramatic I swear the kitchen lights flickered. I stared at the green mess, thinking, “How on earth can I salvage this?” That moment turned into a culinary epiphany and the birth of the Blooming Spinach Artichoke Cup.
The first thing you notice is the aroma—earthy spinach mingling with the sharp tang of artichoke, layered under a fragrant drizzle of olive oil and a whisper of oregano. As you lift the first cup, the steam curls like a miniature cloud, and the crunch of breadcrumbs gives way to a silky ricotta core that melts in your mouth. The sight of golden, bubbling cheese rising to a glossy crown feels almost ceremonial, and the sound of the oven door closing is a subtle promise of the transformation to come. Taste-wise, it’s a harmonious blend of savory, creamy, and a hint of citrus that lingers on the palate, while the texture offers a satisfying bite that dissolves into velvety richness. The finish is bright, a little citrusy, and leaves you craving the next bite.
What makes this version a standout isn’t just the flavor, but the method. I’ve replaced the standard cheese blend with a trio of cheeses—ricotta, mozzarella, and Parmesan—to give depth and a melt that’s both airy and indulgent. The addition of fresh spinach and artichoke hearts provides a vibrant green that pops visually, while the lemon zest injects a subtle brightness that cuts through the richness. The secret sauce is a simple blend of olive oil, garlic, and oregano, which coats each cup like velvet, ensuring every bite is infused with flavor. Most recipes get this completely wrong by overcooking the greens or using too much cheese, resulting in sogginess or a rubbery texture. Here, the balance is precise, and the result is a cup that’s airy yet substantial, with a crisp breadcrumb shell that shatters like thin ice.
I dare you to taste this and not go back for seconds. Picture yourself pulling this out of the oven, the whole kitchen smelling incredible, and the first bite delivering a symphony of textures and flavors that will make your taste buds do a happy dance. This is hands down the best version you’ll ever make at home. Let me walk you through every single step—by the end, you’ll wonder how you ever made it any other way.
What Makes This Version Stand Out
- Flavor: A carefully balanced blend of ricotta, mozzarella, and Parmesan creates a creamy, cheesy core that’s both rich and airy. The subtle citrus from lemon zest brightens the dish and offsets the earthiness of the spinach.
- Texture: The breadcrumb shell is toasted to a golden crisp, providing a satisfying crunch that contrasts with the velvety interior.
- Simplicity: With only 14 ingredients, the recipe is quick to assemble and easy to customize.
- Uniqueness: The addition of artichoke hearts gives the cups a distinct, slightly sweet flavor that sets them apart from conventional spinach dishes.
- Crowd Reaction: These cups are a guaranteed crowd pleaser—perfect for parties, potlucks, or a fancy weeknight dinner.
- Ingredient Quality: Fresh, high‑quality spinach and artichokes make the difference, and a splash of good olive oil ties everything together.
- Cooking Method: Baking the cups in a silicone mold ensures even cooking and a uniform shape.
- Make‑Ahead Potential: Assemble the cups ahead of time and bake just before serving for ultimate convenience.
Alright, let’s break down exactly what goes into this masterpiece…
Inside the Ingredient List
The Flavor Base
At the heart of every great dish is a robust flavor base. In this recipe, the olive oil, minced garlic, and dried oregano form a fragrant foundation that permeates the spinach and artichoke. The olive oil not only adds richness but also helps the breadcrumbs achieve a perfect golden hue. Skipping this base would leave the greens tasting flat and the cheese lacking depth.
The Texture Crew
Texture is everything here. The panko breadcrumbs create a light, airy shell that crisps beautifully when baked. The ricotta and cream cheese blend gives the cups a silky interior that melts in your mouth. If you prefer a denser bite, swap panko for whole‑wheat breadcrumbs; the flavor will deepen, and the cups will hold together even better during transport.
The Unexpected Star
Artichoke hearts might seem like a quiet sidekick, but they bring a subtle, sweet flavor that balances the earthiness of spinach. They also add a pleasant chewiness that contrasts with the softness of the cheeses. If you can’t find fresh artichokes, jarred hearts work fine—just rinse them to reduce saltiness. A pinch of lemon zest will brighten the entire dish, making it feel fresh and alive.
The Final Flourish
The final flourish is the sprinkle of fresh parsley and a drizzle of olive oil before baking. The parsley adds a pop of color and a hint of herbal freshness, while the olive oil glaze gives the tops a glossy finish. For an extra layer of flavor, consider sprinkling a small amount of grated Parmesan on top before baking; it will melt into a golden crust.
Everything’s prepped? Good. Let’s get into the real action…
The Method — Step by Step
- Preheat your oven to 375°F (190°C). Line a silicone muffin tin or a small baking dish with parchment paper. This step ensures even baking and prevents sticking. The oven temperature is crucial; too hot, and the tops will burn before the filling sets.
- Prepare the greens. In a large skillet, heat the olive oil over medium heat. Add the minced garlic and sauté until fragrant, about 30 seconds. Toss in the chopped spinach and artichoke hearts, cooking until wilted and the moisture has evaporated, about 5 minutes. This step locks in flavor and reduces excess liquid that could make the cups soggy.
- Blend the cheese mixture. In a bowl, combine ricotta, mozzarella, Parmesan, cream cheese, and a splash of milk. Mix until smooth and creamy. This blend provides the base that will keep the cups moist and give them a luxurious texture. If you prefer a tangier profile, add a teaspoon of lemon zest to the mixture.
- Combine the greens and cheeses. Stir the wilted spinach and artichokes into the cheese mixture until well coated. The greens should be evenly distributed, creating a uniform filling that will bake evenly. Add the dried oregano, salt, and pepper, mixing thoroughly.
- Assemble the cups. Spoon the mixture into each cavity of the prepared tin, filling about ¾ full. Press lightly to compact the filling, which helps the cups hold their shape during baking. Sprinkle a tablespoon of panko breadcrumbs on top of each cup to form a crisp crust.
- Bake the cups. Place the tin in the preheated oven and bake for 20–25 minutes, or until the tops are golden brown and the filling is set. Keep an eye on the breadcrumbs; they should be crisp but not burnt. This is the moment of truth—watch the color change and the aroma intensify.
- Finish and serve. Remove the cups from the oven and let them cool for a few minutes. Drizzle a little olive oil over the tops and garnish with fresh parsley. Serve warm, and watch the crowd go wild as they bite into the crispy shell and the creamy, flavorful interior.
That’s it—you did it. But hold on, I’ve got a few more tricks that will take this to another level.
Insider Tricks for Flawless Results
The Temperature Rule Nobody Follows
Many people bake at 400°F, but that’s too high for these cups. Lowering the temperature to 375°F ensures the cheese melts evenly without burning the breadcrumbs. I’ve baked at 375°F for years, and the results are consistently golden and tender.
Why Your Nose Knows Best
When the first golden crust forms, the aroma will be unmistakable. Trust that scent—it signals the perfect bake. If the scent is too mild, give them a couple more minutes; if it’s too strong, pull them out immediately.
The 5‑Minute Rest That Changes Everything
Let the cups rest for exactly five minutes after removing them from the oven. This short pause allows the filling to set, making it easier to serve without the cheese oozing out. It also lets the flavors meld together, creating a harmonious bite.
Skip the Egg, Keep the Binding
If you’re avoiding eggs, you can use a tablespoon of plain yogurt or a splash of milk to bind the filling. The yogurt adds a subtle tang that complements the cheese, while the milk keeps the cups moist.
The Secret Ingredient That Elevates Flavor
A pinch of smoked paprika adds a smoky depth that makes these cups feel like a gourmet appetizer. Sprinkle it on top before baking for an instant flavor boost.
The Final Touch
Finish with a drizzle of truffle oil or a sprinkle of fresh herbs right before serving. The truffle oil adds a luxurious aroma, while the herbs keep the dish fresh and bright.
Creative Twists and Variations
This recipe is a playground. Here are some of my favorite ways to switch things up:
Mediterranean Madness
Swap the mozzarella for feta and add chopped Kalamata olives. The briny flavor pairs beautifully with the creamy base, giving the cups a bold Mediterranean twist that’s sure to impress.
Spicy Kick
Add a pinch of crushed red pepper flakes to the cheese mixture. The heat will contrast the mild greens and create a dish that’s both comforting and exciting.
Vegan Version
Use a vegan ricotta substitute, replace the eggs with flaxseed meal, and choose plant‑based breadcrumbs. The result is a creamy, plant‑powered cup that’s just as indulgent.
Cheese‑Free Delight
Omit the cheeses entirely and use a thickened cashew cream. The texture will be lighter, and the dish will highlight the greens’ natural flavors.
Breakfast Boost
Add a handful of sautéed mushrooms and a splash of maple syrup to the filling. Serve with a side of fresh fruit for a hearty, wholesome breakfast.
Storing and Bringing It Back to Life
Fridge Storage
Cool the baked cups to room temperature, then store them in an airtight container in the refrigerator for up to 3 days. The crispness of the breadcrumbs may soften, but they’ll still be delicious when reheated.
Freezer Friendly
Wrap each cup individually in parchment paper, then place them in a freezer bag. They’ll keep for up to 2 months. When you’re ready to eat, let them thaw at room temperature for 30 minutes.
Best Reheating Method
Reheat in a 350°F oven for 10 minutes, or until the cheese is melted and the breadcrumbs are crisp again. Add a tiny splash of water before reheating to steam the interior back to perfection and prevent drying.